Showing posts with label The Sewing Workshop. Show all posts

Monday, June 30, 2025

A new Siena Shirt with Perfect Points

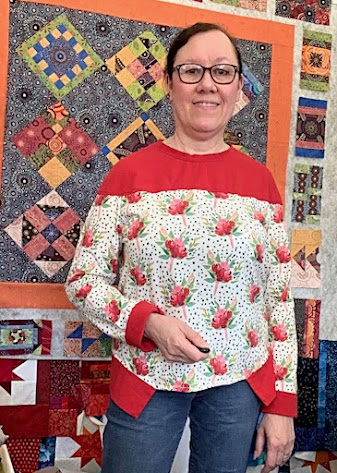
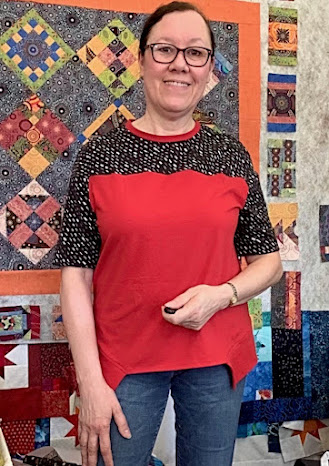
This is my new Perfect Points Siena Shirt! The pairing is fabric from the Perfect Points collection from Windham Fabrics with one of my go-to patterns from the Sewing Workshop, the Siena Shirt.

The Siena Shirt [Sewing Workshop pattern] with Perfect Points [Windham Fabrics].

You gotta love the classic Pickle Dish and Ohio Star patchwork blocks that have perfect points—without having to piece them yourself or deal with all the seam allowances. Easy peasy, right? And who doesn’t love a graphic black-and-white geometric print?!

The Siena Shirt with Perfect Points.

High density cotton fabric

The Perfect Points I and Perfect Points II collections [from Windham Fabrics] are printed on high density cotton. The thread count is 150 threads per sq. in. (75 x 75) making the fabric soft, smooth and so lovely to wear next to the skin. I used Scanfil organic, long staple, cotton thread in 50 wt. for sewing with a Universal 80/12 machine sewing needle. A Scanfil 30 wt. cotton was used for the button holes

Auditioning buttons for the Siena Shirt.
 

Construction challenges

What was I thinking?? I had two different fabric prints, both with strong designs. The Siena Shirt has several pattern pieces—left and right fronts, a button band, front and back side panels, and sleeves—that required pattern matching at the seams if the shirt was going to have a cohesive look. 

Anticipating the pattern matching at the sleeve and side panel seam.

The critical areas for the pattern matching:

  • the bodice fronts with the bodice side panels,
  • the bodice back with the back side panels,
  • at the sleeves where the cap meets the shoulder seam, and
  • where the sleeves meet the bodice side panels,
  • the button band with the bodice front.
Pattern matching at the sleeves and the bodice.

The pickle dish design at the yoke and collar had to be centered and square. The Ohio Star print was also centered at the back (for the box pleat). All of these critical areas required accurate placement of the paper pattern on the fabric and careful pinning, cutting, and sewing.

Back view: centering the fabric designs on the collar, back yoke, and shirt back.

I actually cut out three different sleeves—trying to best position the design to make a cohesive look. This was definitely a “learn as you go” construction process.

Three sleeves cut at different places.

A more perfect pattern for Perfect Points

Although I absolutely adore the Siena Shirt pattern (I’ve made it over 6 times now), were I to use fabric from the Perfect Points collections for another garment, I would use a pattern with fewer pattern pieces. A front and back… and possibly a sleeve pattern piece… is all that’s needed to showcase the fun Perfect Points patchwork designs but make the garment much easier to construct. 

Better pattern choices for tops from my pattern stash would be the Wiksten Top and the Nine Lives top. Both have minimal pattern pieces and I’ve made both of these in the past. Or if you have a coat/jacket pattern with minimal pattern pieces, these prints would make a great “quilt coat.” 

Patterns with minimal number of pattern pieces:
Wiksten Top and Nine Lives top 

And there’s always quilts, bags, home dec items (pillows, runners, toppers, etc.) that would be so easy by just fussy cutting pieces or quilt blocks from these fabrics. And the points would all be perfect!

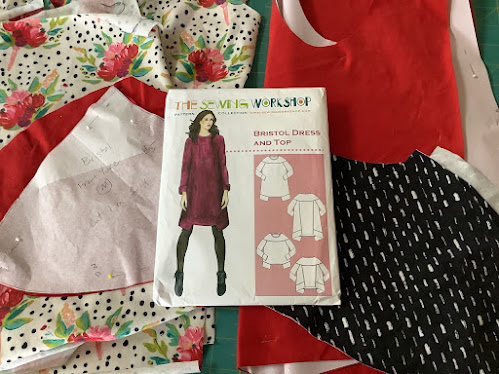
A Make Nine 2025 finish

This Perfect Points shirt fulfills my “Make it Again” prompt for Make Nine 2025. With the first six months of the year behind us, I have 6 of 9 Make Nine projects completed. I consider this fabulous progress!

Make it Again prompt, Make Nine 2025.

Make Nine 2025 tracker, June 29.

As we wrap up the month of June, here is my wish for you, “May your bobbin always be full and your points always match!”

My Perfect Points Siena Shirt.


Sunday, April 2, 2023

Another Bristol knit top: Make Nine project #4

Can you have too much of a good thing? In the case of the Bristol Top pattern paired with Art Gallery knits... I think not.

The  Bristol Top with cotton knits from Art Gallery Fabrics.
My Make Nine 2023 Wild Card prompt.

When you're faced with the comment, "wear something green in honor of St. Patrick's Day," you quickly rummage through your closet to see what you have. Hmmm... not much. However, the luck of the Irish must have been in the air as I found two AGF knits on an "end of the bolt" sale. The prints were from two different collections, but with Art Gallery's fabrics, you can mix across collections and still come up with a pot of gold at the end of any garment sewing rainbow.

Make Nine 2023: the Wild Card prompt

This Bristol is fulfilling one of my Wild Card prompts for Make Nine 2023. This is my second Bristol this year and the sixth make from this pattern. See all previous versions in this blog post

Bristol Top #6. Pattern from The Sewing Workshop.

My Make Nine 2023 tracker has been updated.

Wild Card prompt on the Make Nine 2023 tracker.

Four projects completed this year with five more to go.

Make Nine 2023 tracker, April 1, 2023


Sunday, March 12, 2023

Remaking the Bristol Top—third Make Nine finish for 2023

I love a good re-make! One of my Make Nine 2023 prompts is "Make it Again" and I've used the Bristol Top pattern [from The Sewing Workshop] to make my fifth version of this knit top.

The Bristol Top: Make Nine 2023 Make it Again prompt.

For Bristol #5, I used two knits from Art Gallery Fabrics—a solid and a print. The Bristol has several options for mixing and matching fabric prints and/or solids—yoke, cuffs, bottom bands, collar band. This version has a contrasting yoke.

Imparting happiness with hand stitching

The Bristol pattern instructions call for top stitching at the seam where the yoke meets the bodice. Influenced by a recent presentation on Bojagi by Youngmin Lee, I decided to hand stitch this with a variegated cotton sashiko thread in a similar color palette. The hand stitching of bojagi is not only a design element, says Youngmin, but a way to impart wishes for happiness into the piece and to the recipient or wearer. With that in mind, my plan is to topstitch wishes of happiness into this new Bristol top. 

Bristol Top with a cotton sashiko thread for hand stitching.


The many benefits of Re-makes

The last time I made the Bristol, I made two at once! One has long sleeves (as the pattern indicates) and the other is a pattern hack for a short sleeve version.

Long sleeve and short sleeve versions of the Bristol Top.

Shortly after these two, I was thinking about zero waste so I made another long sleeve Bristol with leftover knit fabrics from other garments. 

Bristol Top made with leftover fabrics from other knit garments.

The first Bristol was a Make Nine project in 2020

My first Bristol Top, 2020.

Reasons I like re-makes?

  • The more you make, the quicker and easier they go!
  • The pattern is already fitted and modified to your body and style. It's one less BIG step in the garment-making process.
  • You have your notes about the pattern to resolve the quirky/confusing parts, clarify any instructions, and the tips and shortcuts you've discovered along the way. (Yes, write these things right on the pattern pieces or the instruction sheets!)
  • Different fabrics/colors/prints make every version different. (Besides, you don't wear all of them at the same time anyway, right?)
  • Reusing a pattern is a wise investment in money, resources and time.
  • If it feels good, do it again!

Completed Bristol top #5.

This is my third Make Nine finish for 2023. Full steam ahead!


Monday, August 1, 2022

Color blocking a shirt with Paintbrush Studio flat fat stacks

Color blocked garments combine one or more fabrics that are usually contrasting, bold, or unexpected, in a single garment to make a statement. Color blocking is a cool trend and can make use of interesting sewing techniques. Have you tried this technique? 

I just completed a creative experiment to make a "faux" color blocked shirt using a flat fat stack from Paintbrush Studio.

Color blocked Siena Shirt using Indian Summer cotton fabrics.

So, what’s a flat fat stack?

Paintbrush Studio Fabrics offers "flat fat stacks" with their quilting cotton collections. A flat fat stack is a selection of fat-quarter-size (18” x 22”) prints that are printed side-by-side on a single, continuous piece of fabric. It’s like buying a fat quarter bundle only the fat quarters aren't individual pieces—they come on a long piece of fabric. I used a flat fat stack from the Indian Summer collection by Sumana Ghosh-Witherspoon for this shirt. It had 12 fat quarter prints—or 3 yards of fabric. 

The Siena Shirt pattern

My shirt pattern was the Siena Shirt from The Sewing Workshop. It’s a pattern I’ve used numerous times so I was familiar with the pattern pieces and the construction.

The Siena Shirt pattern from The Sewing Workshop.

Pattern layout and construction

Laying out the pattern pieces was similar to the pattern's diagrams except the fabric was laid out in a single layer—no pieces were cut on the fold or in a double layer. Left and right front pieces were cut from different areas of the fabric to achieve the color blocked look. Same with the back pieces.

Pattern pieces laid out on a single fabric layer.

The collar, collar stand, sleeves, and back yoke were cut from different areas of the fabric and prints, too. The Siena Shirt worked well for this initial experiment because there were several smaller pattern pieces that could fit easily on a fat quarter piece of fabric.

The Siena Shirt made good use of the variety of prints in the flat fat stack.

During construction, I was careful to line up the prints across the front and side front seams and the back and side back seams. I didn’t have to match anything at the side seams.

Matching the print at the front seams.

The button band also looks color blocked. After button auditioning, the dark red ones made the cut.

Auditioning buttons for the front button band.

My 6th Make Nine finish for 2022

I’m fulfilling the “Something New in ’22” prompt for my Make Nine Challenge with this project. The extra thought and time involved with laying out the pattern pieces and matching the prints was worth the challenge and experimentation. 

Make Nine 2022 tracker, July 31, 2022.

Using the continuous yardage format of the flat fat stack eliminated the piecing that's generally required for color blocking... but achieved the same visual effect. The asymmetry is very much like color blocking seen in garments with this fashion trend. Because the various fabric prints were from a fabric collection, the designs and aesthetic were cohesive... which made choosing the fabric(s) easy.

"Faux color blocked" Siena Shirt. It goes with everything!

My husband’s comment about my new shirt: “It goes with everything.”

That's a "win!"


Saturday, January 29, 2022

First 2022 Make Nine finish: The Bristol Top x 2

Once you get past the unfamiliarity of a new sewing pattern—modifications, assembly instructions, finishing details—a remake can be a breeze! Looking at my prompts for this year’s Make Nine Challenge, I’m glad I included a new “Make it Again” prompt, because now I’ve got not one, but three Bristol Tops to wear... the last two finished recently in record time. 

The Bristol Top (times 2) is my first Make Nine finish for 2022.

Bristol Top from The Sewing Workshop made with knits from Art Gallery Fabrics.

My wardrobe of Bristol Tops

I made my first Bristol Top [pattern by The Sewing Workshop] in 2020. It was one of the Wild Cards on my Make Nine list that year. The impetus of my Bristol re-make in 2022 was a beautiful floral Art Gallery knit that I spied at a local quilt shop and bought as a holiday gift to myself. (Yes, gift yourself fabric every chance you get!)


Cutting 2 tops at one time

The Bristol Top pattern has wonderful opportunities for color blocking. My collection of knits from Art Gallery Fabrics is admirable (wink, wink), so I had several options for color blocking this garment.

If you're going to use your lovely Art Gallery knits, you might as well cut out two Bristol tops.

With a solid red knit and a black/white knit print from my collection, I decided on two different color combinations: 

  • the solid red to accent my new floral, and 
  • a black print and solid red pairing. 

Having the fabric decisions made, I cut out pieces for two tops at the same time. Let me tell you... this is the way to go!! It was very efficient!

The Bristol Top: long sleeve and color blocked.
Floral knit print is West End Gathers K-54720 from the Bloomsbury collection.

The first Bristol (above) featured the new floral fabric on the bodice. The solid red was used in all the contrasting areas—yoke, cuffs and bands at the bottom.

A pattern hack for version 2

For the second Bristol (below), I tried a pattern hack to make a short sleeve version so I could have a soft cotton knit top for warmer weather. The following weekend, I finished the short sleeve version. This top has fondly become my NIU Huskies [Northern Illinois University] top since red, black and white are the team's colors.

The NIU Huskies top.
A short sleeve version of the Bristol Top.

The Bristol Top is an easy and fun pattern with lots of color blocking options. Or make it from a single fabric print, if you please. And now after this sewing endeavor, I have the pattern piece for the Go Huskies! short sleeve version. 

My first Make Nine finish for 2022 is a multi-success!

The "Make It Again" prompt is the first Make Nine finish for 2022.

You can be sure I'll be on the lookout for more Art Gallery knits in area quilt shops on my travels. And I hope you try a Make it Again project in the near future.


Friday, August 6, 2021

The Nine Lives top with Kangaroo Path

Do Kangaroos have nine lives? I don't know, but my new Nine Lives top [pattern by The Sewing Workshop] uses the lively yellow Kangaroo Path print from M&S Textiles Australia and I just love it! Paired with the smoky blue-grey Lillup Dreaming (ash colorway) print [M&S Textiles Australia] and my repurposed vintage buttons... it's perfect in every way.

My new Nine Lives top with fabrics from M&S Textiles Australia  and repurposed vintage buttons.

The Kangaroo Nine Lives top: details and modifications

I've made the Nine Lives top several times. With only a four basic pattern pieces, it offers plenty of potential for customization, modification and embellishment. My "kangaroo" version has these mods: 

  • a front patch pocket,
  • an appliqué accent at the shoulder,
  • a side vent,
  • high/low front and back hems,
  • straight hem.

Design details: appliqué on right shoulder and a left breast patch pocket.

The blue ash color of the Lillup Dreaming fabric print is what initially inspired me to make this top. The golden yellow Kangaroo Path was a serendipitous accompaniment.

Back view of the Kangaroo Nine Lives top with ash colorway of Lillup Dreaming

I'm particularly fond of the contrast fabric on the breast pocket. It balances the appliqué on the right shoulder. The contrast fabric collar, pocket accent and appliqué bring the back fabric to the front of the garment.

Details: side vent and high/low hems.

The vintage buttons—a wonderful find at a resale shop—added another complementary detail to this top's color story.

Repurposing vintage buttons from a resale shop.


Close-up of the vintage buttons.

By hand and machine

Lately I've been enjoying a lot of hand stitching—big stitch quilting, kantha, and garment finishing techniques. The handwork on my Kangaroo Nine Lives includes:

  • an appliqué embellishment,
  • finishing the front and back hems.

The machine sewing includes:

  • the garment construction, 
  • patch pocket, 
  • buttonholes and attaching the buttons,
  • the seam allowances were finished with a serged edge.

Nine Lives top with the Valencia pants.

A me-made garment for August!

I am quite pleased to start off the month of August with a new me-made top! The summer weather is still upon us, so I foresee many opportunities to wear my kangaroo top. In the above photo, I'm wearing the Valencia Pants [The Sewing Workshop pattern] with my new Kangaroo top. In "kangaroo" style, both the pants and the top have had pockets added! (wink, wink.)

The Nine Lives Vest pattern [The Sewing Workshop]
and Kangaroo Path fabric from M&S Textiles Australia.

This is the fourth version of the Nine Lives pattern that I've made. My first Nine Lives top was made as the pattern instructed with an assymetrical hem. Alas, this version is not documented on my blog.

Version 2 was made with a pintuck fabric.

Dare I make 5 more?


Sunday, April 18, 2021

The Berwick St. Tunic with Australian Aboriginal fabric, a Make Nine finish

My new Berwick St. Tunic by The Sewing Workshop.
Fabric from M&S Textiles Australia.
This is the Berwick St. Tunic in an Australian aboriginal fabric print—my fourth Make Nine finish for 2021.

This Make Nine finish checks the "New to Me" prompt as this is the first time making the Berwick St. Tunic pattern [by The Sewing Workshop]. I also learned a new construction detail: a concealed button placket.

The fabric is an Australian Aboriginal print called Gathering by the Creek (burgundy colorway) by Janet Long Nakamarra [for M&S Textiles Australia]. I loved this colorway the minute I saw it and knew it was destined to be a garment for me.

The warm Spring weather has turned around this week and the Berwick's long sleeves are a comfortable and welcome buffer against the cool temperature. 

Details about the Berwick St. Tunic
This long-sleeved tunic has a mandarin collar, concealed front button placket, pleated front peplum, side vents, and sleeve plackets with narrow,  buttoned cuffs. I have enjoyed working with The Sewing Workshop patterns—the style, the fit, the instructions are all good—and there are always interesting details or construction techniques included in the making of the garments. This one was no different.

The Berwick St. Tunic pattern. The fabric print is one of the Dreamtime designs by an Australian Aboriginal designer. Fabric from M&S Textiles Australia.

The new garment construction detail for me was the concealed front button placket. The pattern instructions were right on point and I sailed through. Hint: if you're not proficient with making button holes, this placket has it covered (literally!). 

In my case, I didn't have enough of the red colored buttons for the front and cuffs, so I used the off-color buttons under the placket and the red buttons at the top and cuffs—where the buttons would show. I opted not to put a button or button hole in the collar as I knew I would wear this garment open at the neck.

Different colored buttons used in the concealed front placket.

I also sewed the sleeves closed with a non-functioning button. The sleeve openings are sufficiently wide to get my hands through. 

Placket sleeves with a narrow cuff.

The irregular stripe of Gathering by the Creek print runs uninterrupted down the single-piece bodice back. No pattern matching was needed! (Gotta love a great stripe!)

The Berwick, back view.

The side vent allows for ample ease. And I have slightly lengthened the sleeves to suit my style... and long arms.

The Berwick's side vent.

Because of the front peplum, you do have to put the tunic on over your head.

The Berwick St. Tunic, front view.

For the next Berwick
Now that I have one make of the Berwick under my belt, the next time I use the pattern I'd incorporate modifications: 
  • give it a full front opening and omit the peplum,
  • shorten to make it shirt length,
  • eliminate the cuff plackets and just use the narrow cuffs,
  • remember the total number of buttons needed.

Me in my new Australian aboriginal Berwick

All in all, it was a successful project and another Make Nine 2021 finish! 

Make Nine 2021 worksheet: April update


Related Posts Plugin for WordPress, Blogger...