Sunday, February 26, 2023

The Inclinations Shawl—a Make Nine finish

 My Inclinations Shawl, a stash buster yarn project for Make Nine 2023, is finished (and not without a few froggings)!

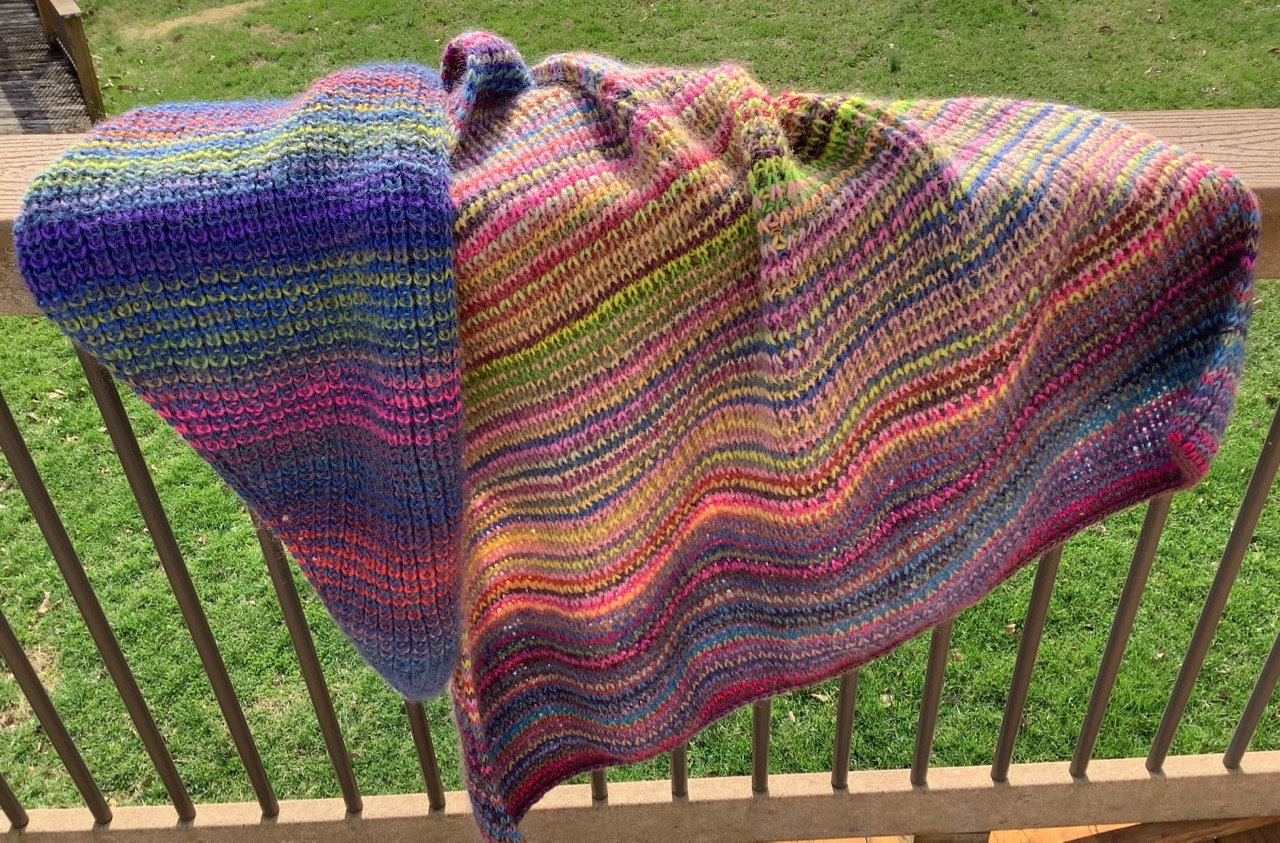
Make Nine 2023 finish: yarn stash buster project, the Inclinations Shawl.

This is my second Make Nine 2023 finish, and fulfills the stash buster prompt. You can't go wrong with a stash buster project that also has stripes. It's always an exciting knit!

Inclinations Shawl, a stash buster project. 68" x 42.5"

2-row stripes with variegated yarns

At first, I thought I'd use a monochromatic blue yarn [Classic Shades from Universal Yarn] and interject brighter, more colorful stripes using Poems [Universal Yarn]. However, the more the variegated colors of Poems interacted, I became fond of the colorplay effects achieved within the single skeins.

Starting the Inclinations Shawl.

So, after the Classic Shades skein was used up, I busted through various skeins of Poems and let the colors in this variegated yarn play on its own terms across the rows. This is how the center glow was achieved with the lighter colored skeins of Poems.

Inclinations Shawl showing the lighter colors in the center.

I busted through 10 skeins of yarn from the stash. A nice dent, I'd say.

Over 10 skeins of yarn used.

When the remainder of the 10th skein of Poems was all brown and all the same value, I stopped knitting. By this time, I had 174 stitches on the needle and the shawl was well over 75" on the diagonal side. The last color change was a stripe of bright magenta... and ending on a bright note was my signal to wrap it up.

Striped, I-cord bind-off.

In the pattern, there were several options for a bind-off.  I chose the 2-yarn, striped I-cord version. The bind-off took quie a long time, but well worth the investment. 

Project Stats

Here are the specs for my Inclinations Shawl:

  • Over 10 skeins of worsted weight yarn: 9+ skeins of Poems [100% wool, 109 yd, 50g]; and 1 skein of Classic Shades [30% wool, 70% dralon, 197 yd, 100 g]
  • finished size: 68" x 42.5" with a hypotenuse of 78" (unblocked)
  • size 5 needle
  • 174 stitches at the bind-off
  • 262 rows.

Frogging did occur!

I had a difficult time figuring out how to fix errors with the half Fisherman's rib stitch. The floats that are created when you knit the stitch below made it confusing for me. I tried a couple of times if I caught an error in one row beneath, but going down several rows was chaos.

Trying to fix mistakes several rows below was not successful.

Frogging did occur. Twice. With about 3 - 4 inches of knitting each time—at the wider side of the shawl. Not fun, but a cleaner result once it was re-knit. Luckily, the "stickiness" of the wool yarn helped preserve the live stitches so it was easier to get them back on the needle after ripping out the rows.

Frogged!

Make Nine 2023 progress: 2 of 9

This is my second Make Nine project for this year. It was finished 3 days prior to the start of The 100 Day Project in which I am participating. 

Make Nine 2023 worksheet: stash buster prompt fulfilled.


My Inclinations Shawl.

I've used this shawl several times already. It's warm yet light weight, squishy and snuggly. I love the color changes and I'm happy to have created something new with stash and leftover yarns.


Sunday, February 19, 2023

Prepping for The 100 Day Project 2023

The 100 Day Project kicks off this week—February 22, 2023. I'm prepping supplies for my third year participating in this free global art project.

Base fabrics for 100 Days of Textile Collage and Stitch and two reference books.

For the past two years, I did two 100 Day Projects each year. This year, again, I'm planning and prepping for two different 100 Day Projects: 

  • one involving fabric, threads and stitch,
  • the other is going to be hand lettering.

100 Days of Textile Collage and Stitch

For the textile project, the plan is to create textile and stitch collages on fabric "pages" that will ultimately be assembled into a fabric stitch book/journal. The journal will be assembled using the "slot and tab" bookbinding method. This allows me to stitch individual pages without having to worry about page spreads or page order. 

Auditioning fabrics for the stitch collage journal.

I've pulled and cut different yarn-dyed fabrics [from Diamond Textiles] into 9" squares (with allowances for squaring up after stitching and seams). I envision the finished page size to be approximately 8" square. Now that backgrounds are cut, I want to serge the edges to prevent raveling during the process.

Trimming yarn-dyed fabrics for fabric collages and journal pages.

Threads, fabric scraps, and various stitch collage fodder will be gathered and packed into small baggies and zippered pouches along with tools such as needles, pins, scissors and perhaps an embroidery hoop.

My two reference books for ideas and inspiration are: 

  • Inspiration for Embroidery by Constance Howard, 1967 (and the pages have that lovely nostalgic scent of an old book), and
  • The Collage Ideas Book by Alannah Moore, 2018

I'm amused that these references were written over 50 years apart and I'll be using them in a 2023 project. 


100 Days of Hand Lettering

This past Christmas, I received a cool calligraphy set of nibs and inks. As with any hand skill, in order to get comfortable and proficient, it requires practice. The 100 Day Project is the perfect platform and motivation for doing this! I also enrolled in an online hand lettering class for art journaling—"Love your [imperfect] Letters" with Willa Wanders—and I'll be using it as a guide through the 100 days of practice.

Calligraphy set and tablet for 100 Days of Hand Lettering practice.

What do you get out of The 100 Day Project?

I'm Doing The 100 Project
Here is a video documentary from the Marquette Arts and Culture Center that hosted a community 100 Day Project and an exhibit of the body of work created by participants. Several of the participants talk about their project and what they discovered from the process. Have a listen...

Then find a simple idea,
make a promise to yourself,
show up every day,
and trust the process. 


Sunday, February 5, 2023

My first Junk Journal—a Make Nine finish

Little did I know when I set my Make Nine 2023 prompts, that the first "finish" would be the response to the "New to Me in '23" prompt. Although this project is not a "wearable," it was a technique that was new to me, and something different. So, here it is... my first Junk Journal art journal.

A bird's eye view of my Junk Journal's pages.

Art supplies + fabric, fiber, and threads

The Junk Journal January challenge prompted this art journaling adventure (see this blog post for the background). Getting out—and using—various art supplies and combining them with fabric and yarn scraps was exciting and liberating! The kitchen table was a clutter of mixed media for the month, but you can't be creative if you're frequently cleaning and tidying. AmIright?

Junk Journal spread in progress. 

Here are a few page spreads from my Junk Journal, starting with the inside front cover with the list of daily prompts.

The first spread inside of my Junk Journal.

"Mulberry" was the acrylic paint color for the "One Color" prompt.  The "wordy" prompt features words from a hotel napkin. 

"One Color" (left) and "Wordy" prompts.

This "Musical" quote came from an old calendar and the dragonflies were already on the paper used on this page so it was a perfect pairing.

Day 29 "Musical" prompt.

On Day 30, the book spread had an "unexpected" short page...

Day 30 "Unexpected" prompt.

... that turned into an "unexpected" adventure.

Day 30 short page.

Notes and discoveries about Supplies

"Keep friends close, keep art supplies closer."

"Keep friends close, keep art supplies closer." was the response to Day 31prompt, "Close." Being this is my first art journal, I learned things from the experience about using my art supplies. 

  • Acrylic paint is opaque and dries fast! It's a good color medium to modify a page, cover unwanted images, and unify a background through color before collaging and journaling.
  • Acrylic paint creates a good surface for mark making. It has a flat, matte surface and is easy to write on with markers, pens, or pencils. Glue stick adheres well to these painted areas.
  • Posca paint pens are so cool! I want a few more colors and some with a finer tip for lettering.
  • The pages with gel medium are still a bit tacky. Maybe my application was too thick.
  • I'm making a conscious effort to find more printed paper napkins. These are fun and have lots of possibilities in a composition.
  • Some papers used for the Journal pages were somewhat "wimpy." I had to cover a fast food paper bag, for example, with a collaged background to make the page more stable.
  • Stamping on coated papers takes longer to dry and is prone to smudges. Uncoated papers are easier for this technique.
  • Next time, I would make my journal pages closer to a square format. This is to accommodate posting images on Instagram.
  • I'm glad my journal signatures were sewn to the journal spine with space between. This better accommodated any thick, bulky pages due to layering, attaching 3D objects, and using foam stickers to attach items to pages.

Notes and discoveries about the Process

Go Wild with your Art.

I feel my art journal pages definitely improved as the month progressed. Here are my notes and discoveries about the process.

  • Prompts were helpful. Although I had to think about how I would respond to several, it was good to have jumping off place for each page or spread.
  • Don't think to hard! Creating a page based on a prompt doesn't have to be a literal translation.
  • I enjoyed mixing sewing and stitching materials with paper, paint and other art supplies.
  • Warm up by working on the background: painting, collaging, throwing on color.
  • I began noticing a lot more things in the scraps of paper, threads, torn pieces and other recycled materials that I was using.
  • I really loved the recycling aspect of this project—from making the journal with recycled papers to using scraps and crumbs from previous projects.
  • Details—dots, outlines, a bit of washi tape, marks—adds a finishing touch.
  • The different paper types and page sizes made each day interesting. It was also liberating to let collage pieces hang off the edges and stick out beyond the journal's covers.
  • Be fearless! You can change your mind. An image/background/text/etc can always be covered, modified, or veiled with something else if you don't like it or it's not working.
  • As with most things... the more you do, the better you get!

2023 Junk Journal.

There are still a few unused pages in my journal—opportunities for additional collage and mark making. I'd also like to make a few more junk journals. Perhaps I'll try another size/shape or use an interesting binding stitch on the spine.

Make Nine tracker

I've fulfilled the "New to Me in '23" prompt for Make Nine 2023. On to the next adventure!

First finish documented on the Make Nine 2023 tracker.


Related Posts Plugin for WordPress, Blogger...