Friday, December 30, 2011

Knit your First Sweater Workshop

Are you ready to tackle your first hand knit sweater? This workshop is for you.
 This slightly-cropped raglan cardigan features a single button closure, a cable ribbing and an eyelet detail at the sleeve line. Techniques covered in this workshop include a top-down seamless construction, raglan sleeves and knitting cables without a cable needle, plus discussions on measurements and fitting.

The workshop will meet for 3 sessions starting January 9, 2012. The workshop fee is $55 plus the cost of the yarn. The a pattern and handouts are included with the workshop. We'll be using Fibra Natura Sensational, a 100% superwash merino wool for the project. The sample shown here has stripes, however workshop participants will be making a single yarn (solid or variegated) version.

Please contact me at veronicaquilts@gmail.com for more details, to register and order your yarn supplies. Space is limited.

Thursday, December 29, 2011

Whaddaya think, Teach' ? (part 2)

They are just knitting their hearts out! Here are pics of more handknit projects that were lovingly knit this season by my knitting students for their family and friends.
Stripes, texture patterns, pom-poms and colorwork.
Check out the colorwork on these knitted caps. Using a red/white/green color scheme, Jane modified a basic "leaf" motif to create holly leaves. Then she added French knots for the holly berries. How festive! These hats make you want to take to the slopes.

Whaddaya think, Teach' ?

Shalom Cardi got a Thumbs Up!
I love—LOVE—getting pics of projects that my students have completed. These are not class projects, but things they have seen or found in other resources (patterns, magazines, on-line), and have decided to make on their own. How exciting it is (and very gratifying for me) to see them venture out with the skills they have developed in class and create these pieces with amazing results!

Here are a few things that my knitting students have whipped up in the past 2 weeks. Left: this is Lois' first Shalom Cardigan [pattern by Meghan of Involving the Senses (her blog)]. It went to a granddaughter for Christmas and, as you can see, got a much deserved 'Thumbs Up.'

Shalom Cardi by Lois
Since knitting this piece was so much fun, Lois made one for herself (right). She added a button closure at the neckline and incorporated two different yarns—very attractive. I wore my version of the Shalom Cardigan to class a few times and Lois asked about the pattern.

Sharon made this baby sweater and cap ensemble (below) for a friend's grandson. Sharon used the stranded colorwork technique and added Swiss darning for more embellishment. Details include a placket, buttons and button holes and don't you just think the ear flaps on the little cap are adorable?? This is one lucky little boy (and a lucky friend and mom, too) to receive this beautiful and thoughtful gift.
Stranded colorwork matching baby sweater and cap.
Stranded knitting baby hat
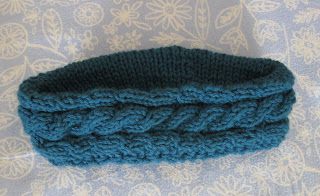
Here is a fun little one-ball quick-knit—a cable knit ear muff (headband).
Cabled ear muff.
 Pat made several of these ear muffs for Christmas gifts. A cabled band is knit and then stitches are picked up on one side so there is a double thickness of fabric. Soft, warm and a great stash buster. You could experiment with different cable patterns, background stitches (all purl or maybe a seed stitch?) and make one in every color.

I would be remiss if I didn't include a nod to a fabulous, funny and inspiring teacher with whom I was fortunate to take a workshop this fall, Sally Melville. This project, the Cardilero (cool name, eh?), is from her book, Warm Knits, Cool Gifts.


Cardilero pattern from Warm Knits, Cool Gifts by Sally Melville.
I picked up the Rio de la Plata kettle dyed hand spun wool at the Knaughty Knitter and was inspired by Sally, her workshop and her designs. So, here is my Cardilero, with an extended left front and a shawl stick by Shaune Bazner.
"Cardilero" pattern from Warm Knits, Cool Gifts by Sally Melville.
Other books by Sally with a laundry list of projects I want to make are:

Her famous Einstein Coat is in the "The Knitting Experience."

I also like the cute vest Sally is wearing in the picture below. I'm sure it's one of hers. Anyone recognize the pattern?
Sally Melville (left) and I at her workshop.

And, to teachers everywhere, Thank You for your inspiration, patience, encouragement and the creative inquisitive spark you ignite within us.

Monday, December 26, 2011

Pets give Christmas gifts, too

China (left) and Lucy, the extra kitty.
For those of you who have pets, you know they are part of the family. Being so, they give and receive Christmas gifts, too. (Yeah, you mommies and daddies with furry, 4-legged kids know what I mean.) Our kitty, China, always gives great gifts, and they are often very partical.

This year, China and Lucy (our part-time kitty whom we co-parent with our neighbors) asked me to help them make kitty pillowcases for their people parents. Lucy (he is a boy kitty) wanted to make pillow cases for his other mommy, Betty. So, here is how the three of us (China, Lucy and I) made their Christmas gifts.

Pillowcases by China and Lucy
Choose two coordinating fabrics. If the fabrics have pictures of kitties, kitty paw prints or kitty toys, so much the better! You need 1.5 yds. of the main fabric and 3/4 yard of the contrast fabric to get a set of two regular size pillow cases. China and Lucy prefer 100% cotton quilters fabric. They recommend to pre-wash and iron the fabrics before you start to cut and sew.
For each case, cut a 10" x WOF (width of fabric) strip of the contrast fabric. This will be the band. Also cut a 25" x WOF of the main fabric (25" or 26" inches long depending on how much fabric you have after pre-washing). Trim off the selvedges so both fabrics are the same width.
10" pillow case band. Press open seam. Turn up hem.
With right sides together, sew the short sides of the band together to create a wide tube. We used a quilter's quarter inch sewing machine foot to sew a 1/4" seam (you could use 3/8" or 1/2" if you want). Press the seam open. Then, press up about a 1/4" hem on one long side of the band.
The body and band with side and bottom seams sewn.
(The red fabric is the body fabric.)
With right sides together and starting at the folded edge, sew the body of the pillow case along one short side and down the open long side. (The center fold of the fabric is the other long side of the pillowcase, so you only have to sew two sides.)

Trim and bevel the corners of the body to reduce bulk.
Press the seam allowances open.
With the right side of the band facing the wrong side of the body, and raw edges and seams aligned, pin the band to the body. (The side of the band with the turned up hem will be free.) Sew the band to the body.
Press the seam allowance toward the band. Turn pillow case right side out.
Fold over the band toward outside of case. Enclose and cover the raw edges of the seam with the folded-up hem. Pin and top stitch the band in place, close to the hem edge. You can use a matching or decorative thread and a straight or decorative stitch.
China's red pillowcases (above) and Lucy's pillowcases for Mommy Betty.
Here are the finished pillowcases. Lucy thought the grey kitties on the black fabric looked like him.
The work is done. Now, go have a snack.
Merry Christmas!

Saturday, December 10, 2011

What's been on our knitting needles

From the Persian Poppies class
with Brandon Mably.
It's so rewarding to share one's passion for an art or craft by teaching it to others... and then see them take off with their newly learned skills. My knitting students have become quite prolific, as well as experienced, and their family and friends should consider themselves very lucky to be getting hand knit creations as gifts this season. (You can't buy this unique hand-crafted needlework in department stores!)

Here are some of the beautiful projects that flew from our needles this year and a few others that are on our "Makin' It 4 Me" lists.

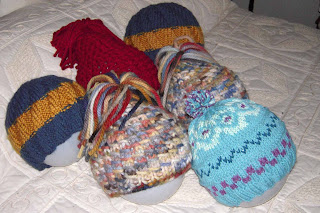
These colorwork hats and Milk Jug boxes are projects from my "Color Knitting II" where students learn and work with Fair Isle and intarsia techniques. The knitters are using their colorwork boxes for all sorts of things—a yarn ball holder, plant box for a poinsettia, and a knit notion box. And, they said they had fun working with the bobbins! Who knew?
Fair Isle hats and intarsia boxes.
These pretty dish cloths were from a study in stripes and textures in my class, "No Fuss Color Knitting." This class is jam-packed with techniques and projects and includes lessons in color theory.
"No Fuss Color Knitting" class design-a-stripe lesson.
With my "Deanna Wrap" slip stitch project, students learn four different colorwork techniques, how to pick up and knit ribbing and a making a buttonhole. They really enjoyed the slip stitch techniques and found the K1B a bit challenging. The cool thing about the Deanna Wrap is the shaping that occurs naturally by way of the different stitching techniques.
Pat included additional rows of pattern to make a longer wrap. She also added an I-cord tie.
Lois chose rustic earthtones for her wrap.
Two other color schemes for the "Deanna Wrap."
The lesson on color value involved a group exercise. (I always find this one so much fun.) What's not to like about playing with 80+ yarn butterflies??
Students work together on a "Color and Value" lesson.
Students ventured into other patterns and projects that inspired them... cables, knit/purl patterns, hats, fingerless mitts, scarves and wraps.

Student projects from Show and Tell.
The Retro Cloche (below left) from my "Knitting in the Round" class was made multiple times with different cast-ons, ribbings and embellishments. The "Lace Knitting" class gave birth to several successful Design Your Own Scarves made in both sock and worsted weight yarns. A pretty lace fan pattern came from the Madeira Cascade Kid Merino Lace Scarf pattern. And, the Flamboyant Scarf, with its interesting juxtaposition of fine mohair and bulky yarns, employs garter stitch and minimal shaping. It was another favorite quick-knit project of several students.
Left: Retro Cloches, lilac lace scarf and a Madeira Lace Scarf in black sock yarn.
Right: Flamboyant Scarf
And here is a colorwork swatch (below left) from a workshop I took with Brandon Mably, half of the Knitting with the Color Guys team. Brandon is a total riot in the classroom and the musical accompaniment (his iPhone hooked to a speaker) was a repertoire of all of my favorites. Brandon and Kaffe Fassett's new book will be coming out early next year. Stay tuned.
Left: Persian Poppies with Brandon Mably. Right: My own slip stitch gauntlet design.
The slip stitch gauntlets (above right) are the outcome of my swatching experiments (yes, I DO swatch!) using the A-B-C color sequence with 2 solids and a long color change variegated. With a little tweaking to the finishing, I think I'll write up the pattern. They were fun!

Hope you enjoyed the smorgasbord of color and fiber goodness!

Wednesday, December 7, 2011

ATCs: What did we do before we had ...

Remember that story that your (or someone's) grandfather told about having to walk 10 miles to school, through 15 feet of snow and blistering cold winds, holding a hot potato in his mitten-less hands to keep warm? This tale (or similar version thereof) was told to illustrate a point, albeit somewhat tongue-in-cheek: how much better the current generation has it compared to previous generations.

ATC artists looked back in time and responded to the ATC theme, "What did we do before we had ___?" Some went back a few decades while others telescoped centuries to reflect on days of yore. So, take a stroll back in history when times were simpler (or perhaps harder?), and the world was more technology free and enjoy these Artist Trading Cards. In the words of Bob Dylan, "for the times they are a-changin'."
Left: What did we do before we had Paper Towels?
Right: What did we do before we had Plastic?
Left: What did we do before we had Wheels?
Right: What did we do before we had Bikinis?
Left: What did we do before we had E-mail?
Right: What did we do before we had Clocks?

Sunday, November 13, 2011

The Creation of a Tote Bag—the process

We had our Annual Guild Challenge exhibit, "Fiber and Caffeine get me going..." this weekend. The Challenge was to create a tote bag inspired by a favorite mug. I emceed the event again this year and we had 10 wonderful entries.
 
One of the best things about working on an assignment that has been issued to a group of artists, is sharing information about our processes, detours and solutions after the pieces are complete. This time, I remembered to periodically document the process (via my digital camera) from the initial sketches through finishing.

Here is a pictorial documentation of the journey of my Challenge Tote Bag. My piece is called "How to be a Fiber Artist," which was inspired by this SARK coffee mug.
Coffee mug inspiration piece.
Here are the initial sketches. They were drawn to actual size: approximately 18" x 15".
Sketches for both sides of the tote bag.
One of the requirements of the Challenge was to include a decorative design element. I used painter's drop cloth canvas for the fabric and hand painted the trees using acrylic and fabric paints. When dry, the paints were heat set.
Hand painted images. Side 1.
Side 2.
I auditioned bits of hand knitted and felted fabric for the "studio / tree house." This knitting was wet felted by hand in a little glass jar (shake, shake, shake).
Felted hand knitting.
Auditioning fabrics and threads:
Auditioning threads for the quilting and thread painting.
The house with the door was proportionally too big for the tree and I was not satisfied with this fabric option for the roof. The colors needed to be clear hues for this palette. I knit and felted 2 more pieces.

The house (below) was a better solution for the tree house and the wooden slat steps. It was more inviting to have windows in the tree house. There is light and energy coming from inside.
 Free motion thread painting was used to create the lettering.
Bag front with free-motion stitching. Choosing a zipper.
Side two of the bag before assembly.
The trees were free-motion quilted. Extra batting behind the tree trunks provided a dimensional (trapunto) effect.
The lining fabric is 100% cotton with a directional print (from one of Kaffe Fasset's collections). Care was taken to insure the direction of the print was oriented correctly inside the bag as well as for the flanges of the zipper. A pocket was added to the inside.
Directional print lining with a pocket and zipper.

I wanted a zipper in the bag to keep the contents from falling out. I made three muslin prototypes to figure out how to sew together the lining, zipper, handles and embellished outside. Canvas tabs were sewn to the ends of the zipper. The handles (another requirement) were made from a purchased woven trim.
Close up of the zipper.

The finished bag.
"How to be a Fiber Artist" bag Side 1.
"How to be a Fiber Artist" bag Side 2.
Other Challenge entries can be seen here on the Riverbend Fiber Arts Guild web site. Other inspiring and fun books by SARK include:
Related Posts Plugin for WordPress, Blogger...