Showing posts with label Riverbend Fiber Arts Guild. Show all posts

Saturday, August 4, 2012

Fiber art demos at the Monteagle Market

My guild, the Riverbend Fiber Arts Guild, was invited to participate in the 53rd annual Monteagle Mt. Market of Arts and Crafts last weekend.
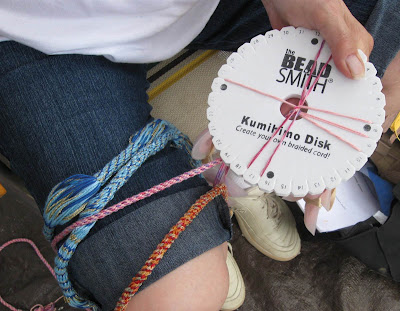
Demonstrations on knitting, hairpin lace (left), kumihimo (right) and inkle weaving.
A group of guild members tended our guild tent on Saturday, and my friends Pat and Kathy and I manned it on Sunday.
Veronica (left), Kathy (center) and Pat,
members of the Riverbend Fiber Arts Guild.
As part of the guild's community outreach program, members provide demonstrations at different venues on various fiber art techniques to educate the community about fiber art. Collectively, we provided demonstrations at the Monteagle Market on spinning, inkle weaving, kumihimo, hairpin lace and knitting with self-ruffling yarn.
Weaving on an inkle loom.
A closeup of a name woven into an inkle band.
Kumihimo braid made using a circular loom.
I provided the demonstrations on hairpin lace and knitting with self-ruffling yarns.
Hairpin lace demonstrations. 
Fiber art note cards, self-ruffling Spectra yarn and a ruffle scarf
at the Riverbend Fiber Arts tent.
It was fun to hang out with friends, share our fondness for fiber, and work on simple projects for the pure joy of feeling the yarn and fibers between our fingers.

Saturday, July 7, 2012

"Shibori: Making Marks" presentation

My multimedia presentation called, "Shibori. Making marks with shaped resist dyeing." was a big hit at the Riverbend Fiber Arts Guild meeting this morning. The audience was very attentive and attendees were mesmerized by the patterns and possibilities. There were many inquisitive and thoughtful questions during the Q&A session and trunk show. What a great audience! Thanks for a great reception to my iPad multimedia presentation.
One of my favorite shibori patterns, arashi, which means "storm."
I brought along several shibori pieces from my wearable art collection including vests and jackets in silk noil, silk dupioni and wool. And, my two pieces that were featured in Belle Armoire, "The Power of Panthera Leo" and my mokume jacket were available for up-close inspection.
Left: "The Power of Panthera Leo"
Right: A shibori dyed raw silk vest with appliqués of Angelina fibers.
I put together a display board of various shibori patterns. Fabric examples include silk dupioni, raw silk, cotton and wool. I also had larger pieces that were passed around so the audience could see the dimensionality created through the shaping and dyeing processes.
My display of Shibori examples.
I'm available to do this presentation and trunk show for guilds and groups. Contact me via e-mail at veronicaquilts@gmail.com if you are interested!

For those who want to learn more about shibori, here are some of my favorite references.


Also visit the World Shibori Network.

Friday, July 6, 2012

Shibori presentation at Riverbend Fiber Arts Guild meeting

I've been asked by the Riverbend Fiber Arts Guild to do a presentation on Shibori. I'll be presenting it at the July guild meeting, tomorrow, July 7. Shibori is a shaped resist dye method that is practiced all over the world by artists, dyers, fiber and quilt artists.
Shibori fabrics.
My presentation includes a bit of history about shibori and the characteristics that make it unique and appealing. I'll also have some fabric examples of various shibori techniques, my bog jacket that was published in Belle Armoire, and my entry in The Power of the Pocket exhibit that won Judge's Choice Best of Show at the 2010 Riverbend Fiber Arts Guild Challenge.

Visitors are invited! The guild meeting is held at Sr. Neighbors, downtown Chattanooga, and it starts at 11 am.

Tuesday, April 17, 2012

Acadian Weaving program at the Riverbend Fiber Arts Guild

We had an interesting and very informative presentation on Acadian Weaving at my fiber arts guild, the Riverbend Fiber Arts Guild, this past weekend. The guild hosted Debbie Todhunter, a hand weaver who has done research on Acadian weaving, interviews with several Acadian weavers, and compiled a wonderful video presentation that she shared with the guild.
Left to right: brown cotton rolags prepared for spinning, Acadian woven hand towels,
and brown cotton bolls before ginning.
The Acadians are of French Canadian descent and immigrated from the Canadian maritime provinces to southern Louisiana in the mid-1700s after being exiled by the British. The Arcadain weaving style is unique—a plain weave done on two-harness looms using primarily short-staple brown cotton. The surprising diversity in patterns (mostly with stripes) was quite astounding considering they were achieved with a limited color palette on two harness looms.

Acadian weaving pattern samples from the
Complex Weavers Study Group.
This weaving style illustrates a blending of cultures, resources and artistic ingenuity of these people. Ms. Todhunter distributed samples of the brown cotton to meeting attendees who had the opportunity to try carding the fibers. 

Also on display were woven samples from an extensive, 150 sample study on Acadian Weaving done by the Complex Weavers Study Group.

If you ever have the opportunity to visit Louisiana's Cajun country, look up the history of these textiles. For a recap of Ms. Todhunter's presentation at the Riverbend Fiber Arts Guild, click here.

Friday, February 3, 2012

Going to the Dogs: upcycled retired flannel shirts

With Valentines Day on the horizon, February is an appropriate month for spreading the love around your community. My guild, the Riverbend Fiber Arts Guild, will be working on its community service project this month and spreading Puppy and Kitty Love by making blankets for animals in local shelters and care facilities.

Along with a few of my fellow guild members, I'm coordinating this program and we're collecting old towels, flannel shirts, flannel sheets and pillow cases for the project. Here is a way to upcycle those retired flannel shirts and give them a worthwhile second life!

Upcycling those Retired Flannel Shirts
Supplies: rotary cutter, cutting mat, straight pins, sewing machine, fabric scraps, flannel shirts. Optional: old towels or batting scraps. A walking foot and a free-motion quilting foot is also useful.

I scavenged the back of the shirt to acquire the largest useable piece of fabric. Step 1: Lay the shirt flat on your cutting mat and cut off the side seams.
Cut the side seam off.
Step 2: Continue cutting the back piece from the shirt, cutting below the collar or the yoke (some shirts have a yoke, some don't). Do this on two shirts. DO NOT CUT the lower (finished) hem. You will benefit from this finished edge... read on.

Cut right below the collar or yoke seam.
Now you should have two shirt backs. Step 3: As the shirts will likely be different styles and sizes, lay the smaller piece on top of the larger piece on the cutting mat. Trim the larger piece to the same size as the smaller one. (Note: the brown shirt in my sample here was a pre-quilted flannel shirt.)
Trim both shirts to the same size.
Step 4: With right sides together, pin along the three cut sides. Leave the bottom side with the hems unpinned.
Pin three sides of the shirt.
Step 5: Sew along three sides. Backstitch at the beginning and end to secure the stitching. I used about a 1/2 to 3/4 inch seam allowance and a 2.3 or 2.4 stitch length. I used a walking foot (even-feed foot) here because one of the shirts was a pre-quilted fabric and had the extra layers.
Sew three sides, backstitching at beginning and end.
Step 6: Turn right sides out through bottom (hemmed) opening. Now that the shirt is right side out, pin the hems together. Topstitch to close the opening.
Pin and topstitch the opening to close.
If there are any worn spots in the fabric, or a hole, use an appliqué to cover and mend.
Use an appliqué to cover any holes in the shirts.
To make a fabric heart appliqué: 
Using fabrics scraps, cut two hearts from fabric. Make them by folding two pieces of fabric in half and cutting out a half-heart shape—just like when making paper hearts.

With right sides together, sew the two pieces of fabric together using a 1/4 inch seam allowance and a small stitch length (2.0 to 2.2 stitch length). After sewing all around the heart, clip the top of the heart close to the stitching line. Trim the seam allowance at the bottom of the heart to minimize bulk.
Sew heart appliqué. Trim excess seam allowances.
Use scissors to cut a small slit in ONE of the fabrics. Cut this slit on the fabric bias and it will not fray. Turn the heart right side out through this hole. Smooth curves and press. Place the heart over the hole or worn area and sew to secure. I free-motion stitched the heart to the blanket when I did the quilting.  
Slit back to turn right side out.
Here is the finished blanket. I free-motion quilted the layers but you could straight line quilt with a walking foot or omit the quilting if preferred. The curve of the shirttail hem is mirrored on the opposite side. You can trim these blankets square if preferred. The dogs and cats will love them all the same.
Quilted dog blanket with appliqué heart.
Optional: use quilt batting or an old towel for a middle layer if you want the blanket thicker, cushier or more substantial. Cut the batting to the size of the shirts (Step 3). Add this layer to the top of the "quilt sandwich" (Step 4) and sew the three sides. Trim away any excess batting before top stitching the opening closed (Step 6). If you add this additional layer, it is a good idea to add some quilting to secure the three layers.

Sunday, November 13, 2011

The Creation of a Tote Bag—the process

We had our Annual Guild Challenge exhibit, "Fiber and Caffeine get me going..." this weekend. The Challenge was to create a tote bag inspired by a favorite mug. I emceed the event again this year and we had 10 wonderful entries.
 
One of the best things about working on an assignment that has been issued to a group of artists, is sharing information about our processes, detours and solutions after the pieces are complete. This time, I remembered to periodically document the process (via my digital camera) from the initial sketches through finishing.

Here is a pictorial documentation of the journey of my Challenge Tote Bag. My piece is called "How to be a Fiber Artist," which was inspired by this SARK coffee mug.
Coffee mug inspiration piece.
Here are the initial sketches. They were drawn to actual size: approximately 18" x 15".
Sketches for both sides of the tote bag.
One of the requirements of the Challenge was to include a decorative design element. I used painter's drop cloth canvas for the fabric and hand painted the trees using acrylic and fabric paints. When dry, the paints were heat set.
Hand painted images. Side 1.
Side 2.
I auditioned bits of hand knitted and felted fabric for the "studio / tree house." This knitting was wet felted by hand in a little glass jar (shake, shake, shake).
Felted hand knitting.
Auditioning fabrics and threads:
Auditioning threads for the quilting and thread painting.
The house with the door was proportionally too big for the tree and I was not satisfied with this fabric option for the roof. The colors needed to be clear hues for this palette. I knit and felted 2 more pieces.

The house (below) was a better solution for the tree house and the wooden slat steps. It was more inviting to have windows in the tree house. There is light and energy coming from inside.
 Free motion thread painting was used to create the lettering.
Bag front with free-motion stitching. Choosing a zipper.
Side two of the bag before assembly.
The trees were free-motion quilted. Extra batting behind the tree trunks provided a dimensional (trapunto) effect.
The lining fabric is 100% cotton with a directional print (from one of Kaffe Fasset's collections). Care was taken to insure the direction of the print was oriented correctly inside the bag as well as for the flanges of the zipper. A pocket was added to the inside.
Directional print lining with a pocket and zipper.

I wanted a zipper in the bag to keep the contents from falling out. I made three muslin prototypes to figure out how to sew together the lining, zipper, handles and embellished outside. Canvas tabs were sewn to the ends of the zipper. The handles (another requirement) were made from a purchased woven trim.
Close up of the zipper.

The finished bag.
"How to be a Fiber Artist" bag Side 1.
"How to be a Fiber Artist" bag Side 2.
Other Challenge entries can be seen here on the Riverbend Fiber Arts Guild web site. Other inspiring and fun books by SARK include:

Thursday, November 10, 2011

Fiber Art inspired by Coffee Mugs

My fiber arts guild, the Riverbend Fiber Arts Guild, is presenting its second annual Guild Challenge this Saturday. The Challenge theme is "Fiber and Caffeine get me going..." and members were to create a tote bag inspired by a favorite coffee mug. We've had 11 months to design and work on our entries... and the big reveal is this Saturday.
Riverbend Fiber Arts Guild Challenge 2011
I've got my entry form filled out with my Artist's Statement (check!). We're required to bring the coffee mug that inspired out piece (go that). And, I'm the team lead for this year's Challenge, so I've been coordinating the day's agenda, preparing the presentation and getting the ballots ready (off to the printer's this afternoon). I'm also teaching Colorwork Knitting this evening and a Free-motion Quilting class tomorrow, so I'm running around like a crazy woman...

Without giving too much away, here is a little preview of my piece. Wish me luck!
 

Thursday, October 20, 2011

Bad taste from Ketner's Mill Fair

Bad taste at this year's Ketner's Mill Fair.
For over a quarter of a century, members of my fiber arts guild, the Riverbend Fiber Arts Guild, have provided free demonstrations on carding and spinning fiber at the Ketner's Mill Country Fair. Guild members pack up their spinning wheels, rovings, tools and samples to travel to the McDonald farm in Whitwell, TN (for some, it's over 60 miles one way) to arrive in the cold, damp and misty morning to set up their stations before fair visitors arrive. Over the past two years, members even added to the merriment and fair-like atmosphere by transporting their alpacas and angora rabbits to the fair. This is part of the guild's outreach program to educate the public on the fiber arts and the yarn that is produced from the downy soft fleece of these animals. As was advertised on this web site as well as the guild's site, we planned to participate again this year. But, shortly after our arrival, we were subjected to an unprofessional and unwarranted confrontation.

Unfortunately, the wonderful woman who helped found and formerly directed the event (and who was our guild's contact for 25+ years) is no longer involved. This year, a woman coordinating activities was carrying a personal grudge against one of our guild members. This woman insisted that the farm's owner tell the guild member to leave. The owner, upon confronting our member, said he didn't know nor want to know the reason, but said that his employee was so distraught and upset that she [his employee] could not function and perform her assigned tasks.

If that wasn't enough, this disgruntled woman continued her disruptive, childish behavior throughout the day with persistent nagging and complaining to the guild's president about the guild's tent, the space for the demonstrators and other inconsequential issues. This petty and annoying behavior only underlined this employee's lack of people skills, professionalism and common courtesy that one would think important in a job that interfaces with the public.

So, what do you think of a nearly-60-year-old woman behaving like this at a public event at which she is employed? Of the thousands of people attending the event, can you imagine that the presence of one person could elicit such immaturity, emotional instability and unprofessionalism?
  • Should an apology be made to the guild for the havoc and ill will she inflicted? 
  • Should an apology be made to the guild member for the public embarrassment to which she was subjected? 
  • Perhaps this employee should be "told to leave" a job for which she is obviously unqualified. Would you want an employee so unstable representing your business or handling sales of your product? 
  • Comments?
Although the BBQ, fried pies and kettle corn might be tasty, this year's Ketner's Mill experience left a bad taste in my mouth, as well as the mouths of several of my fellow guild members. There is a new fiber festival that is making its debut this November near Cleveland, TN. My guild has been invited. Perhaps the guild should give all its support to a venue where guild members are treated with courtesy, respect and are appreciated for what they bring to the plate.

Thursday, September 1, 2011

How does fiber get to be yarn?

Drop spindles.
Ever wonder how the sheep, alpaca, rabbit, goat and other animal fibers get spun into yarn? My guild, the Riverbend Fiber Arts Guild, is having a program at the September 10 guild meeting on spinning with a drop spindle. The drop spindle is a great tool for beginners or those curious about getting into spinning. The program will also include a demonstration on carding batts to make art yarns.

Drop spindles made with recycled CDs and fiber for spinning will be available to use and purchase. Experienced spinners from the guild will have their spinning wheels at the meeting so you can see this technique in action. The guild meeting starts at 11 am.
Get inspired with these books.


Friday, June 24, 2011

Published again!

A complimentary issue of the Summer 2011 Belle Armoire magazine arrived in my mailbox this afternoon with this enclosure:
Congratulations! You've been published in Belle Armoire.
Belle Armoire, Summer 2011
Here is the cover of the newly redesigned magazine and its 160 pages full of beautiful color photos of distinctive, artful garments and accessories. Quickly flipping the pages, I was immediately consumed by the wide variety of techniques shown in the full view and detail shots of the artwear pieces— felting, knitting, tatting, crochet, sewing, fabric dying, embroidery and more. As Amanda Crabtree, the Senior Managing Editor, states in her column, "... no doubt you'll be able to find something in these pages that will speak to you."
A 2-page spread shows my hand dyed shibori bog jacket, p.100-101.
My article, entitled "Compliments of the Dye Pot" [they chose the title], features two of my artwear pieces: a hand-dyed shibori bog jacket and a silk dupioni shibori vest called "The Power of Panthera Leo." The vest won the Best in Show at the Riverbend Fiber Arts 2010 Guild Challenge and was chosen for the runway presentation at the Tennessee Presents Textiles fiber arts show and sale last November.
The Power of Panthera Leo, hand dyed shibori silk vest, p. 102.
I'm honored and excited to have my work showcased in this issue of Belle Armoire and to accompany the other talented artists who are featured. The imagination and skills of these international fiber artists have taken so many traditional needle arts to a new elevation. I'm especially intrigued by the unique combination of techniques that was used in several of the pieces.

When asked to submit the article, I was asked to provide information on materials, technique, inspiration and tips. You'll find these details from all the contributing artists about each of their featured pieces.

So, if you want to nourish your creative soul, sit back and enjoy 150+ pages of fiber art eye candy with the Summer 2011 issue of Belle Armoire. Pick up a copy at your local bookstore or newsstand or order it on-line. Open the pages and prepare to be inspired! You'll find my stuff on pages 100-102.
Related Posts Plugin for WordPress, Blogger...