Sunday, July 24, 2022

I’m in! The 100 Days 100 Blocks 2022 starts August 1

Are you ready for the 100 Days 100 Blocks 2022 sew-along? It’s my 5th year participating!

100 Days 100 Blocks 2022: fabric bundles [P&B Textiles] and block tracker

I’ve got:

I’m ready to go!

Specs and prep for the Kinship Sampler 2022

This year, I’ll be using fabrics from the playful Whimsy basics line from P&B Textiles. Whimsy sports a variety of small texture-like patterns and a full color gamut of warm, cool and neutral hues. 

My Personal Challenge will be experimenting with combining these rainbow hues with black tone-on-tone fabrics—P&B's Onyx basics—rather than using white or light colors for contrast. This will be a new exploration for me in this year’s sew-along. Where's the "spice in life" if you don't mix it up a bit??

I've begun pulling and cutting fabrics for the first few blocks in preparation for the August 1 start date. The sew-along goes through November 8, 2022 and uses the Kinship Sampler pattern (available from Gnome Angel). 

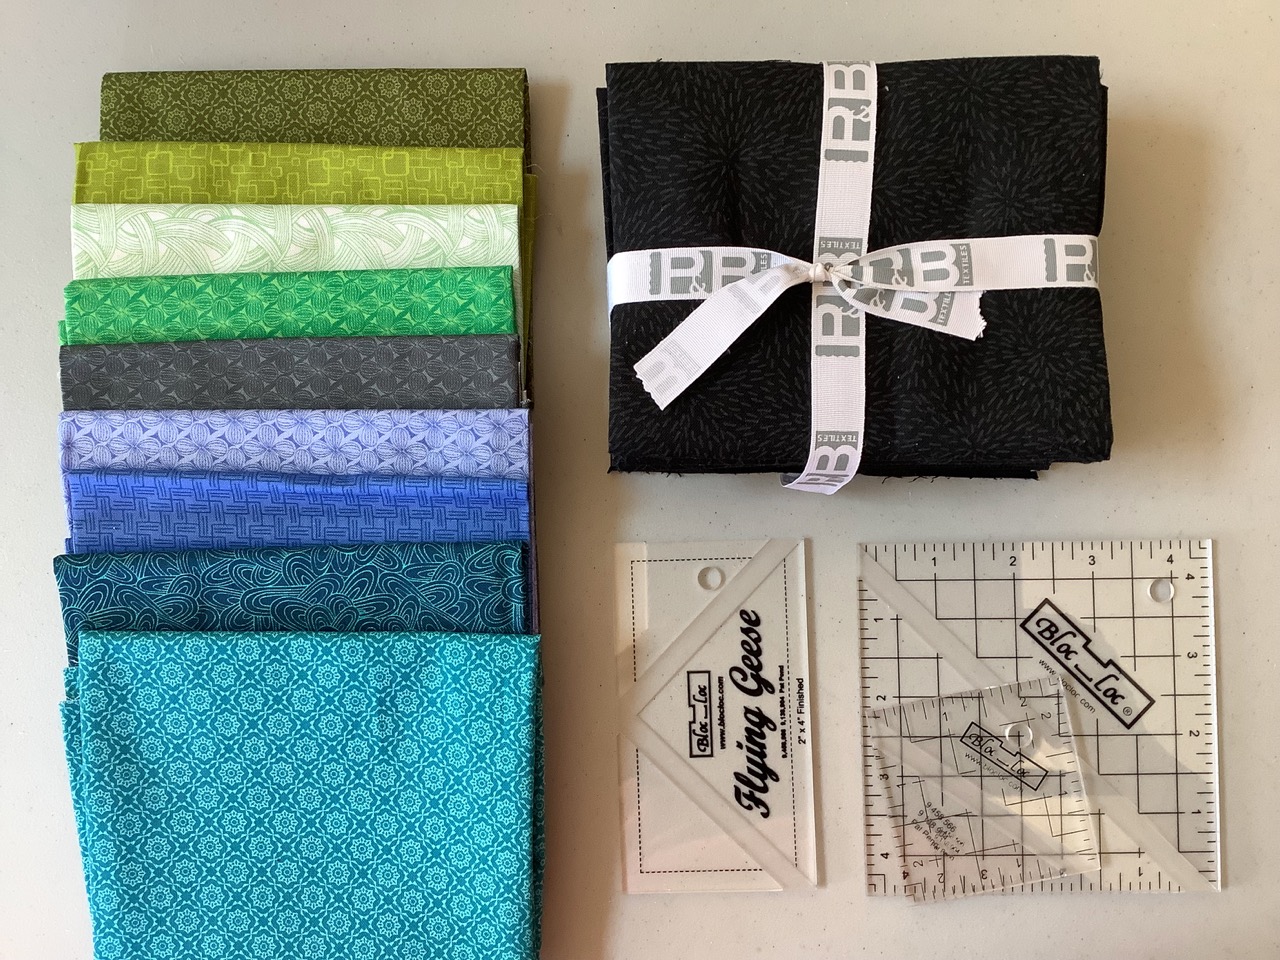
Fabric pull: cool colors from the Whimsy collection and black tone-on-tone fat quarters from Onyx collection [P&B Textiles]. Bloc-Loc rulers for flying geese and half-square triangle units.


The Kinship Sampler is a fun, skill-builder project

There are 50 square blocks that finish at 8”x8” and 50 rectangle blocks 4” x 8” in the Kinship Sampler quilt. Here's why I like it:

  • The sampler is appropriate for confident beginners but the two block sizes keep it interesting for advanced quilters.
  • Angie at Gnome Angel describes the blocks as "borrowing from the traditional and reflecting the contemporary."
  • It’s great practice for perfecting your 1/4” seam.
  • You can make it scrappy or plan a controlled color scheme.
  • The pattern has suggestions for block layouts, or you can see what others have done using the #100blocks100days or #kinshipsampler hashtags for previous years.
  • Doing the 100 Days 100 Blocks sew-along with others is always motivating, encouraging and inspiring. Everyone uses different fabrics and we cheer each other on!

Watch my daily block posts on Instagram [@veronica.fiberantics] and on Facebook.


Sunday, July 17, 2022

The Laced Back Stitch: an ideal stitch for lettering

I recently studied laced stitches in a workshop with Susan Brandeis: the laced running stitch, laced chain stitch, and (my new favorite hand embroidery stitch) the laced backstitch. 

Circle Sampler: laced running stitch circle surrounded with French knots.


Stitched Typography

The laced back stitch came in very handy for documenting a day range on each of the stitched scrolls from my 100 Days of Slow Stitching with Found Objects project.

Documenting the day range on each scroll with the laced back stitch.

The letters and numbers were stitched on each scroll using the back stitch. Then, a second thread was woven or laced through those stitches. The laced thread lays on the surface of the work and is kept in place by the initial back stitches.  

My "stitched typography" was perfected by this lacing (weaving) technique. The photo below shows “before” and “after” lacing. See how the letters are smoother, more cohesive, and more readable? They are also slightly bolder because of the additional thread. The letters now appear more "finished."

Back stitch (top) and laced back stitch (below).

Even as an afterthought, if you decide you want a laced stitch, you can easily go back and do it on existing work.

Vintage Stitch Dictionaries

Two of my vintage stitch dictionaries provide variations on laced stitches. These stitches are also referred to as "threaded" stitches and "whipped" stitches. Whatever the terminology, they are fun and easy stitches to accomplish.

From Needlework Stitches by Barbara Snook.

From Handbook of Stitches by Grete Petersen and Elsie Svennås.


Laced stitch variations

The lacing technique has all kinds of exciting options! Experiment with lacing a contrasting color of thread, multiple threads, decorative yarns, silk ribbon, fabric slivers, weaving in different directions, or incorporate other embellishments.

A running stitch laced with a stand of sock yarn. 
The tension of the laced yarn varies to provide dimension and interest.

Try them all!


Sunday, July 10, 2022

Upcycle your argyles with a loom! Make Nine finish #5

If the socks in the laundry basket are really too far gone to mend, here's a fun idea to remake them into something useful. 

Ready? Get out the scissors! 

The worn sock remake.

Cut the socks into tubes...

Socks cut into tubes.

and weave them.

Weaving with a mini loom and sock tubes. 


The potholder loom keeps worn socks out of the landfill

Remember those rainbow-colored fabric loops and the mini weaving loom you had as a kid? They still make them! I have a shiny new red metal one. And now I'm cutting up worn-out socks to make the loops for the warp and weft. 

Those worn socks get a new life as a mug rug or hot pat and avoid the fate of ending up in a landfill. It's a great repurposing project, earth friendly, and quick and fun to do as well.

Three woven hot pads, metal weaving loom, and crochet hook for binding off.


The weaving process and design options

The weaving set-up and process is the same as when you were 7 years old. If you don't remember, there are instructions/illustrations online or that come with the loom.

My sock tubes were cut about 3/8" wide and it took most of two adult size, short, ankle socks to yield enough loops for my 7" square loom. If you're cutting up knee socks, there will be plenty of loops for one woven square and enough to start the next.

Cutting socks into tubes. The argyle will provide a contrasting color.

If your socks are various colors or prints, try blending them to create stripes and plaids. You'll see a change in color but the pattern of the old sock—like the argyle pattern—becomes obscure through the weaving process.

The weaving process on the mini loom. 

The loom is portable. I can weave on a table or in my lap. I accomplished the "bind off" with a crochet hook.

Binding off with a crochet hook.

The finished hot pad is between 5" - 5.5" square once it's been released from the tension of the loom. You can see the difference in size between the 7" loom and the finished piece.

The finished woven hot pad is approximately 5" square.

The loom came with a metal hook for weaving, but I found weaving with my fingers worked really well. 

I haven't tried it, but the woven squares could probably be stitched or crocheted together to make a larger piece if one desired. For now, I'm using the pieces straight off the loom as hot pads and mug rugs.

Three woven hot pads/mug rugs made from worn out socks.


My 5th Make Nine finish for 2022

Although I have mended quite a few projects this year—shirt collars, shirt sleeves at the elbows, T-shirt hemlines and necklines, toes of socks, the buttonhole on a pair of jeans—I'm going to count this old-sock re-make as fulfilling my "Mend/upcycle" prompt for Make Nine 2022. It's a blast from the past and still as much fun now as it was as a kid.

Make Nine 2022 worksheet, July 2022.

I hope you find the "joy of making" as exciting now as when you were a kid!


Wednesday, July 6, 2022

4th Make Nine finish: Kantha zipper bag

I'm crossing off one UFO prompt for my fourth Make Nine 2022 finish! This kantha stitched Flag Girl, my 4th make, was completed on the 4th of July (very apropos, I'd say).

Flag Girl kantha stitched zipper bag.

One side of the bag has an embroidered motif of a girl holding an American flag. The background is  kantha stitched with thrums of embroidery floss (above). The patchwork side of the bag (below) is improvisationally pieced with leftover fabric bits from a set of projects featuring the Meriwether fabric collection from Art Gallery Fabrics.

Patchwork side of zipper bag.


Details and features of the bag

I've been doing a lot of slow stitching these days—this patchwork piece included. This side of the bag features embroidery stitches, appliqué, and quilting—all by hand.

Embroidered stitch motifs with embroidery floss and a flower appliqué.

Quilting around the rabbit and embroidery stitches.

Here is a close-up of the kantha stitching using single strands of embroidery floss.

Detail of kantha stitching.

An inside pocket was sewn in place by hand before the two bag pieces were sewn together.

Inside pocket of the zipper bag.

There is an in-seam tab on the side of the bag, and the final detail is the ring through the zipper pull.

Zipper ring and fabric tab details.

This is a "sister bag" to the first zipper bag I made in 2020 that was a Make Nine project for that year.

Kantha stitching and hand embroidery on two zipper bags.


4 for 9 for Make Nine 2022

With half of 2022 in the rearview mirror, I've answered 4 of my 9 prompts in this year's Make Nine Challenge

Make Nine Challenge 2022, July update. 


Sunday, July 3, 2022

How to pack a mini studio for your travels

When people ask me about my 100 Day Project—100 Days of Stitching Found Objects and Fallen Pieces—they ask “if” and “how” I take a project like this with me when I travel. 

The answer to “if” is: "Yes. I take this project on the road and I do stitch daily."
The answer to “how” is: make yourself a mini stitching studio. Here’s how I do it. 

Zipper pouches are the perfect travel companion for a Studio On-the-Go.


Taking your studio on the road

Zipper pouches are perfect for a traveling stitching studio. I’ve made a number of pouches over the years—with specific fabric choices, leftover fabrics from other projects, or an orphan quilt block. They can be made in various sizes and shapes. They hold quite a lot of supplies in them and tuck easily into a tote, overnight bag or suitcase.

My go-to pattern for zipper pouches is the Chunky Wee Zippy Pouch by Sam Hunter of Hunter's Design Studio.

Zipper pouches in various shapes and sizes.

Tools and supplies for travel

For my 100 Days of Slow Stitching, I gathered a variety of colors of embroidery floss, perle cotton, sashiko cotton, and 12 wt threads. Sandwich and snack size plastic baggies are great for skeins of floss and cut floss strands because the contents are easily seen and the bags are resealable.

Tools and supplies for a travel stitching studio.

My tools include small embroidery scissors, seam ripper, glue pen (for EPP projects), a metal tin (or needle case/needle book) for needles, pins, safety pins, and other small objects like bobbins, a thimble, needle threader, etc.

Conserving space by sliding spools into cones.

I like the cotton sashiko thread from Cosmo, but the cones are rather large for travel purposes. However, I discovered I can insert the perle cotton spools into the sashiko cones to conserve space in the zipper pouch. 

For the 100 Day Stitching Project, I packed a baggie of miscellaneous scraps, trimmings, and other ephemera for the road. But I quickly discovered all kinds of overlooked “fallen pieces” at hotels, restaurants and other places on my trips—soap wrappers, restaurant coupons, hotel card key folders, advertising flyers, and the like. 

When packing for EPP [English paper piecing] projects, like my 100 Days of 3/4-inch hexies, I pack paper templates, acrylic window templates, and fabric scraps in a clear sandwich or snack bags. If there are multiple shapes or sizes of pieces, each shape will have its own baggie.

Clear plastic baggie for English paper piecing [EPP] travel projects.

One of my zipper bags is always ready to go with supplies and tools for making fabric twine. I periodically refill this pouch with fabric strings and trimmings as needed.

Zipper pouch with fabric twine supplies.

Fabric twine pouch ready to travel.


Other mini tools and supply options

While we're talking about mini travel studios... you can find other "travel size" items that are handy for your creative endeavors when traveling but still conserve space in the suitcase. Visit your local quilt shop and ask them what they have or what they can order for you.

Mini cutting mats.

Along with an extensive selection of threads, hand-dyed floss and perle cotton, stitching yarns, and notions, I found this great plastic zipper project bag at Patches and Stitches, a needlework and quilting shop in Huntsville, AL.

Clear zippered project bag. 13" x 9"


Buy two... or more!

The basis of the saying, "Buy two—one to use and one to lose," holds true for mini travel studio(s). Each of my zipper pouches has a dedicated pair of scissors, appropriate sewing needles for the thread and task, and any other supply that is specifically needed for the type of project or technique. There is nothing worse than opening up a travel studio in the hotel room to find you have no _____ (fill in the blank).

Happy trails!


Related Posts Plugin for WordPress, Blogger...