Sunday, May 31, 2020

My first Komebukuro, a "Birdie" Japanese rice bag

Komebukuro: a traditional Japanese cotton drawstring bag. A plethora of examples of this humble yet classic bag dwell on Pinterest, Instagram, Etsy and blogs. Patterns and tutorials can be found all over the web. I like the idea of this traditional, simple, and useful accessory and have wanted to make one for quite a while. This is my first go at it.

Kumebukuro with Birdie fabric by Mia Charro for Blend Fabrics.

The traditional Japanese rice bag—kome (rice) and bukuro (bag)—was used to store and carry rice for offerings at Japanese temples. Since I'm back to working on my Glorious Hexagon EPP [English paper piecing] project, I'll likely use my new Japanese rice bag to hold these supplies and blocks.

Materials
This was the plan:
  • I wanted to feature these adorable birds from the Birdie collection by Mia Charro for Blend Fabrics on the bag. (Fabric purchased at Chattanooga Sewing Machines)
  • I also uncovered a pile of half-square triangles [HSTs] in my stash. The colors worked and it was a repurposing effort. 
Birdie from Blend Fabrics and miscellaneous HSTs.


Coordinating fabrics: Forme from Lewis and Irene
and Basically Hugs from P&B Textiles.

  • To give stability to the bag, I decided to try a new-to-me product, cork fabric. I received some cut-offs from Midwest Textiles to experiment with.

Cork fabric from Midwest Textiles.

Assembly
The komebukuro is basically a cube. The sides and bottom are all squares so with this formula, the bag can be made any size. My square was 11".  The birds and HSTs were framed to build out the square to 11 inches.

Construction of the sides of the bag.

At the base of each side panel was a piece of cork fabric. The bottom of the bag was also cork.

Press the seams of the cork with a seam roller or wooden iron.

Working with Cork fabric
The cork fabric cuts and sews just like fabric, but don't use a hot iron on this fabric or it will buckle. I used a seam roller to "press" any seams. A wooden iron or finger pressing would also work. I used the regular 80/20 sewing machine needle, 50 wt. cotton sewing thread and my quarter-inch presser foot to sew the cork. It was like working with a heavy weight fabric, but with no stretch.

If I had my druthers
Now that my komebukuro is completed, here are my observations and a few things I will consider for next time:

  • The bag does not stand up by itself. (It's kinda slouchy.)
  • Although the cork fabric provides a flat base and stability at the bag's bottom, the sides need hand stitching, quilting or interfacing for more support for this size bag.

This is a slouchy bag.

  • The size and number of tabs for the drawstring allow varying degrees of closure. I would try tabs of a narrower width so the bag closes more.
  • Drawstring tabs from cork fabric might be an option. They would be fast and easy—no need to topstitch, no raw edges to fold under, etc.

Completed Birdie komebukuro with a cork fabric bottom.

  • The design of these bags is simple and elegant, offering a wonderful canvas for patchwork, hand stitching (kantha, embroidery, sashiko), free-motion and machine quilting. Possibilities for surface design abound.
  • Pockets could easily be added to the inside—or outside—of this bag!
  • I'd like to try different materials for the drawstring... and include decorative finials.
  • It would also be fun to make an accompanying little needle book with a cork fabric cover. (Do I hear you saying, "Good idea for a gift"?)

Close-up of the cardinal Birdie block and HST patchwork.

I love the Birdie squares on my komebukuro! They are cheerful, bright and make me smile. This bag was a good project to experiment and learn about working with cork fabric, and the opportunity to repurpose a batch of leftover HSTs is very satisfying.

Besides... one can't have too many project bags, right?


Sunday, May 24, 2020

Slow stitching EPP hexies, progress on a UFO

I'm not sure why, but over the last few weeks of this quarantine period, I've turned to slow stitching processes: English paper piecing and hand embroidery. Maybe hand processes are more soothing, maybe I was inspired by re-discovered UFOs [unfinished objects], maybe a shake-up was needed in my making... maybe a little of all these.

75 English paper pieced hexies from Glorious Hexagons project.
From the book: The New Hexagon by Katja Marek.

I do know that two events reignited my interest in English paper piecing [EPP]. In mid-April, I uncovered a big pile of 1-1/4" EPP hexagons. Not sure if there was an original plan for these...

A stack of 1-1/4" English paper pieced hexagons [hexies].

A few days later, I was tagged by Katja Marek on one of her Instagram posts. Katja so generously named Block #16 the Veronica block, after me. What an honor! The Veronica block is in her latest book, The New Hexagon 2. Get yourself a copy! (This time there are patterns for 12" as well as 6" hexie blocks.)

Block # 16, Veronica, from The New Hexagon 2 book.

You can bet her book is already part of my personal fiber arts library!

My copy of The New Hexagon 2 book.

Realizing this was a message from the fabric goddesses, I went in search of my previously pieced 6" hexies from my Glorious Hexagon project that coincided with Katja's first book, The New Hexagon.

My Glorious Hexagons project was started in January of 2016. Through a search of my 2016 blog posts, it appears I stuck with it for about 8 months. With renewed excitement, these are ten 2020 additions to the collection.

Six completed hexies made with stash fabrics.
Three 6" hexagons made with Art Gallery Fabrics.
Dawn block #23. Made with Art Gallery Fabrics.

As of today, the pile is up to 75 finished hexagons...

75 hexagons.

and counting...

EPP hexies with tails!


Sunday, May 17, 2020

Make Nine 2020 finish: Slip stitch knit dish towel

On-line videos and real-time product previews have proliferated during the coronavirus quarantine. A couple weeks ago, I stumbled across Heather's "Friday at Five" Facebook Live broadcast with the latest happenings from Universal Yarn—new yarns, great project ideas and featured patterns (some are free downloads). This is where I learned about the Mosaic Dish Towels pattern.

"Mosaic Dish Towel" pattern from Universal Yarn. A Make Nine 2020 finish.

I have a "yarn project" on my Make Nine 2020 list. The plan was for something that was easy, relaxing, small and achievable. When Heather mentioned this project, I knew it fit the requirements... and was functional as well!

The Mosaic Dish Towel took me a weekend to complete. The cast on was Friday evening and I was weaving in the ends on Sunday. The 4-row slip stitch mosaic pattern provided enough intrigue to keep my mind alert and the rest was the mindful slow stitching of a repetitive garter stitch (which I knitted during in-home movie night with my husband). I opted to omit the i-cord loop... and I may even have enough yarn for a matching dish cloth.

Mosaic Dish Towel, 11" x 17",  cotton yarn.

The mix of relaxing repetition and focussed concentration required for a hand knit project may be just what you need these days. Check out Heather's Universal Yarn Facebook videos for knitting and crochet inspiration and project suggestions. She's down-to-earth, her presentation is brief and well paced, she's enthusiastic and knowledgeable about the products, and sometimes she's unexpectedly joined by one of her cats.

It's a delightful way to welcome the weekend!

Sunday, May 10, 2020

My Citizen Mask sewing process

Early in April, after reviewing myriad opinions, websites, blogs, and videos, I chose a mask pattern and did my stint in making masks. The masks were for members of my household and our neighbors. This blog seemed to be a good place to document the process of this (yet another coronavirus quantantine) sewing activity for current and future reference.
Citizen Masks with cotton batiks and knit drawstring ties.

Pattern
I chose the fitted, contoured Citizen Mask 1 Pattern from masksofloveunc.weebly.com. This mask design has a pocket for a filter.

Fabrics
The fabrics I used are cotton batiks from Majestic Batiks. These batiks have a thread count of 205. This is higher than the majority of printed quilters cottons that have a 120 thread count. [Except for the cotton prints from Art Gallery Fabrics which also has a thread count of 205 and is OEKO-TEX certified].

The drawstring ties are knit fabrics from Art Gallery Fabrics.
Citizen Mask 1 pattern and batiks from Majestic Batiks (205 thread count).
Cutting
Cut 2 outside pieces and 2 lining pieces. Use two different prints for the outside and lining of the mask so you can easily tell them apart.
Press 1/4" hem on the outside pieces and lining pieces.
These are the batiks used for the outside of the mask.

Sewing

Sew down the hem allowance close to the raw edge on both outsides and both lining pieces.
With right sides together, stitch the curved seam of the outside mask. Repeat for lining.
Clip the curves or pink the seam allowance at the curve.

NOTE: For reference in the photos below, there is white thread in the bobbin and a matching thread on top.
Batik is the outside and the black/white print is the lining fabric.

With right sides together, align the mask outside and lining, matching the top and bottom center seams.

Nest the seam allowances to make a nice join.

With the lining side facing you, start at the edge of the lining and sew mask outside and lining together along the stitching lines at the top and bottom. Back stitch (for about an inch) at the beginning and end of the stitching lines.*

Trim the seam allowances where the seam lines meet at the bridge of the nose.

Turn mask right side out. Press.
The outside of the mask extends beyond the lining fabric as shown below.

Fold the extension so the hemmed edge meets the lining (a line indicated on the pattern piece). This makes the casing for the adjustable tie.
NOTE: the white bobbin stitching is from the previous step where the hem was sewn down.
With the lining side of the mask facing you, stitch the casing close to the hemmed edge.

With the lining side of the mask up (facing you), sew down the left and right casings, stitching close to the edge. Back stitch at the beginning and end of the stitching line.

Topstitching
In a continuous stitching line, topstitch around the mask about 1/8" from the edge. Starting on the bottom edge, topstitch to the first casing, up the casing (slightly to the inside of the previous casing stitching line), across the top, down the other casing, across the bottom. DO NOT stitch the casings closed!
NOTE: the white stitching is the sewing line (bobbin thread) for the casing.
The topstitching is about 1/16" to the right as shown above.

Nose Bridge Wire
To allow for a better fit, I inserted a wire at the bridge of the nose.
Using 18 or 20 gauge wire, cut a piece approximately 6" long. Fold in half and twist. Use needle-nose pliers to curl in the cut ends so they will not puncture the fabric or have a sharp end.

Lay the twisted wire along the center top of the mask (where the bridge of the nose will be) and mark the placement.

Nose Wire Pocket
Reduce the stitch length on your sewing machine (so the wire cannot poke through).
Sew a pocket for the nose wire approximately 1/2" wide and the length of the measurements from the step above. Leave and opening at one end to insert the wire.
Sew the pocket for the nose wire, leaving one end open for wire insertion.
Insert wire and sew closed.

From the inside of the mask, going between the lining and the outside fabric, insert the twisted nose wire into the pocket. Sew the nose wire pocket closed, being careful not to sew over the wire and break a needle.

Drawstring Ties
I used knit fabric from Art Gallery Fabrics for the mask's drawstring ties.
Cut a piece of knit approximately 1" to 1-1/4" wide by 24" to 30" long.

Pull the ends to stretch and the fabric will curl on itself. There is no need to finish the edges as the knit fabric will not ravel. [Big time saver!]

Using a bodkin or safety pin (whatever will fit through the casing), feed the knit drawstring tie through the casings so the mask will tie at the top of the head. The ends of the drawstring can be knotted, if desired.
Outside of mask. Note it ties at the top of the head.

Inside of finished mask.
Inside/lining side of the mask.

Notes and Tips
  • Use two different fabrics for the inside and outside of the mask. This will make the inside and outside easily identified and the wearer will not accidentally put the "outside" next to her/his nose/mouth.
  • Backstitching at the beginning and ends of stitching lines with strengthen and secure the seams—especially at the high stress points such as the casings.
  • * When sewing the outside mask to the lining, do a deep backstitch (3/4" to 1") so the thread tails will be well into the middle of the mask when it is turned right side out. (This makes the process faster as the thread tails don't need to be cut close.)
  • The knit drawstring ties are soft and stretchy for comfort. The drawstring can be adjusted through the casings for a better, snugger fit and to accommodate various head sizes. 
  • The nose bridge wire helps prevent glasses from fogging (for those that wear eyeglasses).
  • A filter can be inserted from the inside of the mask to sandwich between the outside and lining fabrics.
  • Avoid making extra holes in the mask-making fabrics (decorative stitching, embroidery, excessive pinning, etc.). Holes in the fabric defeat the purpose of protection.
  • I found the videos from The Fabric Patch give a good explanation and illustration about fabrics and supplies for making masks, how small virus particles can be, and lessons learned from making thousands of masks.

Stay healthy. Wash your hands. Wear a mask. Maintain social distance. Do your part!


Saturday, May 2, 2020

Make Nine 2020 finish: charity quilts for cats

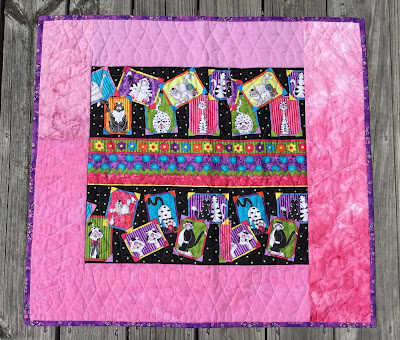
I’m feeling good about checking off this item on my Make Nine 2020 list. It's because it's my Charity project goal. I finished this stack of 12 kitty quilts for the Cat Clinic of Chattanooga during shelter in place.
Make Nine 2020 Charity project: 12 kitty quilts. One for each month of the year.

Early in March, when the Coronavirus quarantine went into effect, I needed a purposeful project to counteract all the upheaval and uncertainty in the world. Improv patchwork and running fabric scraps and orphan quilt blocks through the sewing machine was good medicine.

Improv patchwork kitty quilt with scraps and fabric samples.

There is little precision required for improv patchwork and the 25” x 29” size of these quilts made this project achievable. I felt productive and useful with each little pieced top.

Flannel samples were strip pieced for this quilt.

Scraps, a leftover border print and a Christmas panel were all transformed into useful objects.

Charity quilt from a holiday fabric panel.

Charity quilt using a border print remnant.

It was satisfying to use up orphan and test blocks such as the star block in this quilt...

A single star test block and strip set cut-offs assembled into a quilt top.
(I rather like how this quilt turned out.)

... and several technique test samples—curved piecing, random string inserts, a paper pieced star and leftover strip stratas—that were languishing in the fabric stash.

Several technique samples are combined.

These four quilt blocks were from a block swap. They seemed to shelter in place for 11 years... until now.

Four 9" blocks from a block swap.

Making these quilts also gave me the opportunity to practice free-motion quilting and test new quilting designs. Hooray for a learning opportunity!

Detail of back side showing the free-motion quilting of radiating petals.

Free-motion feathers.

Free-motion leaves.

Several of the kitty quilts have cat fabric prints on the back.

Cat prints for the quilt backs.

Some backs are pieced.

Patchwork backs.

Bindings were done by machine and a good use for leftover 2.5" precut strips.

Bindings by machine. 

When our city reopens and the Cat Clinic is open to visitors, these little quilts will get delivered to the cats and kitties.

12 kitty quilts going to the Cat Clinic soon!

Four other items from my Make Nine list are in progress so I feel I'm on track this year.

Make Nine Challenge goals for 2020.


Related Posts Plugin for WordPress, Blogger...