Sunday, November 26, 2017

When does a 1/4 inch really matter?

When does a 1/4" really matter?
Because I did technical writing in a previous career—writing procedures for digital file creation and file submission to networked, production printing systems—I sometimes get asked to proof or "tech-edit" quilting patterns. A while ago, someone asked if I would look over a draft of instructions they were writing for an easy scrap quilt.

To protect the innocent, I won't show a picture of the quilt design, but will say that the objectives for the project were as follows:
  • to mix a variety of scraps with one background fabric
  • an opportunity to try improv patchwork
  • quilt size: throw or couch quilt
  • experience level: confident beginner
The quilt layout was basically a strip quilt with horizontal strips of [improv] patchwork alternating with strips of the background fabric. The designer was calling the pattern "an easy improv quilt." (keep this concept in mind)

The first read-through
On first review of cutting instructions, here's what was specified:

From the background fabric cut: 
        3 pieces 42" x 6"
        1 piece  42" x 6.25"
        1 piece  42" x 6.5"

Really? REALLY?? The difference between 6" and 6.25" or between 6.25" and 6.5" is A QUARTER OF AN INCH! And once those strips are pieced together with the patchwork/improv strips (and even if the maker did nail the 1/4" seam allowances) who's gonna see the difference between a 6" wide strip, a 6.25" wide strip and a 6.5" wide strip???... on a throw size quilt?  (I think nobody.)

Oh, and when the quilt's washed and the fabric gets all crinkley... ya think you could tell the diff' then?

Would it not be easier and pragmatic to cut 5 pieces 42" x 6"? [or 5 pieces 42" x 6.5"]? (I gently reminded the designer that the pattern's objective was "easy improv.")
--------------

Pattern writers have a responsibility
OMGosh, folks. Pattern designers/writers... be kind to those that will make your projects! Pattern designers have a responsibility to be clear, accurate, concise, and present the information and directions in an organized format (visually and in written form). I listened to an interview with Sam Hunter of Hunter's Design Studio and she talked about writing patterns (and re-writing poorly written or confusing ones) and she was right on. It's not easy—or fast—if done correctly. But if you have that skill, talent or passion for creating patterns, and execute the process with your reader in mind, your patterns are golden. (I've used one of Sam Hunter's and it was great!)

If you attempt pattern writing, put yourself in the shoes of those that purchase or will use your pattern—and be accountable. Makers will not only appreciate it, but they will be more successful and feel confident to make the "next something" that catches their eye.

Consumers have a responsibility, too!
And the other side of that coin? When you purchase a pattern, please adhere to copyright laws! Read Sam's post on the ultimate effect of stealing patterns.

Thursday, November 23, 2017

Happy Thanksgiving in Ghastlie style

When I was growing up, we had those big, all-day-with-the-extended-family meals (grandparents, parents, siblings, two generations of aunts, uncles, and cousins) for the big holidays like Thanksgiving and Christmas. I remember it was best for us kids to steer clear of the kitchen because that's where all the brouhaha of food prep, cooking, and last-minute serving details were happening.
Hand embroidery on A Ghastlie Project by Alexander Henry Fabrics.
If this kind of kitchen lunacy happens at your house, you might be having one of "those" hair days as well. Take a page from the Ghastlie's journal—flip your hair up, and stick a flower or colorful hair-bob in your coiffure and don't stress the small stuff.
Early stage of my Ghastlie hand embroidery project.
Or bring along your hand stitching, find a comfy chair in the front room, and stay away from the kitchen—until someone yells it's time to eat.

Happy Thanksgiving to you and yours.

Sunday, November 19, 2017

Aboriginal designs: a vibrant, decorative, Color Party

If you love color, pattern and prints, you'll love the Australian Indigenous fabrics from M&S Textiles!
Australian Aboriginal or Indigenous cotton fabrics from M&S Textiles Australia.
M&S Textiles Australia was founded in Melbourne, Australia in the early 1990s and is the largest fabric manufacturer of Australian Aboriginal or Indigenous designs. Aboriginal art is one of the oldest and longest continuing artistic expressions in the world and the fabrics made with these designs are soft and supple and beautiful to work with.

A Riot of Color
I'm not at all shy about using color and print in my garments or quilts, however, seeing a display of the designs this company has to offer can be a bit overwhelming to the timid eye. 
Aboriginal design fabrics from M&S Textiles Australia.
Think about pairing these larger scale, organic designs with a blender or other "supporting fabric" to provide a bit of breathing room. Don't worry, these prints play well with lots of blender friends available at YLQS [your local quilt shop]!

In my patchwork blocks (below), I've paired M&S Textiles with Pure Elements (the patchwork on the left) and a coordinate by April Rhodes from Boho Fusion from Art Gallery Fabrics (right).
Using pre-cut strips from M&S Textiles with Art Gallery Fabrics.
Block pattern from Duet by Villa Rosa Designs.
These blocks are made with one of M&S Textiles' Dreamtime pre-cut strip sets (red colorway). In the photo below, the strips nestle with a warm pumpkin-colored yarn-dyed cotton from Diamond Textiles. See how everyone plays together?
M&S Textile Dreamtime pre-cut strips with a yarn-dyed woven from Diamond Textiles.
Or how about this duet? Remember the Principles of Design and accompany a selection of Aboriginal prints with Squared Elements from Art Gallery for a contrast in scale. How fun!
M&S Textiles Dreamtime pre-cut strips
with Squared Elements from Art Gallery Fabrics.
Join the Party!
For the fabric lovers, quilters and makers that embrace color and print with open arms, you will be running to join this party! For those that are more shy, I invite you to try a package of pre-cuts or some fat quarters and a simple pattern for an introduction to these colorful fabrics. 

The M&S Textiles website has a selection of free patterns that showcase its fabrics. I can also recommend the postcard patterns from Villa Rosa Designs (which I've used for these blocks). The Villa Rosa patterns are simple, easy to follow and the projects are quick to make (a small investment of time). I've even used the same pieced strip set to make blocks from both the Duet and Mardi Gras patterns. Check out this pattern line—most every quilt shop carries a variety of these little postcard gems. 
Postcard patterns from Villa Rosa Designs and a quilt block from Mardi Gras.

So, whaddaya think? Are you up for a party with bold color and dynamic, Aboriginal prints? Consider this your open invitation!
Australian Aboriginal designs from M&S Textiles Australia.
I have a Blog Stalker
Recently, I was at a local shop in Chattanooga and a quilter came up to me and said, "you know I stalk you on your blog." Whoo hoo! Somebody out there reads me. 

So, in the vein of Jimmy Kimmel who frequently mentions he's run out of time on the show for Matt Damon, here's a shout-out to my blog stalker: I know you aren't afraid of color, so what do you think of these fabrics? 

Sunday, November 12, 2017

Hand stitching: it's not as Ghastly as some may think

Hand stitched and hand embroidered "Patriotic Girl."
From ArtPlay Stitchery from Adornit.
It's taken me just about a year to get this piece to this stage.
---------

The running kantha stitch is by hand.

The embroidery is by hand (except her hair).

I work on it in small increments of time—between 10 minutes to an hour (if watching a TV program).

It's a portable project and it has no due date.

----------
Yesterday, my quilt guild had its annual brainstorming session to generate ideas for next year's programs. Among the quilting techniques that people were interested in exploring next year were: big stitch, hand embroidery, and sashiko. Traditionally, these are HAND stitching techniques. Although some may feel that "HAND" is a 4-letter word, quilting or stitching by hand can be relaxing, rhythmic and enjoyable... and, yes, it will take a bit more time.

Hand stitching, embroidery and embellishing with heavier weight, decorative threads have made a resurgence in the quilting world the past few years. Its popularity continues to grow. This is thanks to the stitchery artists, pattern designers, authors and instructors [Pepper Cory and Sue Spargo, to name just two] that expose, dazzle and teach us about the artistic potential of these techniques, and the thread and needle manufacturers that bring high-quality products to the marketplace to help us achieve our creative visions.

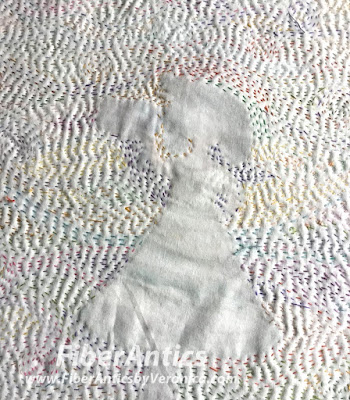
Here are detail photos of the kantha stitching on my patriotic girl.
Kantha stitching detail.
The top layer is a yarn-dyed fabric from Diamond Textiles, [Primitive collection, PRF-569]. The back layer is a piece of white muslin.
Using up bits of leftover embroidery floss.
There is no pattern marked in the background for the kantha stitching. The needle creates its own path. A new thread is fed into the needle when the previous piece is used up.
Kantha running stitch. No plan, just stitching.

A view of the back. The embroidery [the girl and flag] is embroidered just on the top layer. The kantha stitching is through both layers. 
Back view.

I'm not sure if this will turn into a pillow or a wall hanging. Suggestions? I do like the texture of the background stitching in contrast with the non-quilted, embroidered girl. 

From "Calendar Girls" collection of ArtPlay Stitcheries from Adornit.
Another hand stitching WIP [work in progress] I have going is one of the characters from Alexander Henry's ever popular fabric line called, "The Ghastlies." I picked up "A Ghastlie Project" panel at Bless My Stitches in Murphy, NC.
"A Ghastlie Project"
She might show up on a future artwear jacket.
When choosing a fabric for hand stitching—big stitch quilting, kantha or boro stitching, hand embroidery—I recommend a yarn-dyed woven fabric [see Diamond Textiles] as the needle will glide through with ease.

I hope you consider giving hand stitching a try. It's not as "ghastly" as some may think! 

Sunday, November 5, 2017

Primitive Stars jacket, part two—hand stitching

Detail: running stitch on jacket back.
Did you read Part One about my Primitive Stars ikat Jacket? It was about the machine stitching/quilting part of the jacket-creation process. This post is about the hand stitching—or slooooow stitching—process.

The running stitch
On the front, back and sleeve, this jacket is embellished with a mix of fabric scraps—ikat, yarn-dyed wovens and commercial cotton prints. I was following a color palette and was not concerned with the fabric type. These patches are raw edge and attached with a running stitch by hand. I guess you could identify this technique with any or all of the following terms: boro, kantha, appliqué, or quilting... depending on your point of view. 

For this hand stitching, I used Spaghetti and Fruitti [WonderFil Threads] 12 wt. cotton threads. They come in a broad range of beautiful solid and variegated colors. Thread colors were chosen to complement the color of the fabric patches and the color scheme of the jacket.

Stitching on yarn-dyed fabrics
Hand stitching is a dream with the yarn-dyed wovens! You've gotta try it. Really.
Detail: running stitches with 12 wt. cotton thread from WonderFil Threads,
 ikat, and Primitive Stars yarn-dyed wovens from Diamond Textiles.
The thread color for stitching on the cream-colored ikat is Fruitti FT17, a variegated color story of soft lavender, pale periwinkle and a subtle hint of magenta, called "Mountains." 
Jacket pocket with hand stitched decorative band.
The jacket pocket fabric is from a Riverwoods fabric collection by Janine Burke. Looks like a hand-dyed, doesn't it? It's actually a printed fabric, so it's a "hand-dyed look at an affordable price." Quilters and quilt shops—please ask me about availability of this fabric line.

This shows the hand stitches from the lining (inside). It might look like a lot of stitches, but the process is quiet, rhythmic and relaxing—and a nice break from machine quilting.
Hand stitching on jacket (lining side).
This jacket has two buttons and button loop closures. You can see the streaks of raspberry color in the variegated thread in this photo [YLI 40 wt. cotton, color 15V Vineyard].
Button loop closure.
The sleeve detail—machine and hand stitching. I like the juxtaposition!
Sleeve with ikat fabric patch.
My completed jacket. It's a little boro and a little blue.
Primitive Stars jacket with ikat and slow stitching.

Make a jacket, make a friend
And here I am at the International Quilt Market [wearing my jacket] with Maria Shell, quilt artist and newly-published author with her first book, Improv Patchwork: Dynamic Quilts made with Line and Shape. We met in the Houston airport waiting for the Super Shuttle. We both knew immediately where the other was going (wink, wink). You can usually tell someone's a quilter by the clothes they're wearing. (My ikat jacket was a dead give-away.) We struck up a conversation in the shuttle van and in no time found ourselves at the hotel.
Me with Maria Shell and my autographed copy of
her new book, "Improv Patchwork."
Make yourself an artwear jacket. Patchwork... appliqué... kantha stitching... boro with beautiful threads... whatever techniques and materials satisfy your current afflatus (creative impulse). It will start a conversation and you might make a new friend.

Saturday, November 4, 2017

Primitive Stars, ikat and slow stitiching a new jacket

Primitive Stars, ikat jacket (back view).
A jacket—particularly one with a minimal number of seams and pattern pieces—presents a vacant canvas for creative stitching, surface design, and experimenting with patchwork. For fiber artists and garment makers, what better reason is there for pulling out favorite fabrics, threads and treasured scraps and making one?

For my two previous jackets (see this blog post and the photo collage in this post), I used yarn-dyed wovens. These textiles are from Diamond Textiles [don't be fooled by the thinner, copycats] and I am still captivated by the rich, textured designs and the way the threads and stitches present themselves on these fabrics.

My recent jacket finish—just in time for Fall Quilt Market, I might add—combines one of Diamond Textiles' ikats, the blue-grey colorway from the Primitive Stars collection, and a few scraps of yarn-dyed and commercial print fabrics.

Three layers
As with most of my quilted wearables, there are three layers:
  • an outside fashion fabric (pieced or wholecloth),
  • a middle layer (typically flannel or muslin), 
  • a lining fabric, 
... that are stitched—or "quilted"—to hold the layers together. I learned this garment construction method from the Queen of Folk Art, and prolific maker of coats and jackets, Rachel Clark. This jacket has both machine and hand quilting. Here is an in-progress photo of the front right. The "white" fabric you see extending out from the edge of the fashion fabric is the middle layer of the "quilt sandwich."
Jacket front (in progress). The individual jacket pieces are
stitched and quilted and then the jacket is assembled. 
Machine quilting
The photo below is the jacket's outside showing the combination of a straight and decorative machine stitches. This process was manual and random. Sometimes I'd watch the color change in the variegated thread [40wt. from YLI] and switch to the decorative stitch to highlight the new color.
Machine quilting with straight and decorative stitches.
I do not mark the lines for quilting (who's got the time?? not I!). An advantage of using a yarn-dyed fabric is that the pattern or "print" is woven into the fabric and it's on grain. You can use the fabric's "print" as a guide for machine quilting with the walking foot.
Machine quilting (lining side).
When the season turns from summer to fall, think about sewing a jacket to wear in the cooler weather. The Houston convention center for Quilt Market was cool and a few evenings were windy and chilly once the sun went down. I was glad I had a jacket—especially one with a pocket!
Jacket front
Here is the follow-up blog post with close-ups of the hand stitching and other jacket details. Because people ask, here is the materials list for this jacket:

:: Yarn-dyed Primitive Stars blue-greyfabric [Diamond Textiles]
:: Multi-colored ikat [Diamond Textiles]
:: Fabrics from Great Wall collection [Midwest Textiles]
:: hand stitching with 12 wt. cotton Spaghetti and Fruitti thread [WonderFil Threads]
:: 40 wt. cotton variegated thread for machine stitching [YLI Threads]
:: cotton fabric for center layer
:: jacket pattern: "Raggy Jacket" by Four Corners Designs
Related Posts Plugin for WordPress, Blogger...