Showing posts with label knit fabrics. Show all posts

Saturday, October 7, 2023

Cold Front = long sleeves or jackets?

We awoke to mid 50-degree temperatures this morning. The cold front came through overnight and the upcoming week is predicted to be in the mid-60s to mid-70s. Although I welcome the crisp, cooler Fall weather, I have two short sleeve Bristol knit tops cut out and ready to sew!

Bristol Top with short sleeve version cut out.

Short sleeve pattern hack

I've made the Bristol Top several times. It looks different with every fabric print and it's fun to mix and match fabrics for color blocking. The pattern pieces lend themselves to several fabric combinations—yoke, sleeves, cuffs, bottom flap. 

On a re-make in 2022, I did a pattern hack—to make a short sleeve version. This weekend, I wanted to fine tune the sleeve by shorting the length and making the opening slightly larger to allow for more movement.

Short sleeves cut out and ready to sew.

The original sewing plan

I got an itch to do some garment sewing last month. My original plan for a new Bristol was:

  • to use up knit fabric remnants from my stash,
  • add to my short sleeve knit top wardrobe (I have mostly long sleeve knit tops),
  • fine tune the short sleeve pattern piece from the previous pattern hack.

The sleeve pattern was modified. I had all the pieces cut out for two short sleeve versions... ready to sew. 

         Now the darned cold front has moved through...

Another fabric combination for a new Bristol Top.

Throwing caution to the wind, I say, "Too bad on the weather forecast!" I'm sticking with the original plan and will take a jacket along. 

Plus, you can't always trust the weather forecast, now can you???


Sunday, May 7, 2023

Creative braiding: upcycling T-shirts and knit fabric scraps

This month's Slow Fashion Challenge as well as other recycling and sustainability initiatives has made me acutely aware of opportunities and techniques for upcycling and repurposing textiles. Selvedge magazine recently offered a virtual workshop given by Studio Brieditis and Evans. The workshop was about upcycling T-shirts using braiding techniques. If you've ever braided hair, you can do this!

Braided strings of knit fabrics and recycled T-shirts.

For the workshop, I used a few old T-shirts as well as cut-offs and scraps from previous knit garment projects to try out a few braiding techniques—using 3 strands and 4 strands. 

Experimentation is critical to discovering which sequence of the knit fabric strings create interesting color combinations. The magical part of creating patterns in the resulting “textile” is when the braids are arranged side-by-side. 

Three-strand braid.

This screen shot from the virtual workshop shows examples of patterns that can be created.

Screen shot from Selvedge virtual workshop on creative braiding.

Check out the other creative upcycled items the team at Studio Brieditis and Evans have created at the ReRagRug blog. You might think twice about donating old T-shirts or disposing of fabric scraps once you see the possibilities for giving them a second life. 


Sunday, April 2, 2023

Another Bristol knit top: Make Nine project #4

Can you have too much of a good thing? In the case of the Bristol Top pattern paired with Art Gallery knits... I think not.

The  Bristol Top with cotton knits from Art Gallery Fabrics.
My Make Nine 2023 Wild Card prompt.

When you're faced with the comment, "wear something green in honor of St. Patrick's Day," you quickly rummage through your closet to see what you have. Hmmm... not much. However, the luck of the Irish must have been in the air as I found two AGF knits on an "end of the bolt" sale. The prints were from two different collections, but with Art Gallery's fabrics, you can mix across collections and still come up with a pot of gold at the end of any garment sewing rainbow.

Make Nine 2023: the Wild Card prompt

This Bristol is fulfilling one of my Wild Card prompts for Make Nine 2023. This is my second Bristol this year and the sixth make from this pattern. See all previous versions in this blog post

Bristol Top #6. Pattern from The Sewing Workshop.

My Make Nine 2023 tracker has been updated.

Wild Card prompt on the Make Nine 2023 tracker.

Four projects completed this year with five more to go.

Make Nine 2023 tracker, April 1, 2023


Sunday, March 12, 2023

Remaking the Bristol Top—third Make Nine finish for 2023

I love a good re-make! One of my Make Nine 2023 prompts is "Make it Again" and I've used the Bristol Top pattern [from The Sewing Workshop] to make my fifth version of this knit top.

The Bristol Top: Make Nine 2023 Make it Again prompt.

For Bristol #5, I used two knits from Art Gallery Fabrics—a solid and a print. The Bristol has several options for mixing and matching fabric prints and/or solids—yoke, cuffs, bottom bands, collar band. This version has a contrasting yoke.

Imparting happiness with hand stitching

The Bristol pattern instructions call for top stitching at the seam where the yoke meets the bodice. Influenced by a recent presentation on Bojagi by Youngmin Lee, I decided to hand stitch this with a variegated cotton sashiko thread in a similar color palette. The hand stitching of bojagi is not only a design element, says Youngmin, but a way to impart wishes for happiness into the piece and to the recipient or wearer. With that in mind, my plan is to topstitch wishes of happiness into this new Bristol top. 

Bristol Top with a cotton sashiko thread for hand stitching.


The many benefits of Re-makes

The last time I made the Bristol, I made two at once! One has long sleeves (as the pattern indicates) and the other is a pattern hack for a short sleeve version.

Long sleeve and short sleeve versions of the Bristol Top.

Shortly after these two, I was thinking about zero waste so I made another long sleeve Bristol with leftover knit fabrics from other garments. 

Bristol Top made with leftover fabrics from other knit garments.

The first Bristol was a Make Nine project in 2020

My first Bristol Top, 2020.

Reasons I like re-makes?

  • The more you make, the quicker and easier they go!
  • The pattern is already fitted and modified to your body and style. It's one less BIG step in the garment-making process.
  • You have your notes about the pattern to resolve the quirky/confusing parts, clarify any instructions, and the tips and shortcuts you've discovered along the way. (Yes, write these things right on the pattern pieces or the instruction sheets!)
  • Different fabrics/colors/prints make every version different. (Besides, you don't wear all of them at the same time anyway, right?)
  • Reusing a pattern is a wise investment in money, resources and time.
  • If it feels good, do it again!

Completed Bristol top #5.

This is my third Make Nine finish for 2023. Full steam ahead!


Sunday, March 29, 2020

Social distancing Make Nine finish: the Bristol Top

Are you weathering the COVID-19 storm? As quilters, sewers, knitters and makers, we know the power of stitching and its ability to soothe the soul and ease a worried mind. During this time of social distancing, I have been making charity quilts and checking off items on my Make Nine 2020 list. The Bristol Top is one of my Make Nine finishes.
Me in my new Bristol Top [The Sewing Workshop pattern] made with knits from Art Gallery Fabrics.
I'm standing in front of a work-in-progress, The Farmer's Wife sampler quilt.

The Bristol Top
In a garment sewing workshop I took a few years ago, I saw several people making and wearing the Bristol. It looked great on everyone! I initially passed up this pattern because I didn't see its potential. However, upon seeing how it fit on the body and what others did with color blocking, mini stripes and pattern hacks, I wanted to try it.

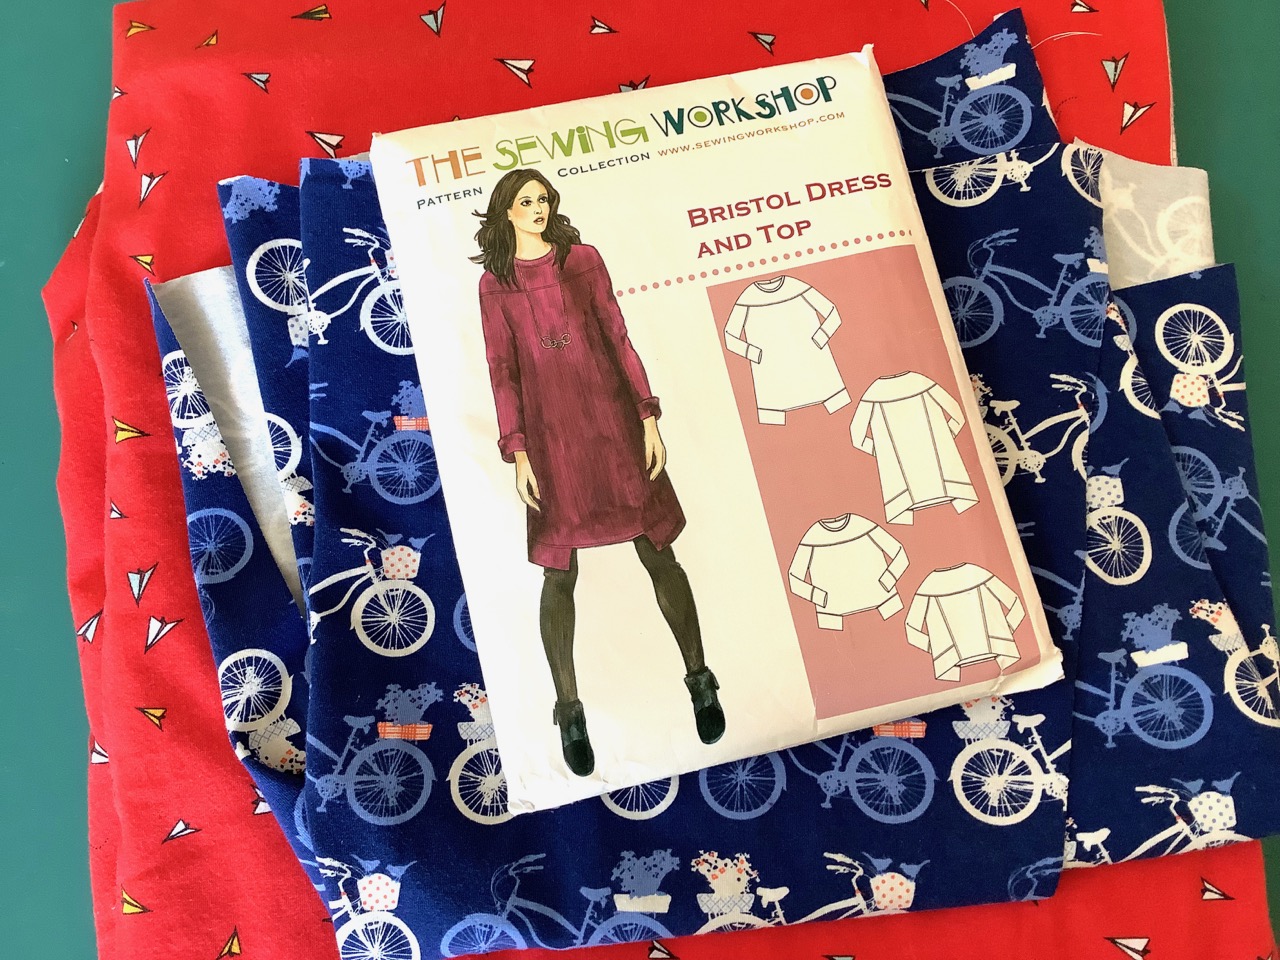
Bristol Dress and Top pattern from The Sewing Workshop.

This top makes up so much cuter than its line drawing schematic on the pattern package lead me to believe. This pattern paired with knits from Art Gallery Fabrics is very comfortable to wear.

Contrasting fabric for the yoke.

Pattern details
The fun details for the Bristol—the cuffs, the lower band, front and back yokes and a back panel—are part of its eight pattern pieces. All these have color blocking potential! The construction for the Bristol is straightforward. In fact, the printed instructions are only one side of a single sheet of newsprint.

Cutting out the pattern pieces.

I didn't have quite enough of this yellow knit [from Art Gallery Fabrics] for the entire top, so this situation pushed me to find a coordinating print—which I used for the yoke and neckband.

The sleeve cuffs were an easy, styling detail. They can be worn turned up or down. If you have a directional print, you'll want to pay attention to how the cuffs are attached to the sleeve (if that matters to you).

Cuffs for the Bristol Top.

The diagonal seam lines in the back would make for a slimming effect if the sides and back panels were made with contrasting fabrics. I'm looking forward to trying Bristol with other fabric combinations... and I might try a pattern hack and make it with short sleeves.

Back view of my Bristol Top.

Behind me in the photo above is my Farmer's Wife sampler quilt. It's another WIP [work in  progress] I am working on during this world-wide quarantine.

I hope you have taken up your needles, threads and fabrics to help get through this worrisome time as well. If you need patterns or supplies, contact YLQS [your local quilt shop]! Many shops have on-line shopping, respond to emails and social media requests, offer curb-side pick-up and they still need our support to get through this trying time.

(To my blog stalker: I hope you are well and accomplishing many of your quilting projects.)


Sunday, February 23, 2020

Making quilts with knit fabrics

Can you make a quilt with knit fabrics? With thoughtful consideration for tools and process, it is definitely achievable! Here's what I learned from this experiment.
Choose a stretch, knit, jersey or ball point needle for sewing with knit fabrics.

What to do with knit fabric scraps?
I love scrappy quilts! I also embrace the challenge of working with scraps—for bags, charity quilts, pouches, wall pieces and bed quilts. I had several small samples of Art Gallery knit fabrics [95% cotton, 5% spandex] that were languishing in the scrap box. The pieces were not large enough for a garment (without extensive patchwork, color blocking and searching for an appropriate coordinating fabric), so another solution was needed.

Knit patchwork quilt top.

While visiting with Jan and Andrea, shopkeepers at Bumbletees Fabrics, the possibility of successfully making a quilt with knit fabrics was planted in my mind. They showed me a quilted throw made with a beautiful Art Gallery floral knit [Floral Glow Twilit from the Autumn Vibes collection]. The throw was free-motion quilted on a long arm using Cuddle fabric for the backing. This throw has a major snuggle factor!

Quilted knit throw

So, with knit scraps in hand, I embarked on another kitty quilt to experiment with quiltmaking with knits. (The kitties love it when I do fabric experiments.)

Choosing tools and materials appropriate for sewing and quilting knits
Needles: I've learned from past projects that using a sewing machine needle made for knit fabrics—ballpoint, stretch, jersey, knit—is imperative. 
Thread: I used an Aurifil 50 wt cotton for piecing and WonderFil Tutti [50 wt. variegated cotton] on the top and DecoBob [80 wt. poly] in the bobbin for quilting.
Stitch selection: I used the lightning bolt stitch #17 on my Janome for piecing. This stitch accommodates the stretch of the knit fabrics without popping the stitching when the fabric stretches.

WonderFil DecoBob 80wt for bobbin, Tutti variegated on top.
Use a needle designed for knit fabrics.

Cotton Batting: I was able to zigzag stitch batting scraps together to get the size needed.

Piecing batting scraps with a 3-step zigzag stitch.

Backing fabric: Cotton flannel was used for the backing.
Basting: I pin basted the quilt sandwich. Because the knit fabric wanted to roll at the edges, I found that pin basting very close to the edge was very helpful. I think spray basting would be a good basting solution as well.

Pin basting very close to the edge to minimize fabric curling.

Free motion quilting on knits 
The next conundrum would be the free-motion quilting on a "stretchy" fabric. Even with the presser foot raised to the highest position, the open-toe free-motion [hopping] foot dragged in places and caused pleats.

Pleats and tucks caused by the presser foot during quilting.

The next foot I tried was the free-motion [cupped] zigzag cording foot (below center). This foot dragged on the knit top more than the open-toe foot. Hmmmm....

Left: open-toe free-motion foot. Center: zigzag free-motion foot. Right: convertible free-motion foot.

The successful foot for free-motion quilting across the knit fabrics was the convertible free-motion foot (above right). It does not hop when quilting. The presser foot height was set so the foot just hovered over the quilt top without dragging on the fabric. (Be sure the presser foot is down/engaged when adjusting height so you can see how close the foot is to the fabric.)

Close-up of quilting and scrappy binding.

Binding: regular (woven) quilting cotton was used for the scrappy binding which was attached by machine with a blind hem stitch.

Shrinkage: After washing, only the cotton binding showed signs of shrinkage. The quilted knit fabrics looked the the same before and after washing the finished quilt.

Finished quilt: 28" x 24"

The flannel backing is an all-over cat print.

Flannel cat print backing.

Kitty Approved!

Stan Leigh approves!

This was a good experiment. Now I have notes and experience for future quilted projects that include knit fabrics. Give knit quilts a try! Just think through the process and it won't be as difficult as you might presume.

Sunday, February 2, 2020

Odette top in Lugu and Plaid knits: a Make Nine finish

Hello to February and my first Make Nine 2020 finish! This is the Odette Top made with Lugu and Mad Plaid cotton knits from Art Gallery Fabrics.
Lugu & Plaid Odette knit top. Odette and Ivy pattern from The Sewing Workshop.
Cotton knit prints [Lugu and Mad Plaid collections] from Art Gallery Fabrics.

Fabric purchasing factors
These two cotton knits were purchased together [Barb's Sewing Center] with the thought of using them in a color block garment. I liked both of these collections from Art Gallery independently when each was released. But it wasn't until I saw the bolts side by side at the fabric shop that I realized I liked them together as well.

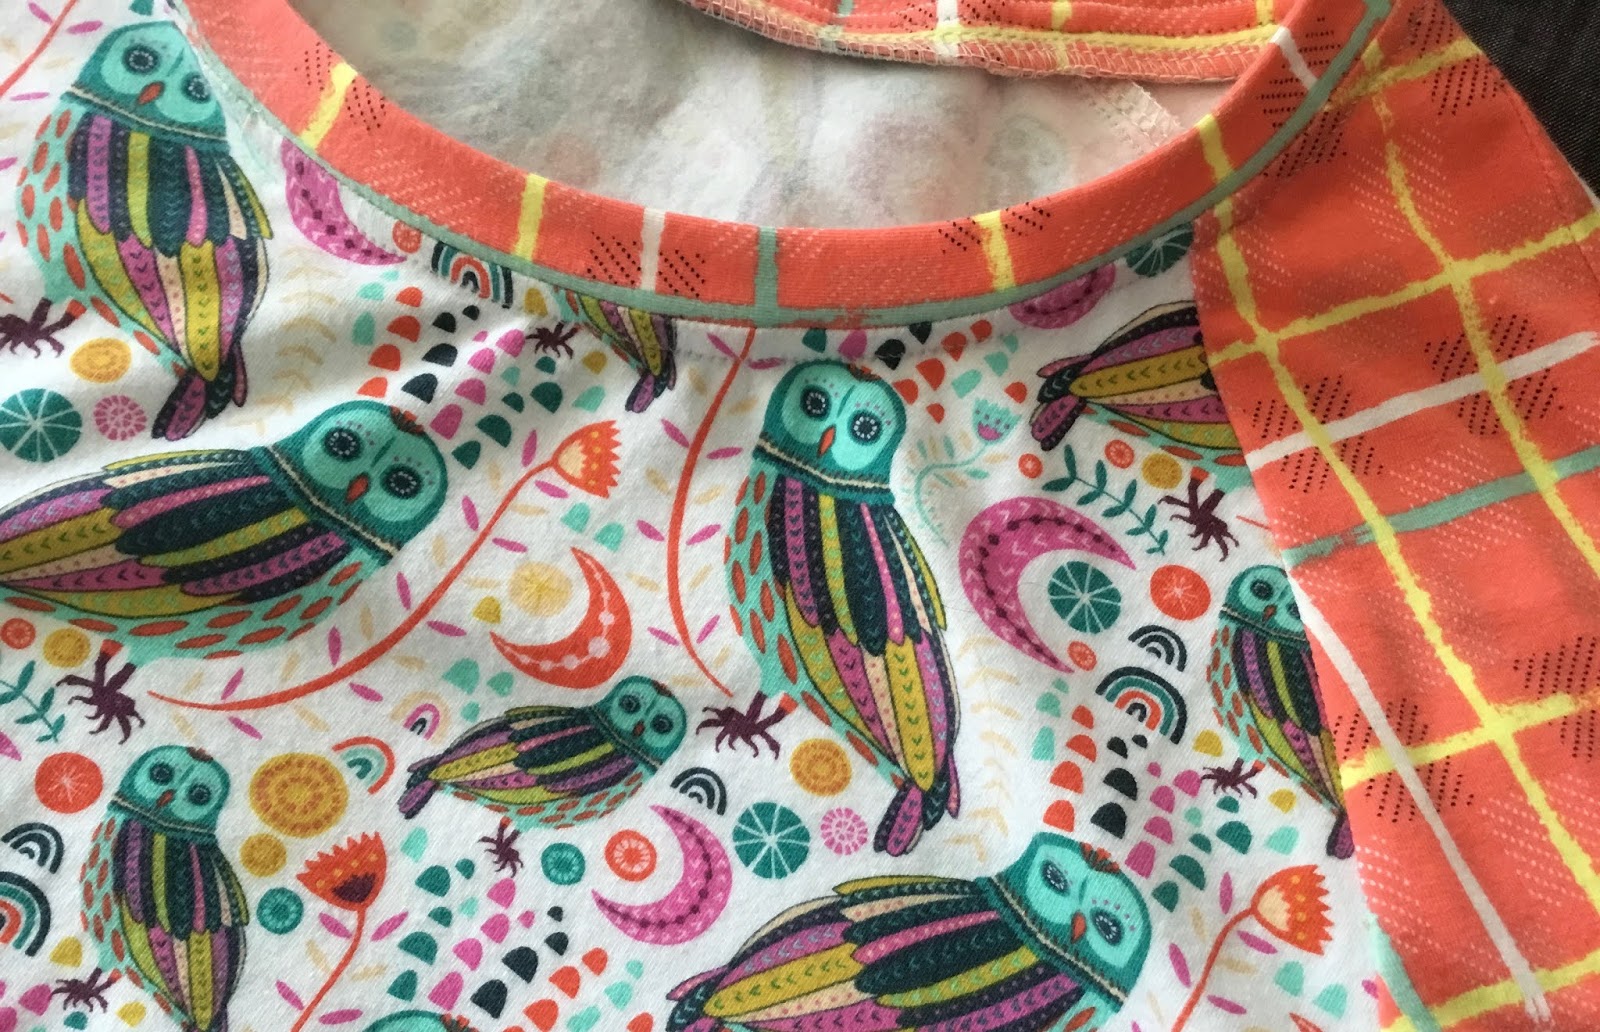
There is an interesting contrast between the geometric plaid print [Electric Watermelon Plaid (gotta love the name)] and the hand drawn, whimsical owls by fabric designer, Jessica Swift. The color palettes harmonize—maybe with a syncopated beat. The Odette & Ivy Top pattern is a go-to pattern of mine, and the winter weather prompted a top with long sleeves.

Electric Watermelon Plaid and Sova Sunshine (owls) knits [Art Gallery Fabrics].
Pattern: Odette & Ivy Tops [from The Sewing Workshop].

My Make Nine journal indicates I started this project on January 19, 2020 with the pattern layout and fabric cutting. The top was completed on February 1. 

Odette Top: front, back.

Working with a Plaid
I was careful to position and match the plaids for both sleeves. The pattern piece layout wasn't as "fabric efficient" as it would be with a solid or all-over print, but it was well worth the extra time and slightly more fabric waste. [I'm sure I'll use the scraps in future projects.]

Matching the plaids.

I waited choosing the fabric for the neckband until the top was fully assembled. I decided on the plaid but was concerned about the alignment of the stripes on the narrow neckband. 

After attaching the neckband, I realized the turquoise stripe in the plaid abutted the Lugu fabric. It was not what I originally intended but after sewing, it looked like a faux piping detail. Happy accident!

A turquoise stripe at the neckband edge looks like a faux piping.

This top coordinates nicely with my Valencia pants in a charcoal Art Gallery denim fabric (a 2019 Make Nine project). Love it when things come together!

Lugu top coordinates with charcoal Valencia pants.

And, the asymmetrical peplum is in just the right position to access the patch pocket in my pants.

Wearing my new Lugu Odette top with the Valencia pants.

It's Groundhog Day
I understand groundhog Punxsutawney Phil saw his shadow today, prognosticating an early Spring this year. Winter or Spring, I predict I'll keep on keepin' on with my Make Nine projects. And if, as in the Groundhog Day movie, the day gets into a continuous loop, at least it will be a loop of finishes!

I'd be OK with that, too. How 'bout you?


Sunday, March 3, 2019

The Odette Top: it's all about the raglan sleeve DARTS!

Generally speaking, I don't much care for raglan sleeve tops—for myself. I have narrow, slopey shoulders, so with a set-in sleeve, there is definition where the shoulder meets the arm, and the silhouette is more tailored. A style I like.

Then I met Odette—a knit top pattern from The Sewing Workshop.
Odette and Ivy Tops pattern from The Sewing Workshop. Note the dart in the raglan sleeve.

I've made the Siena Top (The Sewing Workshop pattern), so I'm 'comfortably' familiar with the sizing, fit and wearing ease of the tops from this pattern company. With a piece of knit fabric from Art Gallery Fabrics [Willow Blooms Spices from the Spices Fusion collection] already pre-washed and longing to be sewn, I decided to give Odette—a top with raglan sleeves—a go.
Odette Top (front).
My Odette Experience
Odette in M (medium) was just as accommodating as my experience with Siena. No mods needed! Yes, believe it! Ms. gorilla arms didn't even have to lengthen the sleeves!
Odette Top (front) showing front peplum.
Making this top could not have been easier. And the best part? The shoulder darts in the sleeves! For someone that doesn't care for raglan style sleeves... the darts made the fit and shaping feel like it was a set-in sleeve.

Edge finishing
One of the things I really like about The Sewing Workshop patterns is that the instructions include when to finish the seams and edges. You don't have to think about it—the pattern tells you when in the process to do this step.
Serged edges in contrasting [red] thread.
My inside detailing for this top is the red thread used to finish the seam allowances and hems. A nice contrast to the black print with the pink floral accents. [And for full disclosure... the red thread was already in the machine.]
Finishing and serging the edges with contrasting thread.
Serged hem finish in contrasting thread.

I <3 this top! The raglan sleeve has other potential design options—like using contrasting fabrics for the sleeves and the bodice. And a short sleeve version would be great for warmer weather.

I highly recommend this pattern. Give it a try. I've changed my mind about raglan sleeves because of the sleeve darts in this pattern! Thank you, Linda Lee and The Sewing Workshop for caring about and adding the details.

Monday, December 31, 2018

2018 year-end review

Sometimes you feel time gets away from you and you didn't accomplish nearly what you wanted. Looking back through my photos of 2018, I found I accomplished quite a lot—much more than I thought... or remembered. Although I know I have numerous WIPs [work-in-progress]—note: I'm not calling them UFOs, unfinished objects—I'm pleased to say I had quite a few good finishes in 2018!

My 2018 finishes: garments and quilts.
Top Row (left to right):

Middle Row:
  • Long-sleeve knit tops: I made two this year with knits from Art Gallery Fabrics.
  • This is my intro photo for the September Textile Love program. I met a lot of fabulous and talented textile artists through this participation on Instagram.
  • Cuddle Quilts: I made 3 for the Choo Choo Quilters community service project. This one is an improv quilt. I also quilted one for a fellow member.
Bottom Row:
  • Patchwork T-shirt: Tried patchwork using knit fabrics. Much fun!
  • Siena Shirt: I've made two tops from this pattern from The Sewing Workshop. Also two pairs of the Valencia pants with a pattern hack of adding lined patch pockets.
  • 9 Lives top: another great pattern from The Sewing Workshop and and a fast make. I've made two tops from this pattern. Fabric shown here is a navy pintuck from Diamond Textiles with a batik collar from Majestic Batiks.
I hope your 2018 was productive and you enjoyed every stitch!

Monday, May 28, 2018

Crazy patchwork with knits? Yes, it's possible!

With an upcoming three-day holiday weekend, I promised myself a longer, continuous, dedicated, hands-on chunk of time with my craft. Starting early in the day yesterday (by forgoing computer work), my mind was fresh. My studio space was flooded with natural light and I was excited to be working with fabric at the sewing machine again.
Knit fabric trimmings after cutting out the back pattern piece for a knit top.
A pile of knit fabric scraps greeted me on the cutting table. After cutting out the back for a knit top a few weeks ago, there wasn't enough fabric to cut out a front. I had considered a color block design, but didn't have fabrics that appealed to me. This is where the project initially stalled.

Crazy Patchwork with knits?
With a fresh eye and inspired by slow fashion, Me Made May, and the zero-waste movement, I decided to try crazy patchwork—with knits... nothing ventured, nothing gained, right? The knit fabric is from Art Gallery Fabrics and has a directional stripe design. If I pieced it randomly, the stripes would go in various directions. Hmmm... this could be interesting!

The scraps were pressed (using spray sizing) and edges cut straight with a ruler and rotary cutter to make the patchwork process easier. I started assembling peices—crazy patch style.
Knit patchwork using a crazy patch assembly method.
There was no intentional matching of the stripes. I just needed to fit the pieces together in the most efficient way to get a piece of fabric large enough to cut out the front bodice piece.
Patchwork bodice front.
There wasn't enough fabric scraps for one sleeve—let alone two. A contrasting fabric (also from another garment) was introduced to the mix.
A contrasting fabric was used for the sleeves.
With all the pattern pieces cut out, contruction began. 
Garment pieces ready for construction.
I love this top! 
  • The random angles of the stripe pattern give it a lot of interest. 
  • The piecing of the knit fabric scraps was not difficult. 
  • As with any patchwork pieces with bias (or stretchy) edges, spray sizing is a good solution.
  • I was able to get another top out of this piece of fabric.
  • I like the zero-waste concept and using up scraps.
  • I have something totally unique and fun to wear.

Patchwork with knit fabrics is possible!
Garment sewing is on the rise
Garment sewing for the home sewer is coming back in vogue. Quilt shops and independent sewing centers are expanding their fashion fabric offerings (including knits!) and are offering beginning sewing and garment sewing classes. So,Zo has a list of indie pattern companies that are offering discounts in conjunction with Me Made May 2018 Challenge.

If you are a quiltmaker, you already have many skills that will apply to garment sewing! I hadn't considered quilting techniques such as "crazy patch" or random piecing for use with *stretchy* knit fabrics, but it worked! Start with a fresh eye and an open mind and you'll be surprised what comes off your sewing machine.
Related Posts Plugin for WordPress, Blogger...