Showing posts with label Make Nine 2021. Show all posts

Tuesday, December 28, 2021

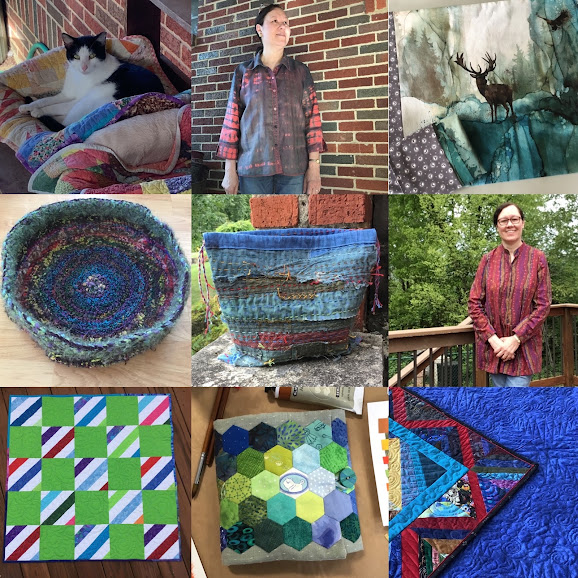
Make Nine 2021 photo recap

One never knows what a year will bring. After taking the Make Nine Challenge for three years, it's interesting to see where the focus was each year and what got completed. My Make Nine 2021 had a more diverse mix than my 2020 projects with five quilts, only two garments, pillow cases, a yarn project, a needle book and a boro stitched bag. (In comparison, 2020 had 5 wearables; 2019 had 10 wearables.) Here is a photo summary of 2021.

Completed projects for Make Nine 2021.
Top row: Crumbs kitty quilt; Upcycled and repurposed linen top; Easy & Fun pillowcases.
Middle: Crochet Yarn cat bed; Mindful stitching drawstring bag; tried a New sewing pattern.
Bottom: Charity quilts; Wild Card needle book; UFO quilt.

Make Nine 2021 worksheet

This year, I remembered to include completion dates on the worksheet. In reviewing the completion dates, I think the year shows to be balanced: January, March, April, June, July, August, October, December. I also realize that the more complex projects will span several months. A diversity of easy/quick makes and more involved projects offers a nice variety of tasks available at any given time.

Here is the worksheet of prompts that corresponds to the 2021 Make Nine photos (above). 
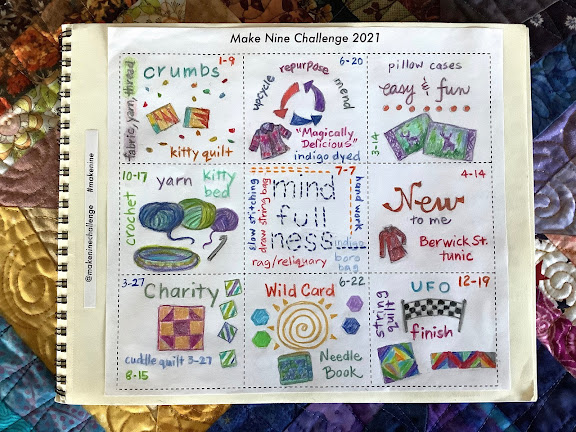
Make Nine 2021 completed worksheet.


Stories and processes

The details and the processes for my Make Nine 2021 projects can be found in these blog posts:

  • Crumbs: The year started off with a kitty quilt made with fabric crumbs and patchwork bits. (completed January 9)
  • Upcycle/Repurpose/Mend: my upcycled porcupine shibori linen shirt was dyed in a Shakerag workshop with Doug Bolous. It was a serendipitous project. (completed June 20)
  • Fast and Easy: pillowcases were made for the camper using two fabric panels and a glow-in-the-dark pillow cuff. (completed March 14)
  • Yarn: I crocheted a cat bed from leftover yarns. Unfortunately, the kitties didn't care for it and don't use it. (completed October 17)
  • Mindfulness: Another serendipitous project from the Doug Bolous workshop was a reliquary or rag assignment. An overdyed rag was boro stitched and transformed into a drawstring bag. (completed July 7)
  • New to Me: I made the Berwick St. Tunic with a lovely red fabric print from M&S Textiles Australia. This has become a favorite shirt of mine. (completed April 14)
  • Charity: I finished three cuddle quilts to support my guild's community service project. (completed March 27 and August 15)
  • Wild Card: EPP hexagons made during 2020 lockdown were made into a new needle book. I use the book quite often now that I am enjoying handwork. It takes up little space in the overnight bag. (completed June 22)
  • UFO Finish: The year-end project was a scrappy string quilt that spanned two centuries. Finished at last! (completed December 19)

For comparison, my 2020 Make Nine accomplishments included 4 garments, a knit shawl, pillow cases, a knit dish towel, a kantha zipper pouch and 12 charity kitty quilts. In 2019, I completed the Challenge (with substitutions) and made 10 wearables, a zipper pouch and pillowcases. 

The 2020 recap is in this post. The 2019 recap is at the bottom of this post.

Planning for next year

I do intend to participate in Make Nine again next year.

  • Again I'll list "general prompts" on my worksheet rather than identifying specific projects. This allows for flexibility as unexpected projects present themselves through the year. 
  • My sketchbook has a loose Wish List of things that could fulfill a few of the prompts. I'll add notes as ideas arise. 
  • Dating each project's completion is a good documentation practice I plan to continue.

Make Nine 2021 is a wrap! I'm looking forward to a creative and fruitful new Make Nine in 2022.


Wednesday, December 22, 2021

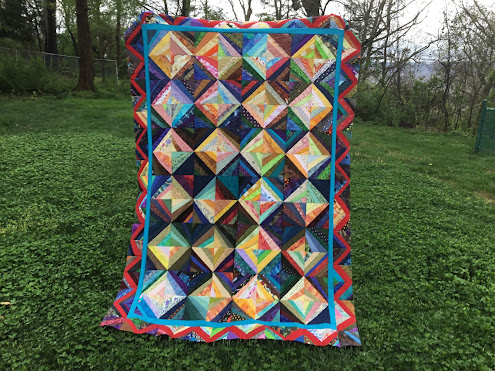
My last Make Nine finish for 2021: A string quilt UFO

This quilt spans two centuries.
It incorporates fabrics and quilt blocks from four decades—the 1990s, 2000s, '10s and '20s.
It's a string scrap quilt and my last finish for Make Nine 2021, the UFO project.

Scrappy string quilt. Make Nine 2021.

"She had a deep scrap basket."

This string quilt top was finished in April of this year, 2021. The blocks are a combination of left-over blocks from a 1990s quilt, demo blocks from a quilt guild program in 2017, and the remaining blocks are a stash buster with fabrics spanning four decades—including this one. This is what they mean when they say, "she had a deep scrap basket."

String quilt top completed in April 2021.


Free-motion quilting on a domestic sewing machine

With a recent sewing machine upgrade—to a Janome M7—this was a perfect project in which to "kick the tires" and put the machine through its paces. The 13.5" bed made maneuvering the quilt sandwich a breeze. This project prompted me to clear off the card table to the left of my machine and the drawing board at the back of the machine so I had plenty of space to rest the quilt and build a quilting nest.

Machine quilting on my domestic sewing machine.


Scrap quilts are so forgiving! 

You can hide a lot of flaws when quilting a scrap quilt. The variety of fabric prints and colors will camoflauge any wobbly quilting and inconsistencies. At my whim, I did free-motion swirly/loopy designs in the "light" diamonds... and zig-zags and straight line motifs in the "dark" diamonds. All different designs or a "variety on a theme." The different motifs tested the capabilities of the machine and the operator (me).

A sampling of free-motion quilting patterns appear in the blocks.

I practiced rulerwork and ditch quilting on each side of the narrow inside border. I like the ruler foot that comes with the M7.

Rulerwork and ditch quilting the inside border.

The faux piped binding was comprised of a newly-purchased DecoStitch Elements from Art Gallery Fabrics and a Canvas blender from Northcott. The binding was attached completely by machine.

Faux piped binding. Applied all by machine.

I decided to add a meandering doodle in the narrow border. This was a last minute decision, but thought the border was too wide to go without any quilting.

Faux piped binding and free-motion doodle in the inside border.

I took my time sewing on the binding (taking 3 hours) but I got that bobbin thread close to the ditch on the back.

Stitching line for the binding (shown from the back).

I used the royal blue 108" Canvas wide backing [Northcott] for the backing fabric. The the texture from the free-motion quilting patterns shows quite nicely on this tonal wide back.

Free-motion quilting seen from the back of the quilt. 


Quilt Stats

Cotton and poly threads used for free-motion machine quilting.

Here are the quilt stats for the string quilt:

  • top threads: 50 wt, 40 wt. variegated cotton threads [by Wonderfil Threads, Superior Thread, YLI]
  • 50 wt 2-ply cotton thread [Aurifil] for the rulerwork ditch quilting
  • bobbin thread: Glide trilobal poly thread [by Fil-Tec]
  • 19.5 hours free-motion quilting and rulerwork
  • 3 hours to attach the faux piped binding completely by machine
  • finished December 19, 2021
  • finished size: 59" x 83"


All Together Now

It's about time these orphan quilt blocks found their way to a finished quilt! They're All Together Now.

"All Together Now" finished size 59" x 83"

And all 9 of my Make Nine 2021 projects are complete!

Make Nine 2021 worksheet.


Sunday, October 17, 2021

A failed Make Nine yarn project

I've had a basket of yarn butterflies, swatches and leftover yarn balls for several years. So, for my Make Nine "Yarn" project, I thought I would empty the basket, repurpose the leftovers and make something useful. How about crocheting a kitty bed for our pack of tuxedo kitties? 

Crocheted cat bed.


The plan for using and mixing the yarns

How to use this diversity of yarn weights, colors, fiber content and textures? If I held multiple strands together, it would equate to a bulky weight yarn. I would make sure I had one on-going yarn strand when a new yarn strand was attached. This would quickly use up many of these odds and ends.

A bulky yarn would also lend itself to a quick project. My size J crochet hook could accommodate multiple strands. And the various yarn textures and colors would merge and blur together to create a colorful, mosaic-like composition. 

Crocheting with multiple yarn stands together.

Starting at the center with a pairing of a boucle and a novelty yarn, the improvisational crochet process began. The miscellaneous little yarn balls began to disappear into the spiral base of the new kitty bed. I'm not sure that the increases (stitches) were equally spaced, but the bottom of the bed was fairly symmetrical and seemed to lay flat—the goal. The textured yarns disguised any inconsistencies. 

Crochet in the round.

Once the center was an ample size for a couple of cats (no measuring here), the next step was figuring out a way to build up the sides. The kitties like to feel protected and cozy in a nest-like structure. With a little trial and error and some strategic decreases, the sides began to take form. 

Finished crocheted cat bed.

Now, this kitty bed is not like the stuffed, store-bought ones that we put the quilts in. The yarn made it warm, but the bed is not very fluffy. I put it beside the other beds and no kitty went into it. 

Kitties in the store-bought beds.

I proceeded to make a quilted "mattress" from an old T-shirt to possibly entice its usage.

Cut from an old, worn T-shirt.

A "mattress" for the new cat bed.

Cat bed with cotton knit mattress.

Still not appealing to the kitties! Even Stan Leigh was sleeping beside the new bed... and dangerously close to falling off the chair!

Stan Leigh sleeping beside the bed... nearly falling off the chair.

A Make Nine Fail

The tuxedo kitties would rather pile up in twos in the other beds than to use this one. I'm not sure if they don't like the synthetic fibers in some of the yarns, if the bed is not cushy enough, or if it's too foreign to them...  no one wants to sit in it. ???  Any ideas? 

Stan Leigh is not interested in the new bed.

I'm happy the yarn leftovers were reduced, and were upcycled rather than thrown away. I enjoyed the crochet process, but the end result was not a functional cat bed nor satisfactory to the kitties.

Nonetheless, the effort was made... and I'm checking off this prompt on my Make Nine list.


Saturday, July 10, 2021

Boro-inspired drawstring bag: reliquary or rag?

One of the projects we worked on in Doug Baulos's book arts workshop, Retracing Nature: Folio, Book, Installation, revolved around the concepts of "reliquary" vs "rag." Either can evoke a sense of reverence, preciousness, history, culture, a passage of time... and other emotions.

Scraps of fabrics, patched and stitched to a base cloth and indigo dyed.


Project: Rag

This is the beginning of my "rag" project. Inspired by boro, patching, the act of using precious small pieces of fabric, mending, preserving and renewing, I began to create my piece. Scraps and trimmings from other projects were patched (machine appliquéd) onto a base fabric. 

Elevating the Rag

The patchwork "rag" was then dyed in an indigo vat. Different fabrics took the indigo dye in varying degrees of color and value. Once the overdyed patchwork was dry, I began to hand stitch with cotton sashiko threads. 

Fabric patches overdyed in indigo.


There was no predetermined plan or design for the stitching or color placement—just the mindfulness of running the needle and thread through the fabric layers. Adding to the texture, the knots were left on the "right side"—the "raggy" side. A new thread was started wherever the previous length ran out. 

Running stitches with cotton sashiko threads.

The running stitches both strengthened the patches and added color to the piece. Cross stitches were added to hold down the random, loose or unruly bits.

Cross stitches hold down unruly and frayed edges.


The metamorphosis to a functional object

My hand stitched rag needed to become something functional... something useful... so it would be frequently touched, held and admired. The flat rag metamorphosed into a three-dimensional small bag (approximately 9.5" x 8" x 2"). The boxed bottom was hand stitched and the tabs were left on the outside.

Boro-inspired drawstring bag.

The bag's inside is smooth and beautiful... with colored rows of stitching on a background of sky blue indigo.

The bag's inside with rows of colorful stitching.

Keeping with the suppleness of the hand-stitched piece, I did not use a zipper or other mechanical or machine-made closure. I think the simple drawstring closure is appropriate.

Boro-inspired drawstring bag.

Reliquary or Rag?

I have not yet decided what to keep in this bag: small balls of yarn, a travel project, handwork? For now, it is holding the memory of an enriching workshop experience with Doug Baulos, memories of new friends with whom I shared that experience, thoughts of the previous projects from which the patches came, and the relaxation and mindfulness that came with the creation and stitching processes. 

That is enough. It is full.

Is it reliquary or rag? 

The answer lies in the eyes and heart of the beholder.

------
After writing this blog post about the story of this piece, I realized that it certainly identifies with my Make Nine 2021 "Mindfulness" prompt. I'm counting it as my 7th Make Nine finish.


Thursday, July 8, 2021

Stitching Success Tracker: the halfway mark

It's July... and the first half of 2021 is in the past. A look at the Stitching Success Tracker indicates a lot of hand stitching, patchwork, English paper piecing and spurts of garment making happened from January through June. So, I'm pleased with my stitching accomplishments for these first six months of this year!

Stitching Success Tracker from January - June, 2021.


Completed Make Nine projects

Moving from an activity-based report to a project-based report, my Make Nine 2021 is also fairing well with 6 successfully completed projects.

Make Nine 2021 progress through June.

The first half of 2021 has been filled with fabric, thread, stitching and textile creativity.

Just how I like it.


Saturday, July 3, 2021

The making of a needle book, a Make Nine finish

When I rediscovered English paper piecing [EPP] during the 2020 pandemic lockdown, I was following several EPPers and EPP stitch-alongs on Instagram. In addition to the brilliant tips and cleverly pieced projects found in the posts, I was in awe of the beautiful, handmade needle books I discovered. A needle book was swiftly added to my Project Wish List. 

Assembling a needle book.

My needle book: gathering materials and requirements

Excited to get a new needle book underway, I decided to source materials from the stash for this project. Gathering various fabric bits—a pile of 3/4" hexies from an EPP online sew-along, fabric samples and leftovers, orphan EPP pieces and a package of felted wool charms—I set off to cobble together my own needle book.

The size of the needle book was dictated by the pieced patchwork of 3/4" hexies. This piece was used on the book's outside cover.

A patchwork piece of 3/4 inch hexagons for the outside cover of the book.
The Husky dog is from Best in Show from PBS Fabrics.

Book pages were made from favorite fabric scraps from several fabric companies I rep. Wool charm squares were attached to book pages for various needles and pins it would store.

Wool felt hand stitched on yarn-dyed woven from Diamond Textiles.

Wool felt charm squares for needles and pins.
Squares are hand stitched on cotton fabrics.

Orphan diamonds from an unfinished EPP block were perfect for pockets.

Appliqued pockets from orphan EPP star. Fabrics from M&S Textiles.

A zippered pocket was a handy addition.

Zippered pocket on the inside cover. The floral is a digital print from P&B Textiles.
The background fabric is from a collection from Art Gallery Fabrics.

Book assembly and finishing

I debated whether to nest the folios into a single signature vs. to bind them separately. Referencing a bookbinding book, I decided to sew them to the cover as individual signatures.

Sewing the signatures to the cover.

The other dilemma was how to close the book. I tried several configurations and options but the final outcome was a button-and-loop closure.  A seam in the cover was unpicked to insert a knit fabric button loop.

A knit fabric button loop created the closure.

With the signatures stitched to the cover, it was time to appliqué the hexagon patchwork to the outside cover. Sewing on the button was the final detail.

Appliqueing the hexagon patchwork to the cover.

A Make Nine 2021 finish

Here is the finished needle book. Another Make Nine 2021 finish! This project fulfills my "Wild Card" prompt. I like the fussy-cut image of the Husky on the front as it reminds me of our Yuki dog... making it extra special.

Completed Needle Book. A #makenine project for 2021.

Great progress, I must admit. Six of my 2021 Make Nine projects are now complete. I'm feeling pretty confident that the goal will be met this year.

Make Nine 2021 progress grid. 6 of 9 projects complete.


Sunday, June 27, 2021

The Porcupine Shirt: an indigo and shibori Make Nine finish

An impetuous buy at a resale shop met with the indigo dye pot in a recent workshop with Doug Baulos. And it was Magically Delicious!

A Liz Claiborne linen shirt itajime shibori dyed in indigo.


Retracing Nature: Folio, Book, Installation
workshop

Over-dying in an indigo dye bath was not a scheduled activity in a recent book arts workshop [at Shakerag Workshops] called, "Retracing Nature: Folio, Book, Installation" with artist Doug Pierre Baulos. But at the urging of fellow workshop participants, Doug generously offered to show us a method for preparing an indigo dye vat with natural indigo plant material. And so the story of my "Porcupine Shirt" began... 

Preparing the indigo dye vat with Doug Baulos and
Brooke Cassady (right), workshop assistant.

Thinking I might use a garment as a pattern or basis for my installation piece in the workshop, I made a serendipitous trip to the local resale shop to see what I could find. There it was... a salmony-pinkish Liz Claiborne 100% linen shirt. $3. I had no idea what was about to happen.

Clamping the collar. 

With little time to prep for the freshly bloomed dye bath, I opted for the itajime shibori method—using clothespins to create the clamped resist. (It was quicker than stitching and gathering to create a restist.) Below is the shirt, folded and clamped with clothespins.

Kinda looks like a porcupine, don't ya think? Thus the name: Porcupine Shirt.

The porcupine is ready for dyeing.
(Notice its shadow.)

I waited to put my piece into the dye pot since it was larger than the pieces from other participants. Doug carefully lowered the shirt into the indigo dye pot to minimize the introduction of any air or bubbles into the dye bath.

Carefully lowering the shirt into the indigo dye.

The removal was just as careful.

Removal from the dye pot.

Here is the little indigo porcupine drying in the sun. We did dye the critter an additional time to strengthen the color.

Drying in the sun.

After removing clothespins, the unfolding revealed this... 

Thank you to Becky Edwards for taking the video.

Tah-da! Here it is. Like magic.

The unwrapped shirt.


Drying on the line.

Auditioning buttons

The original white buttons on the shirt were removed before dyeing the shirt. Even though they had the Liz Claiborne brand imprinted on them, it seemed that white buttons were not appropriate for this makeover.

Auditioning buttons.

I chose to gradate the colors: a bright salmon button at the top, two iridescent red-violet ones for the center, and two indigo at the bottom.

Shibori dyed shirt with an assortment of colored buttons.

Shibori dyed shirt back and sleeve detail.

My new Porcupine Shirt satisfies the Make Nine 2021 "Upcycle/Repurpose/Mend" prompt. 

Make Nine: June 2021


If you ever have an opportunity to take a workshop with Doug, know that Doug is up for an unscripted adventure or detour wherever inspiration may lead. So be prepared to Seize the Day—or seize the opportunity to throw something into the dye pot. 

It's always magically delicious!

Thank you Doug!

Related Posts Plugin for WordPress, Blogger...