Showing posts with label time-span quilt. Show all posts

Wednesday, December 22, 2021

My last Make Nine finish for 2021: A string quilt UFO

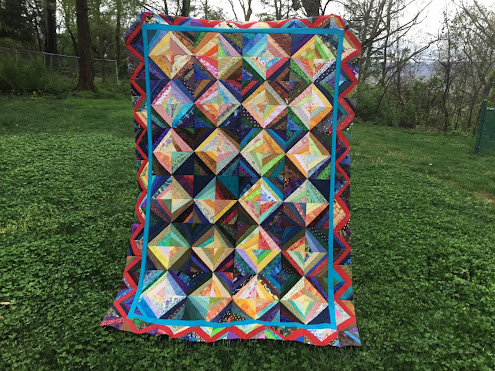
This quilt spans two centuries.
It incorporates fabrics and quilt blocks from four decades—the 1990s, 2000s, '10s and '20s.
It's a string scrap quilt and my last finish for Make Nine 2021, the UFO project.

Scrappy string quilt. Make Nine 2021.

"She had a deep scrap basket."

This string quilt top was finished in April of this year, 2021. The blocks are a combination of left-over blocks from a 1990s quilt, demo blocks from a quilt guild program in 2017, and the remaining blocks are a stash buster with fabrics spanning four decades—including this one. This is what they mean when they say, "she had a deep scrap basket."

String quilt top completed in April 2021.


Free-motion quilting on a domestic sewing machine

With a recent sewing machine upgrade—to a Janome M7—this was a perfect project in which to "kick the tires" and put the machine through its paces. The 13.5" bed made maneuvering the quilt sandwich a breeze. This project prompted me to clear off the card table to the left of my machine and the drawing board at the back of the machine so I had plenty of space to rest the quilt and build a quilting nest.

Machine quilting on my domestic sewing machine.


Scrap quilts are so forgiving! 

You can hide a lot of flaws when quilting a scrap quilt. The variety of fabric prints and colors will camoflauge any wobbly quilting and inconsistencies. At my whim, I did free-motion swirly/loopy designs in the "light" diamonds... and zig-zags and straight line motifs in the "dark" diamonds. All different designs or a "variety on a theme." The different motifs tested the capabilities of the machine and the operator (me).

A sampling of free-motion quilting patterns appear in the blocks.

I practiced rulerwork and ditch quilting on each side of the narrow inside border. I like the ruler foot that comes with the M7.

Rulerwork and ditch quilting the inside border.

The faux piped binding was comprised of a newly-purchased DecoStitch Elements from Art Gallery Fabrics and a Canvas blender from Northcott. The binding was attached completely by machine.

Faux piped binding. Applied all by machine.

I decided to add a meandering doodle in the narrow border. This was a last minute decision, but thought the border was too wide to go without any quilting.

Faux piped binding and free-motion doodle in the inside border.

I took my time sewing on the binding (taking 3 hours) but I got that bobbin thread close to the ditch on the back.

Stitching line for the binding (shown from the back).

I used the royal blue 108" Canvas wide backing [Northcott] for the backing fabric. The the texture from the free-motion quilting patterns shows quite nicely on this tonal wide back.

Free-motion quilting seen from the back of the quilt. 


Quilt Stats

Cotton and poly threads used for free-motion machine quilting.

Here are the quilt stats for the string quilt:

  • top threads: 50 wt, 40 wt. variegated cotton threads [by Wonderfil Threads, Superior Thread, YLI]
  • 50 wt 2-ply cotton thread [Aurifil] for the rulerwork ditch quilting
  • bobbin thread: Glide trilobal poly thread [by Fil-Tec]
  • 19.5 hours free-motion quilting and rulerwork
  • 3 hours to attach the faux piped binding completely by machine
  • finished December 19, 2021
  • finished size: 59" x 83"


All Together Now

It's about time these orphan quilt blocks found their way to a finished quilt! They're All Together Now.

"All Together Now" finished size 59" x 83"

And all 9 of my Make Nine 2021 projects are complete!

Make Nine 2021 worksheet.


Tuesday, January 31, 2017

Have you ever collaborated with Anonymous?

Using vintage textiles in new quilts.
About 10 years ago, I purchased a stack of unfinished vintage Dresden Plate rings online. Several full rings accompanied a handful of half and quarter rings and a few random blades. The fabrics were charming and the prints were cheerful vintage feedsack prints and other 1920s and 1930s small scale patterns. These Dresden rings were hand pieced.

Serendipity stepped in one day and they happened to be lying beside a stack of blocks that I made in a Marti Michell learning-to-work-with-templates workshop.

Hmmm.... they look pretty good together.

Hmmm.... could they play together in a quilt?

Let's see if this will work.

And so became this quilt, "Dresden meets Marti at Riverbend." This is another quilt I brought to the "Back to the Future" kick-off meeting at the Choo Choo Quilters guild. Here is the quilt hanging in the Georgia Quilt Show in 2010. 
"Dresden meets Marti at Riverbend"
2009, 45" x 48"
If you're familiar with Chattanooga's annual Riverbend Music Festival, you can envision the various music stages and concession tents that line the street paralleling the winding Tennessee River that runs through the city.

Although traditionally placed on a light background, my vintage Dresden pieces felt right at home on the darker, contemporary tonal fabrics.
Vintage Dresden fans stand out on these dark backgrounds.
The curved appliquéd Dresden rings nicely complement the angles and geometric shapes in the patchwork.
Free-motion machine quilting on my Dresden time-span quilt.
I took cues from the fabric prints for the free-motion machine quilting designs.
Free-motion quilting.
This quilt top was a bit like assembling a jigsaw puzzle that had pieces missing. Spacer blocks were used to fill in the areas between the appliqué and pieced blocks. The asymmetrical layout, however, lends itself to the festival theme.

The interplay of color and stitch connects the two sets of quilt blocks as well as the different generations of the quiltmakers. Who says you can't mix hand and machine piecing? And these blocks were from two different centuries!
Detail of "Dresden meets Marti at Riverbend" quilt.
This was a fun time-span quilt to make. Both the Dresden rings—hand pieced by an anonymous quilter—and my workshop quilt blocks found their way into a completed quilt. And I believe a finished quilt is always a good thing. For Ms. Anonymous and me, this might not otherwise have happened if we hadn't collaborated.

Have you ever collaborated with Anonymous?

Friday, January 27, 2017

A patriotic sampler from vintage quilt blocks

Red, white and blue sampler quilt made from vintage quilt blocks
and vintage patchwork fragments.
Do you collect vintage textiles? In the early 2000s, I was a frequent peruser of the "vintage quilt blocks" and "antique quilt blocks" categories on e-bay. Purchases of vintage pieces can be prompted by an interest in the fabric prints and their historical significance, a unique or favorite block design, a color palette, their purported age (caveat emptor/buyer beware), or purely an inexpensive price tag on a random lot that you are compelled to rescue.

This is my time-span patriotic sampler quilt. It came to be from two e-bay purchases—each an assortment of vintage patchwork fragments—with a price tag that was right for me. When the contents of these two independent purchases were sitting side-by-side, the red-white-and-blue color palette became so prevalent to my eye that I decided they could work together in a single quilt.
"Patriotic Sampler" time-span quilt using vintage and new fabrics.
Completed in 2006. Hand quilted. Finished size: 54" x 46"
This sampler is another quilt I showed at the Choo Choo Quilters guild meeting to kick off the "Back to the Future" theme of working with vintage textiles. These quilt blocks were not quilted, unlike the remnants used in the pinwheel quilt I talked about in this post.

In this vintage assortment, there was a nice variety in the size and motif of the quilt blocks. The four larger blocks include a churn dash, 8-pointed LeMoyne star, spiderweb block and the 8-pointed flower block made from the red plaid fabric. These larger blocks were spread across the top and surrounded by smaller 9-patches and strips of 4-patches. The "missing" point from the LeMoyne Star was quilted into the quilt.
LeMoyne Star and Churn Dash blocks.
The hexagon flower patch was hand appliqued onto a new reproduction fabric. The 4-patches and 9-patches were made with a variety of shirtings and small prints. The red-checked flower block was hand pieced (not appliqued) by the original maker.
Close-ups of the sampler quilt blcoks.
Spiderweb quilt block.
A single orphan 4-patch was turned on point and framed to give it more prominence. A new dark blue fabric frames the block. The frame is trimmed to the required size to fill the space.
A 4-patch on point was made into a square-in-a-square. 
More small prints... and stripes... add to the variety of the vintage prints. New, reproduction-style fabrics were used for the inner and outer borders as well as the backing fabric.
Stripes and small prints. The border fabrics are reproduction prints.
And this quilt is actually hand quilted—by me! Following guideposts in the patchwork, the quilting is simple.
Hand quilting.
The Baptist fan (quilting motif) was used in the border.
Hand quilting: Baptist fan motif.
The backing was a new fabric—a patriotic reproduction with George Washington—that tied in with the theme. The quilt was completed in 2006.
A George Washington patriotic fabric on the back of the quilt
ties in with the theme.

Sunday, January 22, 2017

Working with vintage textiles and fabric fragment finds

Rescued quilted pinwheel pieces.
Are you a rescuer of vintage textiles? Do you scrounge yard sales, e-bay listings and antique shops for old quilts, vintage linens and abandoned quilt blocks?

I am. I do.

I think many quilters and needleworkers understand and can identify with the time, effort, patience and love that went into the creation of those embroidered dresser scarves, tatted and crocheted doilies, cross-stitched pillowcases and tablecloths and the myriad vintage patchwork fragments that somehow get abandoned and forgotten but resurface in yard sales and estate auctions. We make a connection with these items and somehow, through these vintage textiles, make a connection with their [often anonymous] original makers. With that, some of us are moved to take those finds and fragments and upcycle them into new projects, giving them a new life and new purpose.

This year, the two quilt guilds I belong to, the Choo Choo Quilters and the Chattanooga Modern Quilt Guild, are partnering to bring vintage textile rescuer extraordinaire, Mary Kerr, to Chattanooga for a lecture and workshops for us. And the Choo Choo Quilters are devoting 2017 to rediscovering, renewing, and working with vintage patchwork pieces to upcycle them into new works.

In kicking off the Choo Choo Quilters' 2017 "Back to the Future" theme, I brought a few quilts I made over the years from rescued vintage textiles to the guild meeting. In upcoming blog posts, I'll share them with you. Here is the first one.
"Christmas Pinwheels" from salvaged quilt blocks.
This quilt was created from an e-bay purchase of five quilted pinwheels. One was too soiled and damaged to work into the new piece. The pinwheels were obviously cut out of an existing quilt—the batting was exposed, the fabric edges were ragged and unfinished. Some blocks had the triangle sashing attached on one or more sides. Likely, the original quilt from which these blocks came had a classic red and green color scheme. The green dye of the vintage fabrics, however, was unstable and fugitive.

I took the group of odd pieces and created a new workable layout, rotating and rearranging the pieces so the sawtooth sashing looked planned. New patchwork was added to repair and complete the quilt where needed. To simulate the faded green dye, I used a hand-dyed fabric for the patched pieces. Below, you can see the "new" green fabric beside the original.
Combining old with new fabrics to repair the pieces.
New fabric patches appliqued on or joined to the vintage quilted pieces.
Sometimes you must get creative with your patches to maintain the pattern in the patchwork. The arrow in the photo below shows a single triangle that consists of both vintage and new fabrics.
New fabric abuts vintage fabric in the pieced half-square triangle sashing.
To join the previously-quilted pieces, the batting was butted together and the raw fabric edges were turned under and blind stitched down to an adjacent piece.
Back of the quilt showing where pieces were joined.
In some areas, there was minimal seam allowance to turn under. You just have to make do with what is there. The new patchwork areas were hand quilted in effort to maintain consistency with the original. The binding was new and made with the hand-dyed fabric.
Back of quilt shows join.
"Christmas Pinwheels" time-span quilt.
This is what I consider a time-span quilt—a quilt or quilt top that was started in one era or generation and completed in another. A time-span quilt is often started by one person and finished by someone else.

This project was a labor of love and an exercise in problem solving—to create a usable, finished quilted piece from the salvaged blocks of a damaged quilt.

This quilt is not square.
It does not hang straight.
The triangles are not uniform in size or shape. But the red pinwheels and green sawtooth sashing spoke to me and I like to think I rescued them and created a second life for them.

The quilt has a character and charm that makes me smile when I look at it. And it comes out every year at Christmastime and cheerfully hangs on the wall through the holiday season. I'm glad I had an opportunity to share this quilt with my guild and here with you.

Friday, September 25, 2015

Piecing a double wedding ring quilt top from the past

Some stitching friends and I got together last weekend in Sewanee for a couple hours of Slow Stitching. One of the projects that came out of the UFO [unfinished object] pile was this lovely double wedding ring quilt top started by Claire's mother.
Unfinished double wedding ring quilt top.
We laid the bulk of the top across two tables to assess the progress. Except for a few pieces, the top is almost complete and Claire is determined to finish it. I love time-span quilts, don't you?
Assessing the next steps.
The rings are pieced by machine, but the muslin footballs and centers are all pieced by hand. This is not an easy pattern! Claire's mom was obviously quite a proficient piecer as the top lays very flat.
One ring needs to be removed and relocated to finish the top.
It appeared that all the necessary pieces were there in order to finish the top. One partial block had an extra "football" unit (above photo) that needed to be taken off to make the pieces fit together properly. Claire thinks this misplaced ring contributed a bit of frustration to the project and might have been the reason her mom set it aside and it didn't get finished. This will soon be remedied.
The misplaced football will go at the end of this row.
You can tell by the placement of the fabrics in the rings and intersections that the original quiltmaker had a definite color scheme in mind. Claire plans to keep the scalloped edge and has additional fabrics from her mom's fabric stash to use for binding. 
You can see the carefully executed color plan for this quilt.
Won't this two-generation double wedding ring be so charming when it's quilted and bound? What a heart-warming story it tells. I'll have to suggest to Claire to document the story on a label.

Thursday, November 7, 2013

Group collaboration—Part III

Brown Bag Journal
This post wraps up my thoughts and commentary on the recent Brown Bag Guild Challenge. (Here are links to Part I and Part II.)

Most of the time, quiltmaking is a solitary activity. Quilters work individually on their projects and show them to family members, to friends, at their guild meetings or to the recipient upon completion. There was a lot I learned and gained from working on a team project, or a Team Challenge such as this one, that I'll recap below.

But first, I must mention the other important component of the Brown Bag Challenge. A Quilt Journal—the conduit for communication and documentation—accompanied each bag through the journey. Most of the participants signed, dated and wrote entries in the journals as the bags progressed through each one's hands.
A Quilt Journal was included with each Brown Bag Challenge project.
As someone who enjoys knowing the creative thought process behind a piece of artwork, the content of the journal is valuable and important to me. So a heartfelt "Thank You" to those who took the time to write something. The journal preserves this documentation as well as the personal story of these quilts. Can you remember your initial vision for a project after 7 or more months have passed? I can't— not all the details and nuances, anyway.
Owners and participants pasted fabric swatches in the Journal.
In review, this Challenge was an extremely successful project. Each contributor:
  • garnered inspiration from the pieces they encountered in the bags,
  • capitalized on others' work, 
  • learned new techniques or revisited previous-learned techniques, 
  • stretched their design and problem-solving muscles, and
  • had their quiltmaking and block drafting skills sharpened. 
Each month brought new opportunities for collaboration—with new co-participants, totally different materials, and a brand new theme. (Kinda like a Project Runway team challenge... only with a lot less drama!) And most everyone said they enjoyed the Challenge and would be interested in doing future group projects like this.
My thoughts on the "team" concept:
As part of a team, you rely on your teammates and they rely on you. For this Team Challenge, everyone brought their talent, experience and point of view to each project. Even though an individual might not be able to contribute the same amount to each bag, collectively, the team did justice to every project. Everyone gets a turn at bat and makes the play according to what's on the field and what's on the scoreboard at that time. Sometimes you have to make a sacrifice to advance the runner... and that's OK. The guild built in extra time for when life throws a curve ball and schedules were hectic. And, the final outcome was grand!

TEAM = together, everyone achieves more.
    If you belong to a guild, I hope it offers a Challenge opportunity and you get involved. If you don't belong to one, find one in your area, get some friends together and make up your own challenge, or sign up to participate in a Challenge on-line or through one of the quilting publications.

    My next Challenge? ...working with the free-form blocks that were returned in my Brown Bag. Are they not fabulous?!?
    Contributions to my Monet-inspired Brown Bag Challenge.
    To see all the Brown Bag team efforts, visit the Choo Choo Quilters Challenge recap.

    Tuesday, November 5, 2013

    Group collaboration—Part II

    This is a continuation of the Choo Choo Quilters Brown Bag Challenge (read Part I here) and the contents from the fourth bag that I received. The theme and block design was well established but the fabrics were quite diverse—felted wool, batiks, flannels and cottons. The previous contributors established a bordered block design with a flower in the center of the block. 
    Flower blocks contributed by previous participants.
    A nice design element in some blocks was where parts of the focal image (a leaf, petal, stem) extended into the border—providing a sense of depth. My task for this bag was to find or design a pieced or appliquéd flower quilt block. The inspiration came from this display at a quilt show I attended during that time.
    Inspiration at a regional quilt show.
    My contribution included one appliqué block and one pieced block. I followed suit and one of my flowers had elements extending into the frame.
    My two flower blocks: appliqué (left) and pieced (right).
    Here are all the blocks Kim received at the final reveal.
    The final group of nature-inspired blocks.
    A revisit of techniques learned in a workshop with Nancy Crow was the impetus for my contribution to the fifth bag. With a request for a Gee's Bend style quilt, I abandoned the rotary ruler and did all free-hand rotary cutting—whoop, whoop!
    Contents from the last bag.
    Newly created strip sets were added to the bag, and I also re-configured blocks from previous contributors. This was very liberating and allowed (per the Challenge guidelines)! In reading the accompanying Brown Bag Journals, I was not the only participant to invoke this option.

    As the last contributor, you can get a better perspective of the project—you have more pieces to work with and can insure everything is unified and cohesive. The last contributor can fill in any holes and add final touches (like making a label), or crank out a few extra blocks to complete the top. If needed, she/he can reign in the renegade bits... unless they support the composition. I think this is the last person's responsibility... "turn off the lights and lock the door if you're the last one out," you might say.
    Final strip sets and blocks. 
    The other component of the Challenge was the Quilt Journal, which I will discuss in Part III of my ramblings. Stay tuned...

    To see what came out of all the Brown Bags, visit the Choo Choo Quilters Challenge recap.
    Related Posts Plugin for WordPress, Blogger...