Showing posts with label quilt binding. Show all posts

Sunday, May 31, 2026

What cotton thread is best for mending a quilt binding?
3-ply vs 2-ply

Quilt binding lives a hard life. 

What thread weight is best for mending a quilt binding?

This quilt, Strike Zone, is a case in point. Strike Zone was finished in 2010 and is frequently used—on the couch, in the recliner, around the shoulders. It’s a large lap-size, raw-edge appliqué, flannel quilt with a cotton backing and binding, and a cotton batting. It has a nice drape, is soft, snuggly, and well-loved.

Stitches are broken and the binding has pulled away from the body of the quilt.

As with Strike Zone, the binding edge of a quilt is the part that gets tucked under, tugged, folded, wrapped around cold feet (yes, with slippers still on), and gripped during every use. Unlike interior quilt seams, the binding endures more tension and wear. So, when I was notified that Strike Zone’s binding needed a little TLC, the thread choice was especially important for mending the areas that were breaking away from the body of the quilt. 


Understanding thread weight and ply 

In my recent Intro to Free-motion Quilting class, my students and I talk about thread weight and ply. Understanding what these terms mean is valuable when choosing threads for certain quilt-making tasks. For the task of mending a quilt binding, I’m focusing on 50 wt thread

  • Weight has to do with thread thickness. It’s calculated by determining the number of kilometers of [one ply of] a thread that is needed to equal 1 kilogram of weight. 50 kilometers, in this case of a 50 wt thread. 

In the thread weight numberingsystem, a higher number means a finer thread. In the range from 12 wt (quite thick/heavy) to 100 wt (very, very fine), 50 wt sits somewhere in the middle of the pack and is commonly used for piecing and quilting. 

Comparison of a 50 wt 2-ply cotton thread, a 50 wt 3-ply, and 40 wt 3-ply.

  • Ply refers to how many strands are twisted together to create the finished thread.
Illustration of “ply.” From Harmony Yarns.
In other words: 

  • 50 wt 2-ply = two fine strands twisted together 
  • 50 wt 3-ply = three fine strands twisted together

Even though both are labeled “50 wt,” the 3-ply version is typically rounder, stronger, slightly thicker, and more substantial.

A 3-ply 50 wt cotton thread from WonderFil Threads. 

Lesson learned

When deciding between 50 wt 3-ply cotton thread and 50 wt 2-ply cotton thread for quilt binding, the answer was much clearer during the mend than it was at the time the binding was initially attached. The answer for mending a binding was a resounding 50 wt 3-ply! I wish I would have chosen a 3-ply thread initially over the 2-ply that was used. (It was probably a color-match reason originally for using the 2-ply.) But I’ve now learned this lesson. 

Strike Zone’s label also needed mending.

Why 3-ply is a winner for quilt bindings 

A 3-ply cotton thread has a rounder, denser, and stronger structure that tolerates use and wear much better. Its structure is less likely to pop or snap under tension. Over time, 3-ply generally survives use and care of the quilt’s binding longer. A weak or overly delicate thread can fail long before the repaired binding fabric wears out again. 

For longer-lasting bindings, and fewer repairs, stronger thread is usually the smarter choice. Especially for: 

  • everyday quilts 
  • children’s quilts 
  • bed quilts 
  • frequently washed quilts 
  • donation or charity quilts 
  • utility quilts 

The 3-ply thread will definitely outlast the 2-ply on this quilt.


When to consider a 2-ply thread?

Even though 3-ply is preferable for the quilts I make these days, there are situations where 2-ply might be advantageous for certain projects. 

Three cotton threads (from left): 50 wt 2-ply, 50 wt 3-ply, 40 wt 3-ply.

Vintage or Antique Quilts. Older quilts can have worn or fragile cotton fabrics that no longer tolerate firm stitching. A softer 2-ply cotton thread can be more gentle, flexible, and reduce the risk of damaging or tearing weakened vintage fabrics. 

For antique quilts and delicate vintage textiles, preserving the textile is often more important than maximum strength and durability. 

Invisible Hand Stitching. If you’re repairing a quilt with tiny hand stitches—such as a vintage or heirloom quilt—and want the stitches nearly invisible, 2-ply can blend more easily into the cotton fabrics. A 2-ply cotton thread creates flatter stitches and has less surface visibility. It’s a bit more subtle and can provide a softer hand—but to the detriment of thread strength. 

Not for garment sewing! On a side note, I will not use a 50 wt, 2-ply cotton thread when sewing garments. Another lesson learned from a real life experience. Use a thread with a poly content—either a cotton covered poly core or an all-poly thread. (It will prevent the back seam of your pants from splitting!)


Final Thoughts 

For most cotton quilt bindings and repairs, a 50 wt 3-ply cotton thread is the safer, long-term choice because quilt edges endure constant stress and abrasion.

Strike Zone, a flannel, ragged edge appliqué quilt.

The best binding repairs don’t just hold the quilt together—they preserve the character, flexibility, and life of the quilt itself.


Tuesday, July 23, 2024

Piecing AGF 2.5” Edition binding strips on the bias to preserve the design

I prefer to piece together my binding strips on the bias. Piecing on the bias insures the seam allowances are distributed, the bulk is minimized, and the binding lies as flat as possible at the joins. 

“Stitched and Bound” [BIN 25411] design 
from Art Gallery Fabrics 2.5” Edition collection.

On this quilt that needed a new binding, I chose one of the Art Gallery Fabrics 2.5” Edition binding fabrics. The 2.5" Edition bindings have distinct designs—designs whose continuity I wanted to preserve at the joins. How do you line up the designs so they are continuous? A little prep and basting glue does the trick!

Prepping AGF 2.5" Edition binding strips so the design stays continuous.

Binding prep for bias piecing

This is how I prepped the binding strips so the fabric design would be continuous across the seams.

1. Fold the end of one of the binding strips on the 45-degree angle (wrong sides together). For this design, I positioned the fold so it was between the “Xs.” With an iron, press the fold to make a nice crease.

Fold one end at 45-degrees (bias).

2. Using Roxanne’s Glue-Baste-It, dab a few dots of the glue close to the fold. A little glue is all that is needed! The glue is tacky, and too much of it could seep through the fabric.

Place glue dots near the folded edge.
“A little dab will do ya.”

3. Position the glued strip on top of the other strip, lining up the pattern so it is continuous. With the iron, press the binding flat to dry the glue. (Your binding strips are now basted together.)

Position the two pieces so the design is continuous.

4. Open the pieces. The diagonal crease is now your sewing line. If necessary, you can draw a line on the fold with a white or graphite pencil to make it more visible for sewing.

Draw a pencil line on the sewing line.

5. Sew on the drawn line or slightly to one side to accommodate the ‘turn of cloth.’

Sew the bias seam.

6. With right sides up, press the newly joined binding flat. Trim the seam allowance to 1/4” and trim off the dog ears. Continue joining additional strips as needed to get the desired length of binding.

Trim, press and the binding is ready to attach.

The design is continuous, the join is nearly invisible, and the binding is ready to attach to the quilt.

The binding on this quilt’s front features the Xs and the back side has a string of dash marks. The extra effort was so worth it!

Completed binding using the “Stitched and Bound” [BIN 25411] design
from Art Gallery Fabrics 2.5” Edition collection.


Sunday, June 11, 2023

Building a stash of scrappy bindings

Sometimes you just want to feed fabric through the sewing machine... without having to do a whole lot of thinking. If you want to do mindless sewing but still feel productive, “scrappy bindings” is the answer!

Prepping a batch of double-fold bindings for charity quilts.

Here's how...

Pull from your stash:

  • those lengths of fabric left over from past projects, 
  • orphan 2.5" precut strips,
  • trimmings from other bindings—the piece that was cut off after making the join,
  • long, skinny trimmings from wide backings,
  • the yard cuts you bought as a "good buy" but didn't really have a plan for.

Cut the fabrics the width you use for bindings (I cut bindings at 2.5" for charity quilts). I also cut the ends of the strips at a 45-degree for a bias join.

Sort the strips by color, value, or print... or just mix them up for a truly scrappy binding.

Chain piece the fabric strips together at the 45-degree edge to make long, continuous lengths. 

Press the seam allowances (I press to one side since I've joined the strips on the bias) and then press the strips lengthwise (wrong sides together) for a double-fold binding.

One of my kitty quilts received a scrappy yellow binding.

It’s good to have a stash of bindings at-the-ready for kitty quilts, kid quilts, and charity quilts... or whatever project you have that calls for a scrappy edge. I have a batch of kitty quilts that I’m working on. These scrappy bindings will be put to good use in the not-too-distant future.


Sunday, May 21, 2023

A new binding on a vintage quilt, Make Nine finish #5

This vintage quilt has been in need of some "mending love" for quite a while. My Make Nine 2023 "Mend/Repurpose" prompt was just the thing to get this project into the queue. 

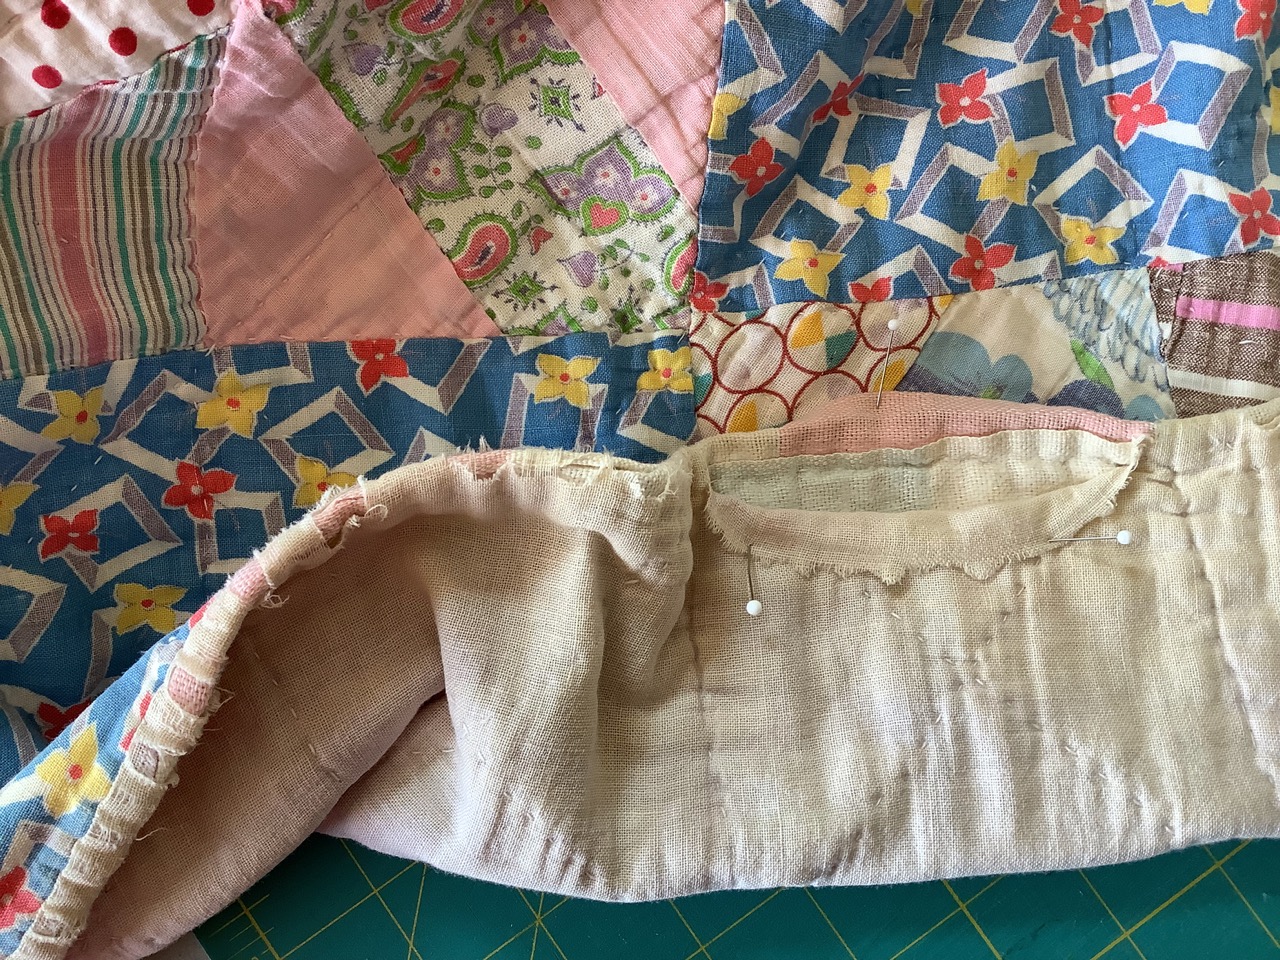
Vintage quilt with worn and frayed binding.


Analysis of the vintage quilt

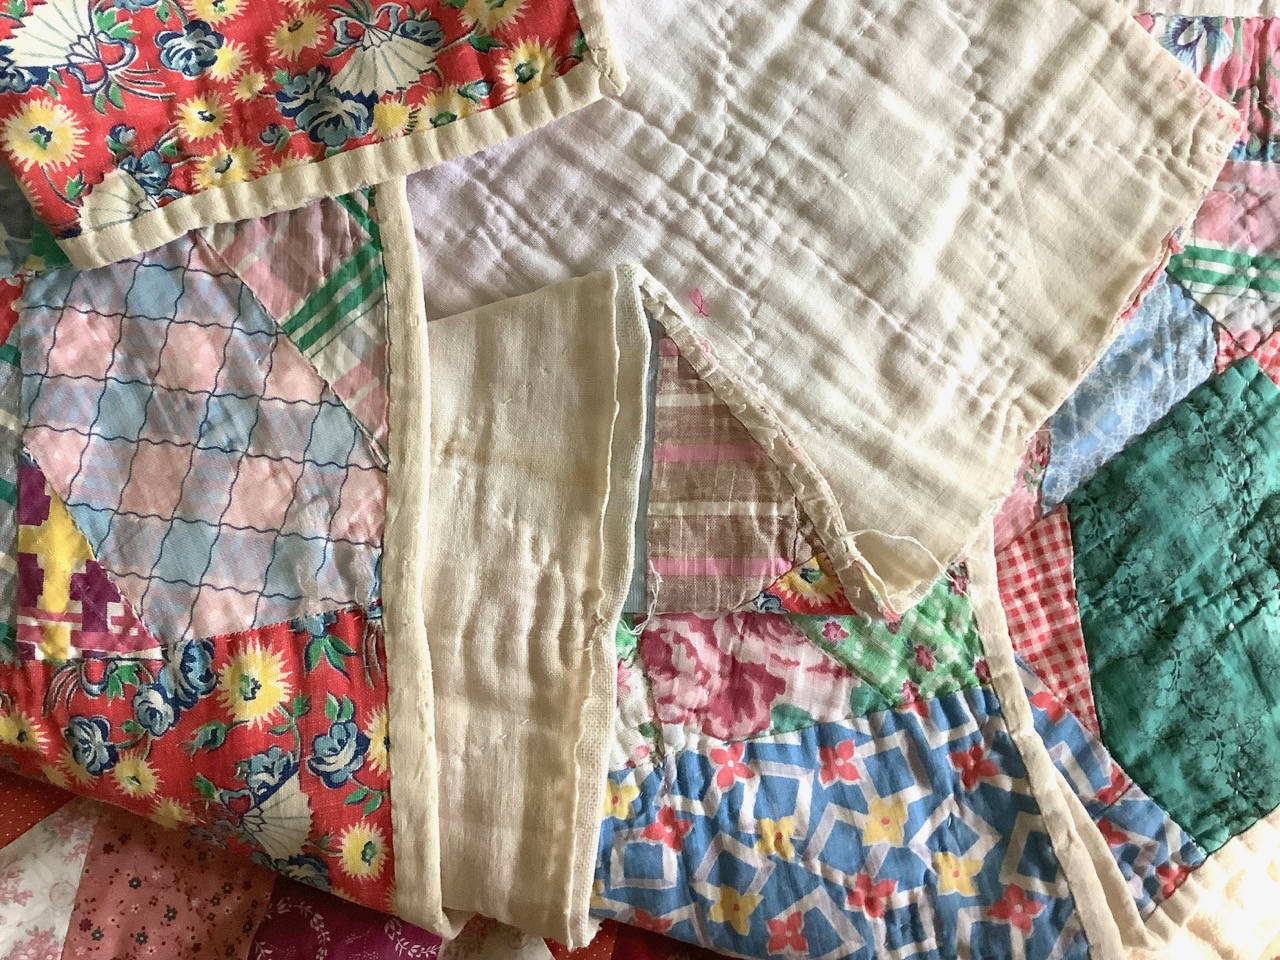
As was often done in the past on utility quilts, the backing fabric (feed sacks, in this case) was used as the binding instead of a separate strip of fabric attached to the edge. The backing fabric was brought around to the front of the quilt—wrapping around and enclosing the edges of the quilt—and then hand stitched to the front to secure. 

It appears there may have been multiple backings on this quilt.

The backing of this vintage quilt was pieced. The fabrics appeared to be feed sacks or flour sacks. The quilt was hand quilted.

Pieced quilt backing made from feed sacks or flour sacks.

There were a few worn places in the patchwork that needed mending. Here is a reproduction fabric that I used to simulate the print and colors of the vintage fabrics.

A worn out area in the patchwork and the replacement fabric.

A new binding 

I had several options for a binding fabric. It was difficult to match the white color of the original binding fabric, so I had to choose something that was "intentionally" different. I opted not to use a very contrasting color—like choosing a color from the patchwork—in order to keep with the feel of the original maker's color scheme. 

Binding fabric options.

I chose Decostitch 715, cafe latte (second from top) from Art Gallery Fabrics. Decostitch has a subtle print that looks like hand stitching and the color did not call attention to itself. 

Double fold fabric for the new binding.

In keeping with the original binding technique, the new binding was machine sewn to the back of the quilt and brought around to the front side for hand stitching. I didn't try to unpick or remove the old binding, but rather covered the frayed edges with a new fabric binding.

New binding machine stitched to the back of the quilt.

Here is a comparison of the newly bound corner and the worn binding at another corner.

Worn and frayed binding (right) and the new binding (left).

Another block with holes was covered with new fabric and then re-quilted by hand. I used a long staple 100% organic cotton thread (2 ply 50 wt.) from Scanfil for both machine and hand stitching the binding, and for hand appliquéing the patches and hand quilting where needed.

An appliquéd patch to cover a frayed area.

Here are the newly-bound edges and corners of this vintage quilt. 

Edges of the vintage quilt with a new binding.

This is officially a time-span quilt that spans the 20th and 21st centuries.

New binding on a vintage quilt.

Make Nine 2023 5th finish

This project fulfils my "Mend/Repurpose" prompt for Make Nine 2023. It's my fifth finish this year.

Make Nine 2023, Mend/Repurpose prompt.

Make Nine 2023 tracking, May 21, 2023.


Saturday, April 22, 2023

Earth Day: Mending a vintage quilt and collaborating with Anonymous

The theme for Earth Day 2023 is "Invest in our Planet." In our little space on the planet, my husband is tending our home garden and weeding the flower beds. My plan is to gather materials to mend the binding edge of this vintage quilt—a quilt that is on the bed and used all the time.

Frayed quilt binding on a vintage patchwork quilt that needs repair.

I realize that adding a new binding onto a vintage quilt will date it to the current year, but I think it's more important to care for and repair the things we have rather than discard them. Mending and repairing this quilt will be a "Collaboration with Anonymous." I like to think that the anonymous quiltmaker who made this quilt early in the last century would be pleased to know it is being used and cared for.

These are the potential fabric options I have for this mend. I'll be doing some auditioning to see what we—Anonymous and I—find most suitable.

Fabric options for a new binding on a vintage quilt.

 A Mend/Repurpose project is also one of my Make Nine prompts for this year.


Oh, and if you're interested in textiles, clothing, and sustainability, try the Sustainable Fashion Quiz on the Earth Day website.


Sunday, December 4, 2022

Precise mitered corners with water soluble sticky tape

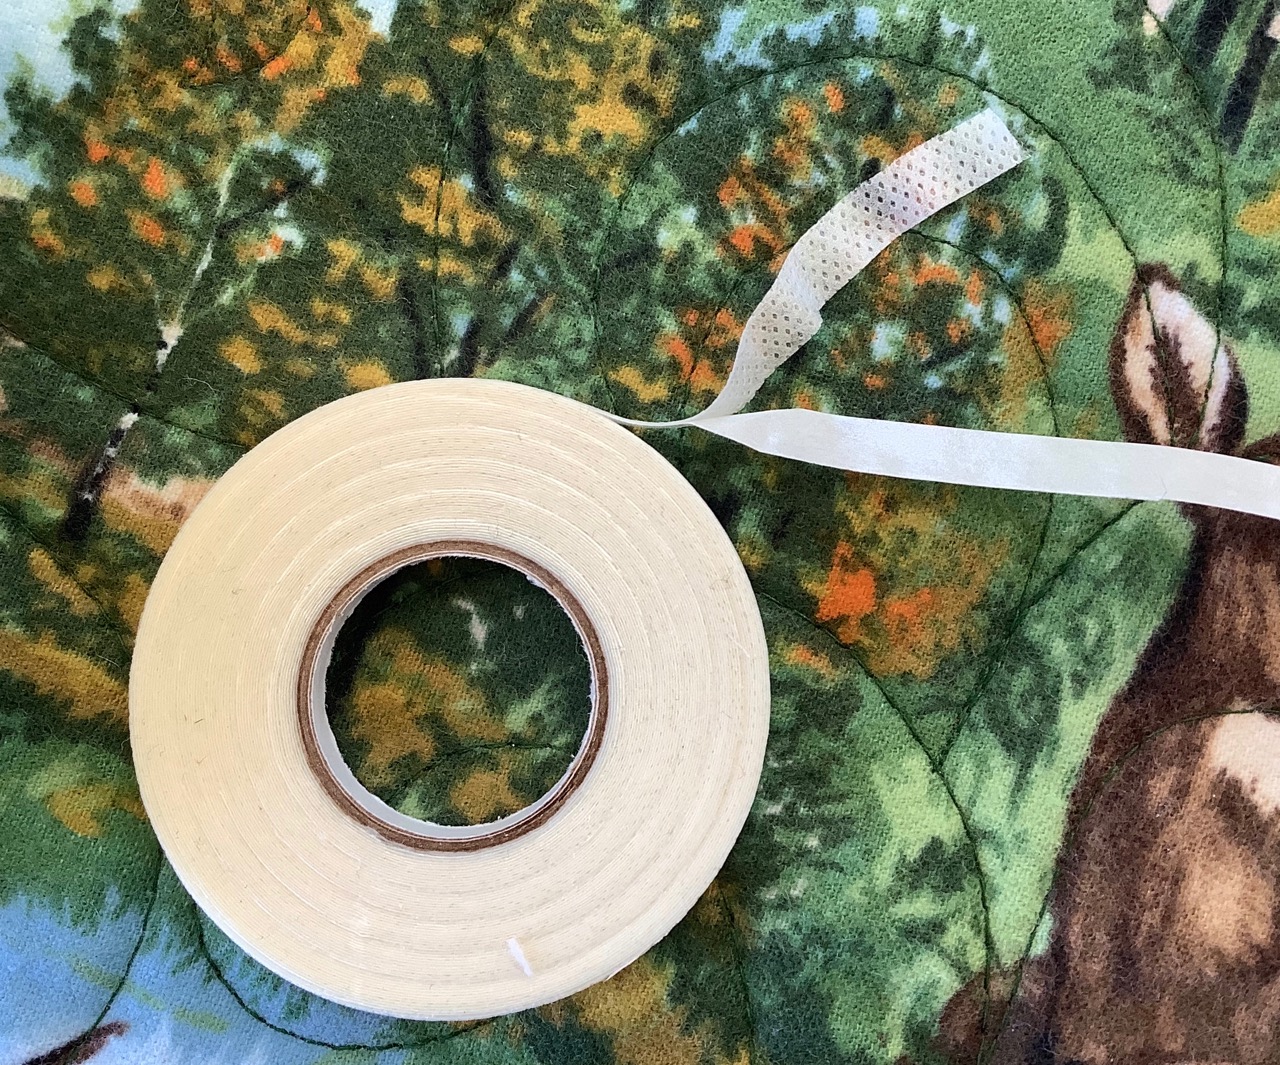
There’s a cool sewing notion that’s a grand slam for getting precise mitered corners on quilt bindings: 1/4", double-sided, water soluble, sticky tape. The shop owner at Chattanooga Sewing Machines recently introduced me to this ingenious product from RNK. I tested it on a charity quilt and here are my findings...

Mitered corners on quilt binding made easy with double-sided sticky tape.


Using sticky tape for mitered corners and quilt bindings

On nearly all my charity quilts, I stitch the bindings on by machine. Although this sticky tape could be used for holding the binding in place around the entire quilt, I used it specifically on the corners. I find that stitching down the corners—while keeping the miter in place—is the most challenging part on the machine. 

  • When do you pull out the pins (or remove clips) that hold the binding? 
  • How do you keep the miters in place after the pins are removed but before the needle sews them down? 
  • Do you use a stiletto or seam ripper to hold the miters while feeding the quilt under the presser foot? 
  • How many hands do I need to make this task easy and achievable? Perhaps an octopus could do this easily. 

Here's where the sticky tape comes in...

Double-sided sticky tape from RNK. 1/4" wide and water soluble.

I cut strips of sticky tape approximately two inches long. With the binding already attached to one side of the quilt, I placed one sticky strip on the cut edge of the quilt, starting at the corner. [Note the tape will be between the quilt sandwich and the binding.] 

Bringing the binding around the edge of the quilt sandwich to enclose the unfinished edge, press the binding onto the tape. The tape holds the binding in place. Do the same on the adjacent side to create the miter. The sticky tape holds down the binding on both sides of the corner and keeps the miter in place.

I still used pins to hold the binding down at the sides, between the corners.

Sticky tape holds down the binding and the miter before machine sewing.

Here is a close up of the sticky tape holding the binding in place before stitching. 

Close up of mitered corners before sewing.

Other uses for sticky tape

This tape comes in at least one other width. It could also be used for hand and machine stitching bindings, inserting zippers (garments, pouches, bags), embellishing with trims and ribbons, sewing hems, and with other tasks for which you wish you had another hand or two.

The tape is flexible and lightweight. It was easy to needle, and didn't make the binding or the quilt stiff.

Preparing more bindings.

So get yourself a roll of sticky tape and sail through attaching bindings and nailing those mitered corners!


Sunday, March 28, 2021

Make Nine finish: a charity quilt in baby steps over 5 years

Sometimes a simple project takes years to complete. Life frequently steps in to disrupt the best of plans. 

Make Nine finish: charity quilt.

Baby step 1: This is a charity quilt whose blocks were started in 2016. Hey! Only 5 years ago. 

Make Nine finish. Completed charity quilt. Finished size 38.5" x 38.5".

Baby step 2: After discovering the pile of strip blocks and thinking "this quilt top needs to be finished," the alternate plain blocks were added in February of 2020. (Almost 4 years later.)

String quilt blocks for charity quilt.

Quilt top completed February 2020.

Baby steps 3 and 4: The quilting was done during a virtual guild workshop in the summer of last year. Then the scrappy binding was made and pinned to the quilted top in September.

Scrappy binding attached on the back to be machine stitched from the front.

Baby step 5: And, yesterday, March 27 of 2021... the binding got sewn down! (5 years in the making.)

Scrappy binding attached all by machine. 

Machine binding with 100 wt. thread
The binding was attached all by machine. This time, I tried a small zigzag stitch (stitching from the front of the quilt), with 100 wt. Invisafil soft poly thread in the bobbin. Invisafil is a thread from WonderFil Threads. Try it! It worked beautifully.

Can you see the bobbin thread? By choosing a thread color that matches the backing fabric... the stitching is practically invisible! 

Detail of binding from the back side. 100 wt. Invisafil thread in the bobbin. 

So, it might have taken 5 years to make this quilt, but it's finished! I'm checking off that project on my Make Nine 2021 list.

Documenting via digital camera
Thanks to my photo library that time stamps the photos I take. And a pat on the back to me and my iPad for documenting various stages of my work. Sometimes photos are taken for color and composition auditioning, sometimes it's for remembering a layout, or in this case, the on-going documentation of my work processes. 

It's good to take notes via camera!


Sunday, March 26, 2017

Quilt bindings: Do you stitch the miters?

Do you stitch closed the miters on a quilt binding? 
Binding.

There's no way out of it...
(unless someone else does it for you).

Either you love attaching binding or you tolerate it because it means your quilt is almost finished.

Binding: cutting binding strips and attaching them was one of the topics in the "Viewpoints and Q-points" panel discussion at the February ChattMQG meeting. There are probably as many variations for making and attaching bindings as there are quilters:
:: single fold
:: French (double) fold
:: attaching by hand and machine
:: attaching all by machine
:: with piping
:: with a faux piping or flat piping (this technique has various names such as "Magic Binding" or "Reveal Binding," etc.)
:: fused binding

... not to mention the various methods for joining the beginning and ending binding tails as well as faced bindings and other edge-finishing techniques. Whew! Quite a smorgasbord.

One detail about bindings that I posed to the panel members as well as the audience was, "Do you stitch the miters closed at the corners?" In judged quilt shows, among the many things that judges may look at is the quilt's binding. Is it straight? Is it filled to the edge with the batting? And... are the miters stitched?

How did our foremothers do it? The miters on
the corners of this vintage quilt are stitched closed.
For me, I DO stitch the miters closed (tack them down, or sew together, if you will). However, since there was such an interesting reaction to this question, I decided to ask others in the quilting community and here's what I found.

Results from the Poll:
Not many ChattMQGuild members stitched the miters closed. The reasons cited include:
  • don't think it's necessary; 
  • hadn't really considered it; 
  • don't want to take the time.
My students who took Beginning Quiltmaking with me said they do stitch the miters. (It warms my heart that they were paying attention in my class.)

Certified quilt appraiser, Holly Anderson, stitches her miters closed. She cited the following reasons, "... [stitching the miters] does have a practical purpose. It holds the corners together better and keeps things from getting caught in the binding and pulling it loose." She added this helpful tip, "You can also correct some not-so-perfect cornering with the hand stitching."

Modern quilter, Carolyn Friedlander, stitches the miters closed only on the back side of the quilt in one of her online class. When asked about the front side, she replied, "I don't stitch up the miters on the front, but you're welcome to do that if you'd like."
The corners on this antique quilt
are stitched down but are not mitered.

Three fabric representatives who are quilters each responded differently:
  • I stitch the back miters.
  • Not very often [do I stitch the miters together].
  • Nope [I don't stitch the miters].

I then contacted Cathy Neri in Quilt City USA. She is a member of the Visitors Service Team at the Paducah Convention and Visitor's Bureau. The CVB has a rotating exhibit of wall quilts made by professional quilt artists from around the world. Cathy examined the quilts in the current exhibit and relayed the practises of the artists:
  • Jenny Raymond, "Shine Down," 2006,  mitered corners, stitched front and back.
  • Marla Yeager, 1998, "Collide-a-Scope,"1998, mitered corners, stitched front and back
  • "Mariner's Compass" with no label/date/ID: mitered corners, stitched front and back.
  • Helen Marshall, "Carnival," 2006, has curved corners (no miters needed) and bias piped binding.
  • Helene Davis, "Big Blue Marble," 2007, no binding. This on is faced on all sides.
  • Linda Lasco, "Grandma's Stars" (from a Timna Tarr pattern) no date, mitered corners and stitched front and back.
  • Laura Wasilowski, fused quilt (no date, no name): fused, fold-over edges then decorative stitched.
  • Untitled work (unknown maker, no date), mitered corners but left unstitched front and back.
  • Caohagan quilt by a Polynesian artist, 2015, mitered corners stitched by hand on the back only.

And finally, Instagram friend, Tiffany Horn of @villageboundquilts posted my question to the online IG quilting community about tacking down the miters. I compiled the feedback in this pie chart.

Compiled responses from the InstaGram online quilting community
from a post by Tiffany Horn of Village Bound Quilts.
Again, the methods for attaching binding were diverse. Some quilters indicated that they chose hand or machine depending on the quilt's recipient or the quilt's use. If the binding was attached all or partially by hand, the miters were more frequently stitched together. What does this tell us?

Individual IG comments that I found interesting:
  • "... For show quilts, always blind stitch mitered binding corners closed." —@dianavanderyar
  • An interesting idea from @mamasan_gerber is to use a double needle when machine binding. "... It gives a nice front look and the zigzag back catches all, so no stray openings." 
  • "... I sew down the mitered corners when hand binding, not machine." —@prettypiney
  • "... I also sew the corners closed front and back... judges tend to like that!" —@quiltedblooms

So, there you have it... responses, insights and different approaches from various pockets of the quilting community about whether to stitch the miters closed on a quilt binding. Have you found this insightful?

Thank you. I appreciate everyone's input and help in gathering answers to this question. A few IG readers said they appreciated getting a look into other quilters' processes. We can learn things from each other all the time. I'll end with this comment from @sharon_drummond, an open-minded quilter on IG:

"... I don't stitch up the corners though I'm rethinking after reading responses." 
—@sharon_drummond
Related Posts Plugin for WordPress, Blogger...